Saturday, December 27, 2008

Barrel Fired Incense Bottle


I barrel fired this bottle form about a year ago and it has been sitting on a back shelf in my studio since then because I thought a little tiny hole had blown out near the base. I remembered it only because a woman at work asked me if I could make an incense bottle for a Christmas gift. I didn't know what an incense bottle was. I had never heard of one before. She emailed me some photos and then I remembered this long forgotten bottle. I told her I had one already made, showed her this photo from a previous blog post and she said it was "perfect." Well, it turned out that the hole I thought was there wasn't there at all. It was just a minor pop-out, perhaps from some loose plaster that was in the studio. Anyway I had to buy a 1/4 inch masonry drill bit and drilled a hole approximately 1-1/2 inches from the bottom. The drill bit cut right through it--No Problemo.

Anyway, if you're going to burn incense this is probably the safest and cleanest way to do it. Wedge the stick part of the incense into a split key ring. A split key ring is one of those key rings that you have to pry apart, place the key into it and then you keep turning it until it is locked onto the ring. The incense is then lit and placed burning end first into the bottle. The split key ring keeps it from falling into the bottle. As the incense burns, the ash falls inside the bottle. The hole that I drilled into the bottle allows oxygen in as the scent comes out the top. Although I don't burn incense, I think it is a pretty good idea.

This morning I also added a new blog to my blog list, River North Pottery. And, don't forget to check out my slide show on my other blog "Coulee Region Art."

Thursday, December 25, 2008

Happy Holidays

Well, another Christmas and another day at work. But, I did get four boxes of pottery sent out to my mother in California. I haven't spent any time in the studio the past couple weeks just because it has been too cold and we've gotten too much snow. The La Crosse area might have the snowiest December in history this year.

I have a new post on Coulee Region Art. I'm actually still working on it but have posted a link to a slide show of an anagama firing. I still need to edit the descriptions for each slide to give a better accounting of the whole process but hope to have that completed sometime tomorrow. My original blog entry gives a good short description of the experience. Just scroll down past the first couple of entries.

Thursday, December 18, 2008

A Couple Christmas Gifts


I promised my mother I would send her some pottery for Christmas gifts. Here are just a couple of my barrel fired pieces. The one on the left is a vase form and on the right is a lidded tea caddy. These are two of my most favorite because of the beautiful markings, but so far all of my barrel fired pots have had beautiful markings.
These two pieces were on Display at Viterbo University for six months and then they kind of disappeared. I believe they were placed in an office for safe keeping and they stayed there for several more months. I was lucky enough to find them yesterday. And, Yes Mom I'm packing them up today and shipping them out to you tomorrow. Oh, in addition to being on display they were also featured in Viterbo's Touchstone 2008 magazine. You can click on this link to see better photos. http://www.viterbo.edu/touchstone/72/Artpage1.html . Just click on my name at the bottom of the "art" column.

Tuesday, December 09, 2008

My Other Blog

I haven't done anything in the studio this past week. It has been pretty dang cold, we've had too much snow, and I've had to work a lot of overtime at my paying job. Speaking of my other job, check out "Coulee Region Art." I have been posting on this sight each Friday. http://art.blogs.wkbt.com/
Would love to hear any comments or suggestions people might have. Still snowing and still cold here in the Coulee Region.

Thursday, November 27, 2008

Studio Projects


This is some of the stuff I'm currently working on and trying to finish up. The bottle and vase forms need to be burnished. I want to barrel these, Christmas gifts I hope. I'm also glazing the round and rectangular platers. Both the platters were made out of red earthenware clay and formed in wooden molds that I made. The black platter I've already discussed. The round platter is glazed with commercially bought turquoise, which will be fired to cone 05. I'm still cleaning up the lines on the 2 sculptures. Not sure how I'll fire these. The little one is porcelain and the larger one is stoneware.

Yesterday with a lot of help from my friend Darrel we did a lot of kiln maintenance. Not too long ago I bought a used Cress electric kiln from my old ceramics professor. It was firing-up real good last weekend when the weld securing all the kiln bricks broke. Thank goodness Darrel was standing in front of it when it happened. All the bricks on the bottom portion of the kiln shifted. Quick thinking Darrel grabbed some banding wire and we quickly wrapped it around the kiln in a few places and tightened it up real tight. It worked and shortly there after the kiln shut down. Total firing time to cone 05 was 8 hours. Anyway Darrel did the welding and we managed to get the thing back together. We also made a new level base for the kiln, that was a problem too. Now it is set up on a layer of hard fire brick covered with a layer of 1-inch 8-pound density fiber. Yeah, yeah, yeah......... Its always something.

Might as well post a couple more Raku Glaze Recipes. I've never tried this one but I like the way it sounds--Antifreeze Boil Raku Glaze. Lithium Carbonate 60, EPK 23, Frit 3124 20, Chrome Oxide 0.25

Another Raku Glaze Recipe that just sounds good is Bad @ss Alligator Raku Glaze. Gerstley Borate 8 cups, Bone Ash 2 cups, Copper Carbonate 0.5 cup, Cobalt Carbonate 0.25 cup, Cobalt Oxide 2%

Wednesday, November 26, 2008

Bears In The Night

I figured I might as well title this piece something, so "Bears In The Night" sounded good to me. I used a wooden form to create the shape of this platter and then used a church key (can opener) to impress all the diamond-shaped points around the edges. The platter is made out of red earthenware clay and once it was bisque fired I painted several coats of white underglaze in the center of the platter. Over that I painted 3 coats of black underglaze. Then I used a sharp pin tool and etched the bears through the black underglaze. To finish this piece I'll brush 3 coats of clear over the platter and fire it to cone 05. Although the black underglaze looks gray in this picture, once it is fired it will be a glossy jet black. The outlines of the bears will be a bright glossy white.

Tuesday, November 25, 2008

Newest Potter In The Coulee Region

Natalie is my little studio Buddy. This weekend she painted underglazes on one of the bowls she made, glazed a couple of my bisqued tea bowls, and glazed a few porcelain pendants I had on the shelves.

She is quite the little artist but pottery is her new medium of choice. Not only is she taking clay home to make things, she is also creating stuff at school.

I'll be posting photos of some of her finished works real soon.

Thursday, November 20, 2008

Raku Glaze Recipes

I was searching through my sight meter and realized that a couple people were searching for a specific raku glaze recipe. One was for a White Crackle Raku Glaze and the other was for a clear so I thought I'd post what I have.

White Crackle Raku Glaze Recipes
#1 Frit 3134 85%
Kaolin 15%

#2 Colemanite 64%
Custer Feldspar 12%
Flint 12%
Ball Clay 6%
Zinc 6%

#3 Gerstley Borate 80%
Nepheline Syenite 20%
Add: Zircopax 10%

Clear Raku Glaze Recipes

#1 Called 1 2 3 Clear
Gerstley Borate 50
EPK 33.33
Silica 16.67

#2 Called 3110 Clear
Frit 3110 100
Tin Oxide 3
Bentonite 3

Wednesday, November 19, 2008

Nude IV In Progress


I have really been enjoying this sculpting stuff. This is where I am after a couple days of carving on my latest project. It is somewhat what I envisioned when I started but every time I take a bit off here or a bit off there the form starts to change and morph into its own being. Hopefully I can finish this up today and start on another.

I've added a few potter's blogs to my page. These artists post frequently and I really like their work. I still have many more to add but will get them added as soon as I can.

I want to fire-up my electric kiln this Saturday but I still have a large bottle form and a vase that I need to burnish. I plan on barrel firing those two pieces. If not Saturday, I'll fire it up on Sunday.

A couple more Raku Glaze Recipes.

Alligator Crawl Raku Glaze Recipe. Gerstley Borate 250, Bone Ash 125, Nepheline Syenite 62.5, Copper Carbonate 62.5, Tin Oxide 53.5

Green Lichen Raku Glaze Recipe. Gerstley Borate 70%, Frit 3134 30%, Add: Zircopax 10%, Add: Cobalt Carbonate 4%, Add: Chrome Oxide 2%, Add: Manganese Dioxide 3%

Tuesday, November 18, 2008

Sculpture Step One

Step one for my latest sculpture. I started this last Friday. Basically I just wedged up about 7 pounds of clay and then sketched out a rough drawing of what I wanted to sculpt. I started carving away with a wire cheese cutter and some old kitchen paring knives. It has come a long way since Friday and I hope to finish it up today.

Good news is that my friend Darrel finally finished all the wiring for my kiln. He ran a 240V line into the area of the basement where the kiln is located and then he connected all the wiring for the elements. I don't have a full load to fire but will fire it up 1/2 full this coming Saturday just to test it out and see how it fires.

Raku Glaze Recipes Of The Day

White Pink Raku Glaze Recipe


Frit 3134 90% EPK 10% Add: Tin Oxide 10%

Turquoise Crackle Raku Glaze

Gerstley Borate 80% Nepheline Syenite 20% Add: Zircopax 10% Add: Copper Carbonate 2%


Friday, November 14, 2008

Greenfield Village Kiln


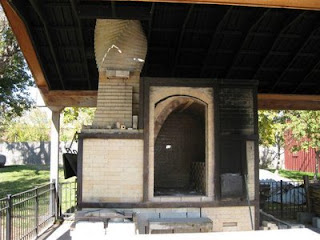
Is this cool or what? Thanks to Kerri for thinking of me and taking this pic when she was visiting Greenfield Village in Detroit, MI. I think this twisting chimney is a work of art in itself. Man! I'd love to have a chimney like this when I build my kiln. I don't know much more than it was built in 2004. I "googled" it and found some more photos, not nearly as nice as this one, but thats about all.
I'm still sculpting. I finished Nude III yesterday, started another, and will get two more going this weekend.
I've neglected posting raku recipes. I know that there are some people looking at the recipes. I'm really just documenting them for myself but I love sharing so here are a couple more.
Deep Blue Ash Raku Glaze Recipe
Gerstley Borate 40%
Nepheline Syenite 10%
Wood Ash 50%
Add: Cobalt Carbonate 1.5%
Flaming Moondrops Raku Glaze Recipe
Lithium Carbonate 20
Magnesium Carbonate 40
Gerstley Borate 70
Chrome Oxide 0.3

Wednesday, November 12, 2008

Nude III


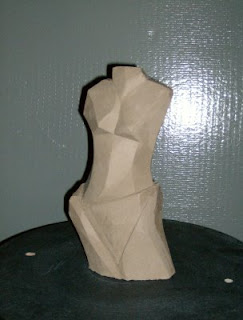
This is my latest sculpture, Nude III. Porcelain clay body, leather-hard state, approximately 8 inches tall.

My original plans for this sculpture was to have smooth curving lines throughout the form but as I was "getting into" the piece I realized that I loved the hard angular cubist form that was slowly developing. I kept the round curved line of the belly and decided to create hard angular lines for the rest of the form. I think its awsome and am going to try another similar sculpture but make it much larger.

Not sure how I'm going to fire this piece yet but will post a photo when it is finally completed.

Friday, October 31, 2008

Nude # 2


This is the piece that I accidently knocked over last week.
It broke right at the knees and it also knocked the head off. The piece was pretty much bone dry but I decided to try to salvage it since the breaks were so clean. I slipped and scored the hell out of the knee break hoping that if it worked I'd fix the head as well. It appeared to have worked quite well and I decided that I liked the form better without the head and I decided to leave the break mark "as is." Anyway, I really like the lines and I'm going to try a few more of these abstracted forms but make them larger.

I can't remember if I mentioned that I am also writing for another blog at work called "Coulee Region Art." Here is the link if anyone is interested. http://art.blogs.wkbt.com/
I really enjoy what little writing I do for that blog because each week it forces me to search out what is happening in art in the area in which I live. I didn't know there was so much happening in this little part of the Mid-West.

I still haven't gotten my potter's wheel built yet and I'm still waiting to get my electric kiln wired up. I'm waiting for a friend to run some 240 to the area where I have set the kiln up. But, that hasn't stopped me from getting muddy. This weekend the weather is supposed to be absolutely beautiful so I think I'll sit in my studio and start on a few more projects like the one above.

For the people that are visiting my blog, I'd like to say thanks. When I started this blog it was really for the sole purpose of creating a diary of what I'm doing and documenting things for future reference. It was also nice to be able to share what I'm doing with friends and family whom I see too little of. But thanks again to the readers. I really appreciate the emails you send.

Might as well post a couple more Raku Glaze Recipes. I still have some more Soldner glazes so here they are.

Soldner's Runny Iron Yellow Raku Glaze.
Gerstley Borate 50%
Borax 50%
Add: Red Iron Oxide 10%
Add: Rutile 3%

Soldner's White Raku Glaze.
Gerstley Borate 80%
Zircopax 20%

Friday, October 24, 2008

Bad Week In Clay

I have been working on an abstract sculpted nude for the past three weeks. It was looking good and I was only about five minutes away from sanding the last imperfection out of it. I get the Dumb Butt award for accidently knocking it over. In its leather hard stage the head broke off and the body was broken at the knees. Arrrg! Both were clean breaks. I actually tried to mend the lower half by slipping and scoring, but I'm not sure if the surgery will be a success. The head broke right at the neck and actually looks pretty good with no head and the clean break. I'll check it out tomorrow and see if it can be salvaged. If not I'll start it all over again.

Just getting back to Linda's comment about my nude torso--I started making the piece by rolling out a coil of clay that was slightly larger than the size of the torso I wanted to sculpt. I let that dry to a point where it was inflexible but still soft enough to use some carving/trimming tools to start sculpting out the form. It is a solid piece of clay but I did use a 3/4 inch drill bit to hollow out some from the bottom of the base. I drilled upward into the middle of the form approximately 3 inches. I did this because I was going to display it utilizing the dowel and a small marble base.

For those of you following my raku posts, I received a good article about Diana Pittis' raku fish sculptures. She describes her methods and also gives out a couple of the raku glazes she uses. The link is below.

http://www.ceramicartsdaily.org/feature/featuredetail/2008-10/gonefishingparttwo.aspx

Better get going.

Thursday, October 16, 2008

Torso Sculpture

My first attempt at the female form. This torso is about 8 or 9 inches tall. The end result is that the form is much more abstract than originally intended, but I'm pretty happy with it. I think it would be easier to work larger. I'll have to try it again and see what I come up with. This piece isn't even bone dry yet and will be bisqued as soon as I get 240 wired to my kiln.

I haven't posted any raku glaze recipes for a while so here are a couple more.

Blue Copper Luster Raku Glaze
Gerstley Borate 82
Cornwall Stone 18
Cobalt Oxide 0.03
Copper Oxide 2.1


Buck's Revised Red Luster Raku Glaze
Borax 50
Gerstley Borate 50
Silica 17
Nepheline Syenite 15
Red Copper Oxide 10
Red Iron Oxide 10

I actually haven't done anything at the studio for the past few days because I had a couple friends visiting from Chicago. Always fun to see them but I left another sculpture project unfinished. I'll have to get back at it today.

Tuesday, October 14, 2008

First Plaster Cast

This is my first attempt at plaster casting. I bought a couple rolls of plaster bandages at the local hobby store, smeared vasaline all over my face, stuck some straws in my nose and applied the bandages to my face. I think it only took about 20 minutes. I can say that it would have been a lot easier if I had had some help.

I actually made the the plaster cast quite a few months ago but just got around to using it this past weekend.

I rolled out some porcelain with a rolling pin and then pressed the flat sheets into the mold. The porcelain dried overnight and then I carefully removed the mask from the plaster form. It looked pretty rough. The porcelain picked up every little detail from the goss banages so I just used some fine sandpaper to remove the unwanted texture.

I haven't bisque-fired this yet but will try to raku fire it with a clear crackle glaze when I have. One thing I forgot to think about was how I was going to display the mask once it is fired. My immediate thought was that I'd just hang it on the wall, but I hadn't planned ahead and did not put any fastening device on the back side of the mask. Oh well, next time. Can't wait to start casting some other forms.


Wednesday, October 08, 2008

Soldner's Copper Luster Correction

Thanks Anna from Aussie for pointing out my mistake. The corrected recipe for Soldner's Copper Luster Raku Glaze is:
Gerstley Borate 80%
Nepheline Syenite 20%
Add: Copper Oxide 2%
Add: Cobalt Oxide 1%
Add: Yellow Ochre 8%

I haven't done any firing lately but I have been trying my hand at sculpting. I decided to try taking on the human form, the torso to be more precise. I've actually made 3 small torsos this past week. Two were absolutely terrible and thrown into the slop bucket, but the third one isn't too bad. I'll have to post a photo of the one I kept tomorrow.

I don't have much raku clay left so I wedged up a bunch of porcelain. I haven't had too much luck throwing porcelain on the wheel but I'm anxious to try sculpting with it. We'll see what happens.

Thanks again to Anna for pointing out my glaze mistake.

Tuesday, September 23, 2008

More Raku Glaze Recipes

I know I haven't posted anything of great interest for a while. I am going to post a couple more Soldner Raku Glaze recipes. I can't believe I have so many. Anyway, here are a couple more.

Soldner's Copper Luster Raku Glaze
Gerstley Borate 80%
Nepheline Syenite 20%
Add: Copper Oxide 2%
Add: Cobalt Oxide 1%
Add: Copper Oxide 3%

Soldner's Runny Green Raku Glaze
Gerstley Borate 50%
Borax 50%
Add: Cobalt Carbonate 1%
Add: Red Iron Oxide 5%
Add: Rutile 5%

I did fire up my cast iron kiln yesterday. I used wood and then finished it off with gas. Not much in it, just a few tea bowls. I did line the inside chamber with hard fire brick and that really helped with the firing process. This past weekend while searching the internet I also learned of a homemade refractory goo made up of furnace cement and perlite. The materials are cheap and the furnace cement is rated to 2700F. Its so cheap that I'm going to mix some up and experiment with it.

I'll also try to get some photos of my latest firing posted in the next couple days.

Wednesday, September 17, 2008

Clay Mixer

Hey Hey Hey!

Check this out. My buddy Darrel had this Mortar Mixer parked out in the weeds somewhere on his property and kind of told me "this will mix some clay, huh?" before I could say boo he had it moved into the basement. Well, of course it went through the flood and the gas motor is toast but Darrel is going to get rid of the gas motor and hook up an electric one. And, of course, I have a lot of cleaning to do. Actually the interior is pretty clean, a bit rusty, but pretty clean. The mixing padles will take some work and maybe a modification or two but pretty soon this puppy will be mixing some clay.
The basement is looking better each day. We've got half of it pretty much done and have even started moving stuff back into it. Not only the clay mixer but even have the electric kiln moved into place and ready to be wired up.
Due to this massive cleanup project I haven't thrown any pots or made anything out of clay in months. Hopefully this weekend I can at least fire some pots and maybe soon I can get muddy again. Better get going, too much to do and never enough time to do it all.

Thursday, September 11, 2008

More Shoveling


Mud, Mud, and more Mud, and still more mud to shovel. This is what I shoveled yesterday after work. This stall is where I plan on putting my electric kiln once it dries up and I do a little more cleaning. Hopefully I'll get it moved in this weekend and have it wired up and ready to fire by the following weekend. So....if people have been wondering why I haven't been making pots, this is why.

Some other notes, thoughts...
The Viroqua Empty Bowls Project is coming up in about a month. I'll post more info when I get it. Hopefully I'll be able to work in someone elses' studio to crank out some bowls. Must get on that right away.

Another upcoming project will be a new blog, in addition to this one. I have been asked to start blogging about "Arts In The Coulee" (the coulee region where I live). I was thinking about featuring an artist or exhibit each week and post artworthy news and events as they pop up. Still getting all the details but stay tuned for the launch.

The only other thing to say is that I must try firing a small brick kiln this weekend that a little girl named Natalie stacked up. I'll have a post dedicated to that pretty quick. I'm pretty excited about getting my bisque kiln into operation. Other than that I'll just keep shoveling.

Friday, August 29, 2008

More Raku Glaze Recipes

Just a few more Raku glaze recipes.

Soldner's Flat Black Raku Glaze
Gerstley Borate 50%
Borax 50%
Add: Cobalt Carbonate 2%
Add: Red Iron Oxide 10%
Add: Rutile 10%

Soldner's Glass Red Raku Glaze
Gerstley Borate 50%
Borax 50%
Add: Red Iron Oxide 10%
Add: Copper Carbonate 5%

Soldner's Lava Raku Glaze
EPK 30%
Silica 20%
Soda Ash 50%

Its going to be another nice weekend so I'm planning on doing another wood firing. Last week when I was reading Clayart one of the topics was hillside kilns. I had remembered somebody telling me about a "coffin kiln." I think I'm going to try building one of these, a small kiln to fire some raku teabowls. Not sure how I'm going to build it yet. Will just have to dive into the project and get the fire lit. Will post photos next week.

Tuesday, August 26, 2008

Cast Iron Kiln

Well, here she is in action--My cast iron wood burning kiln.

Looks good, but unfortunately the kiln did not reach temperature. Not a failure though. I learned lots.

First thing and perhaps the most important for me is that if I'm stoking the fire, I'm not doing it on my knees or bending over. I'm going to add another layer of cinder block to the base of this foundation and raise it up.

Another thing is that this kiln is too tight. By that I mean it didn't have enough air or draft. First of all I need to take a piece off the back of my door. The damper works great but there is a piece of metal that restricts airflow. With the back piece removed you'll be able to see right through the four holes and right into the fire box.

Perhaps most important of all I need to figure out how to put a mouse hole into the firebox floor. I needed air hitting the ember pile during this firing.

I only fired 4 teabowls in this test run. They were placed on a round kiln shelf supported by three fire brick. This really reduced the size of my firebox. There was one inch of clearance between the tops of the tea bowls and my fiber board roof. I also used a couple firebrick as a grate system to hlod the wood up off the floor.

When I rebuild this kiln I am putting the ware chamber above the whole firebox. I am thinking about making a small fiber-lined chamber and setting that over the round portion of the firebox. I am also going to stack brick around the exterior of the cast iron firebox because it puts out way too much heat. Looking for some suggestions. Help Wanted.


Saturday, August 23, 2008

New Kiln Project


Check this out. All kinds of new stuff for my wood burning kiln building project. One of my friends gave me a piece to an old coal burning furnace. Its cast iron, pretty thick and has a nice door. I am going to use this piece as it sits now. It is actually upside down from its original design but it looked to me to be a perfect fit for a small beehive type updraft kiln.

Plans are to use a layer of fine grog on top of the cinder block, level it out and then place a layer of medium duty hard fire brick on top of that for the floor of the kiln.

Next is to place the cast iron fire box on top of that. Not sure how I'll proceed after that. I'm kind of flying by the seat of my pants with excitement. I'm sure the cast iron will radiate a lot of painful heat so I'll probably layer up some red common brick around the exterior.

Not sure How I'll stack up the kiln ware chamber yet but I'll probably use a roof made of fiber.

My buddy also found some stainless steel pipe that will probably make good chimney material but I won't be using this big piece on this project. Better get to building. Weather is great today. Hope to fire tomorrow or Monday. Gotta run.

Friday, August 22, 2008

Soldner's Copper Red Luster Raku Glaze

Soldner's Copper Red Luster Raku Glaze

Gerstley Borate 80%
Nepheline Syenite 20%
Add: Cobalt Oxide 1%
Add: Copper Oxide 3%

Thursday, August 21, 2008

Raku Crawl Glaze

I've been looking for a crawling raku glaze and this one was just recently posted on Clayart, although it is actually a cone 05 glaze from SDSU called San Diego State University Crawl. I'm going to try it this weekend in my wood kiln and will post a photo next week.

47 Gerstley Borate
31 Magnesium Carbonate
19 EPK
4 Borax


According to the person that posted the recipe, "The lower you fire it the more crusty it is (cone 07 or 06) and it is called "Lichen" at that point. And as you go higher it will melt more andbecome a "Crawl" glaze (05) and higher it will be a "Bead" glaze."

Tuesday, August 19, 2008

Wood Fired Raku Tea Bowl


Here is one of the bowls from my last firing. The interior is glazed with Soldner's Clear and the exterior with Hawaiian Blue.

The interior has really cool light blue speckles in it. Don't know where they came from but they certainly add a lot to the bowl.

The exterior is a dry matt surface with subtly changing hues of blue. Normally in my gas fired fiber-lined raku kiln this glaze comes out a deep glossy blue.

Wednesday, August 13, 2008

Wood Fired Raku Kiln

Well, I finally built my brick raku kiln and fired it up this past Saturday. I only fired four tea bowls but the main purpose was just to get the kiln built and learn about kiln design and the science of firing. No doublt I learned a lot, but I still have a lot of learning left.

I started with sixty hard fire brick, 10 soft insulating brick and about 50 red common brick. Inside dimensions were 13-1/2 inches wide and 16-1/2 inches tall. I had a small mouse hole that ran from front to back and 2 additional air holes on each side of the front of the kiln. For the roof I used a piece of 2-1/2 inch fiber board and used 4 soft brick to form a square exit flue in the back top portion of the kiln.

I was going to preheat the kiln with propane but found out at the last minute that both my propane tanks were empty so I started with a little bit of wood and some gas. I think I could have saved 3 hours of time had I preheated with propane. It takes a heck of a lot of time to heat those hard bricks and during this time, inbetween stoking, I decided to stack my red common brick around the outside of the kiln. This turned out to be a great idea as the exterior of this kiln, only one firebrick thick, became uncomfortably Hot. The second layer of brick really helped.

Another thing I learned was that a chimney really helps create draft and heat. Three hours into the firing I started to hear the slight roar of the fire. To see what would happen I stacked 3 more layers of brick on the chimney. Within minutes flame was jamming up and out of the chimney creating good draft and a nice roaring sound. I swear I could feel it as well as hear it. The addition of the chimney made it much easier to judge when to stoke more wood. When the flame and roar started to wane, it was time to add another piece of wood. You could actually determine when to stoke just by listening to the fire.

I also decided to experiment with a door in front of the stoke hole. I used a piece of broken kiln shelf. I learned quickly that seconday air holes are a must, but for this kiln a door is not neccessary.

I'm not sure if my mouse hole was designed properly as I frequently used a ram-rod and pushed it through the length of the kiln to keep air flowing through the embers. Will have to do some more research on that.

I used all kinds of different wood to fire this kiln. Some was cheap pine from wooden crates, some was old treated lumber from a deck, and some was a mix of good hardwood scraps from a cabinet shop. The wood was all cut into approximately 20 inch pieces and split into 1 to 2 inch widths. The kind of wood didn't seem to make much difference but the size did--the smaller width the better.

All in all it wa a good firing and a great learning experience. Got so fired up that I have stacked up another mini kiln of a different design. Need about 40 more brick to finish the chimney but hope to fire it this weekend. Stay tuned.

Tuesday, August 12, 2008

More Soldner Raku Glaze Recipes

Soldner's Dry Pink Raku Glaze
Gerstley Borate 80%
Tin Oxide 20%

Soldner's Curdle Blue Raku Glaze
Gerstley Borate 50%
Borax 50%
Add: Cobalt Carbonate 0.33%
Add: Rutile 3%

Soldner's Copper Red Luster Raku Glaze
Gerstley Borate 80%
Nepheline Syenite 20%
Add: Cobalt Oxide 1%
Add: Copper Oxide 3%

Wednesday, August 06, 2008

My Studio


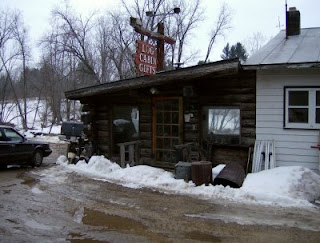
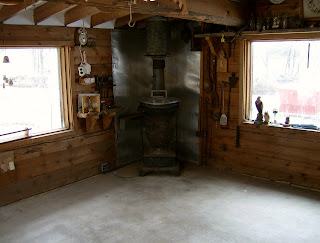
Well, this is it. Doesn't look like much but it has a lot of character. It also doesn't help that the picture was taken during our winter thaw, last April.

Its a nice little place about 10 miles from my house and about 10 miles from the city of La Crosse, situated out in a wooded coulee that overlooks a nice trout stream.

The building itself is quite large and used to be a woodworking shop that built everything from tables and chairs to cabinetes. My studio is the "Log Cabin Gifts" gift shop area. In the back is a mini lumber mill with all kinds big machinery that used to cut and mill big trees. All in all its a really interesting place and a perfect environment for a potter.

Cleaned and Sealed


The studio does have a lot of natural light, although the windows could use a good washing. The studio already had a nice concrete floor but I wanted to seal it to make future clean ups easier. It was bone dry and sucked up three coats of Thompson Water sealer.

There is a cast iron wood stove in the corner. It actually came off a train caboose. Will provide some good heat in the winter but I think the owner of the building is going to put in some better heating.

Still lots to do but it will be a fun on-going project.

Pots On The Rack


Just a few of my pots. I have about a dozen biqued tea bowls. I'll be firing these in my wood fired raku kiln. Still hoping to do that in the next few days but it probably won't happen till Saturday.

I also have some high-fired stoneware coffee mugs that I fired in a gas kiln at Viterbo University. I think I've already posted individual photos of the mugs on my flickr
site.

The platters on the lower shelf were all made using slabs of clay and wooden forms that I made. Its a terra cotta clay body and I'll probably just use a simple underglaze decoration around the edges and then use a clear glaze over that.


Tuesday, August 05, 2008

Soldner Raku Glaze Recipes

I don't know where I collected all my "Soldner" raku glaze recipes from, but I sure have a lot attributed to him. Here are the first few on my list.

Soldner Base Clear Raku Glaze
Gerstley Borate 50%
Borax 50%

Soldner Bisque Slip--Halo
Gerstley Borate 14%
EPK 57%
Flint 29%

Soldner Red Raku Glaze
Gerstley Borate 50%
Borax 50%
Add: Copper Carbonate 10%
Add: Rutile 10%

I finally did stack my brick this past week. I've made a nice little wood-fire raku kiln. I was hoping to fire it Sunday but figured I didn't have enough wood to finish the firing. I collected some more wood that day and Monday morning but got caught in a serious Thunderstorm about 11:00am. Now its back to work. Will fire and post some photos as soon as possible.

Thursday, July 31, 2008

White Crackle Raku Glaze Recipe

I haven't been keeping up on the raku glaze recipe of the day. Anyway, here is todays.

White Crackle Raku Glaze
Gerstley Borate 80
G-200 Spar 20
Add: EPK 5
Zircopax 10

Tuesday, July 29, 2008

Kiln Building Project 2008


Before the flood of 2008 this was a nice concrete slab about 10 feet by 20 feet. After an hour and a half of shoveling, in 90 degree heat, I uncovered the now unlevel and cracked slab.

I was hoping to start laying cinder block and fire brick as soon as I unearthed the slab--Surprise, Surprise! Now I have to level the pad and I'm not sure how to do it. Should I use sand, should I use dirt, gravel? Best source to get this question answered, or at least get some great advice, is WoodKiln on Google Groups. This is a fantastic site for people interested in wood fired ceramics.

I came across this group by accident and joined the same day. After posting an introduction to the group I also asked for some advice about the kiln I was building and questions about the firebrick I wanted to use. Within a day several people welcomed me to the group and I had a lot of great information about my kiln and the firebrick I planned on using.

I was also steered to a site called The Potters Shop which is a great site for books on pottery. I was told to get the book "Laid Back Wood Firing" written by Steve Harrison. In this book he has the plans and how to's about building and firing the kiln that I am planning on building. I plan on ordering the book today and can't wait to start reading it.

Friday, July 25, 2008

White Pink Raku Glaze

White/Pink Raku Glaze Recipe

Frit3134 90%
EPK 10%
Add: Tin Oxide 10%

Thursday, July 24, 2008

Kiln Building

Building the Bourry Fire Box for my Long Throat Kiln. This is just the begining and I'm getting a feel for what it is going to take to build my kiln. This is the front of the Bourry Box. The mouse hole is in the middle at the bottom and the secondary air hole is above that. I'm definately going to need some more brick.

Front wall measurements are 36 inches wide by 25 inches tall. The interior of the firebox is 27 inches wide and I'm thinking of making it 22.5 inches deep.

Of the many diagrams of this type of firebox, most of them show the firebox door just above the mouse hole. For this kiln I am going to put it on the side of the firebox.

As for the firebox lid I was thinking about just using kiln shelves and kaowool fiber but now I'm thinking about using a cast iron hinged door from an old furnace. I'm not sure how I'll do it yet but I'd like to glue or attach soft insulated firebrick to the underside of the door. I think I'm also going to use 3/4 inch rebar rods instead of the hobs to hold up the wood.

I'm not sure what I'm going to do about the throat arch yet. I suppose the best route to go is use arch brick and then some castable refractory to square it off. But that costs money. Will have to ask some questions but I'm wondering if an arch is a neccesity. Maybey I can just use my standard bricks and build a square opening.

I'll be using Low Duty Hard Fire Brick that measure 9 inches by 4.5 inches by 2.5 inches. These are relatively inexpensive and I can buy them locally at a building supply company. Only problem is they only sell full brick and split brick. I'll pick up about 150 more brick next week so I can finish the fire box.

If all goes well I'll get the rest of my firebrick next week and finish the firebox on the weekend.

Tuesday, July 22, 2008

Yellow Crackle Raku Glaze

I almost forgot the Raku Glaze Recipe Of The Day.

Yellow Crackle Raku Glaze.
Gerstley Borate 80%
Cornwall Stone 20%
Add: Vanadium Stain 306%

Small Wood Fired Kiln


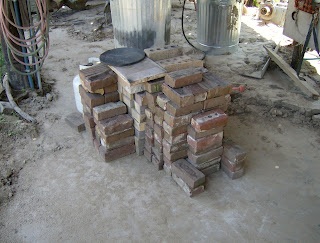
Yes, from this small pile of bricks I'm building a small wood-fired kiln. In this pile is approximately 50 hard fire brick, 75 red common brick, and some pavers and some other crappy brick I can't use.

I am still short of materials though. I need 8 cinderblock, which I am going to use as a base to build the kiln on. Bringing the kiln up off the ground makes stoking the kiln easier on the back and knees. Also I've been told that the kiln will heat up faster, as the ground won't be sucking up all the heat.

I also need some sort of smoke stack which I am going to use as a chimney. I am thinking about a 4-foot section of cast iron pipe which will be inserted into a square sleeve of red common brick. It would also be nice to buy about 20 more hard fire brick. I can buy them locally for $1.39 per brick.

Other materials I have on hand that I'll be using are 10 insulated soft brick, some kiln shelves for the top of the kiln, and some kaowool fiber.

I'm building this in back of my studio on a concrete slab. The area is covered with a coregated tin roof. The 6-inch layer of mud and sand is a gift from the flood which I haven't yet shoveled and hauled away yet.

Stay tuned for pictures of the evolving kiln.

Thursday, July 17, 2008

Fired-Up

Three things noteworthy today that I had to share. First of all I'm really Fired-Up over one of the books my mother gave me for my birthday.

"Wood-fired Ceramics, Contemporary Practices" by Coll Minogue and Robert Sanderson. Here is an excerpt from the inside cover. "In Wood-fired Ceramics, Coll Minogue and Robert Sanderson briefly describe the development of the main types of wood-fired kilns used by today's potters. They then present the aesthetic aims, working practices and kilns of an international group of artists. Kiln-firing logs, clay, glaze and slip recipes, and kiln plans are also included. The work by over 60 artists, which illustrates the text, is representative of the diversity of styles in contemporary wood-fired ceramics. An Awesome book.

Anyway, I gotta build one of the kilns illustrated in this book. It is called a "long throat Bourry kiln" . Sandy Lockwood uses one and hers is based on a design by Stephan Harrison. The link I'm posting is actually Andrew Stewart's kiln but good photos of this type of kiln. I need to get some brick so I can start building.

Another book I recieved is "Ceramics of Picasso" by Georges Ramie. I've never been a big fan of Picasso's paintings but I'm really impressed by his pottery. Maybey I just think his artwork is better suited for pottery rather than canvas. Anyway, this book has 223 fantastic color illustrations.

Another neat item I came across is a product called Cerafiber Wet Pack. This might have a lot of kiln building and kiln repair applications. My friend John works with furnaces and boilers and he is the one who suggested it. It is a needled refractory fiber blanket that is packaged in a moist form. The flexible sheets can be easily cut and can be custom molded in complex shapes to a required size, shape and thickness. When the product dries, a hard rigid surface is created. Its refractory limit is 2400F. I contacted a company in Milwaukee, Wisconsin named Fire Brick Engineers Co. Price is $44.00 for a 2 foot by 3 foot sheet, one inch thick. Seems a bit spendy but it might have a lot of applications. When I get some extra money I'm going to have to get some and see what I can do with it. Better get going. Will try to post some more Raku glaze recipes tomorrow.

Tuesday, July 15, 2008

Alkaline Blue Raku Glaze Recipe

Not much time to blog. Gotta keep it quick. Thought I'd post another Raku Glaze recipe. I didn't get my kiln built this weekend, but I did find my raku burner in the mud. Cleaned it all up, sprayed it with some WD-40 and it worked just fine. Also got a couple new books for my birthday, coming up on Friday. One is "The Pottery of Picasso." The other is "Wood-Fired Ceramics." Both look great. More on them to follow. Gotta' run.

Alkaline Blue Raku Glaze

Frit 3110 70
Gerstley Borate 5
Flint 10
Soda Ash 10
EPK 5
Copper Carbonate 3

Friday, July 11, 2008

Kiln Diagram


I'm pretty excited about this new kiln building experiment. My original Raku Wood Burning Kiln, based on Nesrin Durin's design, was loosely assembled (and I mean LOOSELY). I'm going to tighten everything up and change it into a downdraft kiln consisting of four main components--the firebox, the stack area, the damper, and the chimney.

If all goes according to plan here is how it is going to work. Wood is stoked into the firebox through the stoke hole and placed on a grate to burn. The flame and heat will naturally rise and circulate throughout the interior of the kiln. The construction of this type of kiln will force the flame back downward to be exhausted at the bottom of the kiln and up through chimney, which in my case is a piece of stove pipe about 4-5 feet tall. A mix of firebrick and red common brick will be used to construct the main part of the kiln.

I'm going to load my pots from the top opening of the kiln onto the kiln shelf, and then use kiln shelves to seal up the top. I'm also going to use a piece of kiln shelf, as a makeshift door, to seal up the stoke hole when I'm not adding fuel to the fire.

I haven't thought about peek holes yet, and pyrometers cost money. So.... I'll just wait and see how things go.

Thursday, July 10, 2008

Raku Glaze Recipes

Blue Crackle Raku Glaze
Gerstley Borate 80
Cornwall Stone 20
Cobalt Carbonate 6

Blue Patine Raku Glaze
Gerstley Borate 80
Bone Ash 20
Copper Carbonate 2
Tin Oxide 1.25
Cobalt Carbonate 0.25

Wednesday, July 09, 2008

Wood Burning Raku Kiln


Well, the flood is over and it's time to build some new kilns. Fortunately the flood didn't wash away the bricks I have been collecting and since I don't have any fiber to build another garbage can I might as well start stacking bricks.

I have about 50 hard fire brick and maybe 75 common red brick so I think I can make a few modifications to the kiln pictured here.
I built this kiln in June of 2006 and fired it a few times. It took a long time to fire but I loved the process and the final results. I got this design from Steven Branfman's book "Raku, A Practical Approach, 2nd ed.
I think I'll get rid of the cheap refrigerator rack grate I used to suspend the wood and use some one inch thick iron bars. In addition to that I'll enlarge the fire box and see if I can't incorporate a chimney of some sort for better draft. I guess I'll just have to start stacking brick and see what I can come up with. Stay tuned for a picture of what I end up with.


Raku Glaze Recipes

Thought I'd better get back to posting, at least something. Anyway, here are a couple raku glaze recipes.

Beads Raku Glaze Recipe
Magnesium Carbonate 31.25
Borax 25
Gerstley Borate 31.25
Flint 6.25
Zircopax 6.25

Black Widow Raku Glaze Recipe
Gerstley Borate 80
Nepheline Syenite 20
Black Copper Oxide 71.7

Wednesday, June 25, 2008

The 100 Year Flood, Again


Coon Valley Park.

Actually this photo was taken last August, (the first 100 Year Flood), a day after everything had crested and the waters started to go down. If you have never seen the park you might think it doesn't look too bad but there are spots that are 10 feet deep, or more, out there.

This year's flood, 28 counties in Wisconsin declared Federal Disaster Areas.

One Big Mud Pie


They say that this flood wasn't as bad as the 100 year flood just 10 months earlier, but Bad is bad and the mud is everywhere. This is the basement of my studio. The mud still wasn't completely dried up and cleaned out from last year.

Well, I guess its time to shovel and build and buy new kilns and other stuff.

So, for those of you wondering why I haven't been posting lately, it was mainly do to the depression after the flood. And, with no kilns or ware to fire I just haven't had much to say or post.

Hopefully soon. Until that time I'll try to keep posting my raku glaze recipes.

Flood Mud

What more can I say. The mud was frickin' deep.


Friday, June 06, 2008

Raku Glaze Recipes

Raku Glaze Recipes.
Since its Friday I'll post three Raku Glaze Recipes.

Aqua Luster
Borax 80
Whiting 8
Ball Clay 4
Zinc Oxide 4
Copper Carb. 3

Black Raku Glaze
Borax 3.22
Gerstley Borate 43.01
Soda Ash 21.51
Nepheline Sy. 10.75
Barnard Clay 21.51

Black Copper Luster
Frit 3134 75%
Nepheline Sy. 25%
Add:
Black Copper Ox.15%
Black Iron Ox. 15%

Thursday, June 05, 2008

Raku Glaze Recipe Of The Day

Transluscent Jade
Gerstley Borate 80%
Nepheline Sy. 20%
Add:
Cobalt Carb. 0.50%
Chrome Ox. 1.0%

This glaze is just Soldner' Clear Raku Glaze with the addition of the colorants. It is a glossy deep green transluscent glaze. Pots placed in a post reduction can will produce nice subtle accents in the smoke filled cracks.

Wednesday, June 04, 2008

Alligator Raku Glaze Recipe

Alligator Raku Glaze

Gerstley Borate 8 cups
Bone Ash 2 cups
Copper Carb. 1/2 cup
Cobalt Oxide 1/4 cup

Trompe l'oeil


Anyone for dice? In my blog profile I said I like making anything in clay from coffee mugs to trompe l'oeil. These dice were made from scraps of a low-fire white talc clay body.
I had no intentions of creating an exact replica of dice. I could have, but didn't feel like wasting the time. I was just being playful and knew that regardless of the end result, the dice would still say "look at me" and "pick me up."

Tuesday, June 03, 2008

Rainbow Luster Raku Ash Glaze

Raku Recipe Of The Day is.....

Rainbow Luster Ash Glaze
Gerstley Borate 40%
Nepheline Sy. 10%
Wood Ash 50%
Add: Copper Carb. 10%

Barrel Fired Pottery


Another successful barrel firing. I think this is my fourth firing and I've had really good results each firing. This vase is approximately 13 inches tall and approx. 5 inches at the base.

The colors come from copper carbonate and WalMart brand MiracleGrow (plant food). The black markings are where the pot was laid into the bed of sawdust and of course the patterns of the colors are a result of the swirling flames inside the barrel.

This vase was burnished in its leather-hard state, bisque fired and then barrel fired. Once the vase was pulled from the ashes I wiped it clean and then buffed it up with a little bit of paste wax.

Monday, June 02, 2008

May's Barrel Firing


Not much left in the barrel but my pots and a two-inch layer of ash. I pulled these pots out of the barrel at eight in the morning, and they were still HOT. I started the fire at 2:00pm the day before. I only had 4 pots to fire this time around.

Next step is to wipe off all the ash and dirt of the pots and then apply a light coat of paste wax, which is buffed and polished to a high sheen.

Oh! Don't want to forget the raku recipe of the day. Today's winner is:

Crimson Raku Glaze.

Gerstley Borate 80, Nepheline Sy. 20, Kaolin 5, Zircopax 10, and Crimson Stain 15%. I got this recipe from Augusta State's web site.

Sunday, June 01, 2008

Raku Glaze Recipes

Since I didn't post a raku glaze recipe yesterday, I've decided to post two today.

Reynolds Wrap Raku Glaze
Gerstley Borate 63%
Custer Feldspar 12%
Silica 12%
Ball Clay 6%
Barium Carb. 6%
Copper Carb. 12%

This raku glaze produces blues and dark greens with copper red flashings. If heavily reduced in both kiln and post firing this glaze could be called "polished copper."

Hawaiian Blue Raku Glaze
Gerstley Borate 80%
Bone Ash 20%
Add:
Copper Carb. 5%
Cobalt Ox. 5%
Tin Ox. 3%

This raku glaze is a nice glossy deep, rich, cobalt blue--A Brilliant cobalt blue.

I fired up my raku kiln yesterday. Wanted to try rakuing a big terra cotta pot I had. I also fired a couple tea bowls to fill the kiln. The terra cotta pot cracked right in half as I was removing it from the kiln. I think terra cotta might have a lot of potential. I glazed it with Soldners clear raku glaze. The tea bowls came out just fine. Tomorrow, or the next day, I'll post some photos of my last barrel firing. Stay tuned.

Friday, May 30, 2008

Raku Glaze Recipes

3110 Turquoise Raku Glaze
Also called Ferguson's Turquoise
Ferro Frit 3110 100
Tin Oxide 3
Copper Carb. 3
Bentonite 3

This is my favorite turquoise raku glaze because it can produce a lot of different results. To get a beautiful turquoise crackle I lightly reduce the pot, both in the kiln and in the reduction chamber. If heavily reduced you can get anything from polished copper to copper reds. Examples of this glaze can be found on my blog link "My Photo Gallery." One thing to keep in mind--This glaze will settle in the course of a few days and will harden like a brick in the glaze bucket. I try to make only what I need per firing.

Thursday, May 29, 2008

Raku Glaze Recipe Of The Day

I thought it would be a good idea if I not only documented my glaze recipes but also share them with anybody interested. Not sure If I can stick to a recipe a day but we shall see.

Raku Patina Glaze
Gerstley Borate 1080
Bone Ash 270
Copper Carb. 75
Cobalt Carb. 75

This used to be my favorite raku glaze when I was attending Bemidji State University. It produces a semi-dry sandy textured surface that flashes, especially when quickly reduced. The container lid is lifted, fanned and resealed , "burped," to promote more brilliant flashing. Once a nice flashing is obtained , the pot is dunked in cold water to freeze the colors.

Wednesday, May 28, 2008

Barrel Kiln


Another barrel firing, long over due. This barrel is at my friends Jeri and Kerry's house just outside of Coon Valley. They live up on a ridge and it tends to be windy every time I want to fire.

Last Sunday was a perfect day, 75 degrees, sunny, and no wind.

I arrived at their house about one in the afternoon and once the pots and wood were loaded into the barrel, the fire was lit about 2pm.

At 5pm about 1/3 of the wood had been consumed and I filled it back up to the top of the barrel with more split hardwood, same kind of wood that can be seen in this photo.

At this point there is nothing more to do except crack a cold beer,or two, watch the fire, and wait till the next day when the fire has died out and the pots have cooled off.

Stay tuned for the results.

Thursday, April 24, 2008

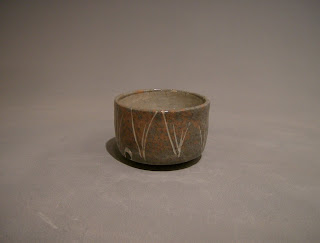
Raku Tea Bowl


This tea bowl is a beauty. I love the soft gray and the complimentary iron red coloring.

The colors came from a slip applied to the clay when it was leather hard. When the slip dried to the touch I carved the grass motiff marks through the slip and into the clay body. Once the pot was bisque-fired I glazed it with Paul Soldner's Clear Raku Glaze.

The gray color looks just like the ancient Japanese Shino called Nezume Shino (mouse gray).

I found the slip recipe on the internet when I was researching Shino.

John Baymore Shino Slip: EPK 25, OM4 25, G200 Feldspar 20, Flint 20, Borax 5, Zircopax 5, Add: 9% RIO and 0.25% Cobalt Carb.

In the original post I found on the internet it said that the slip would turn shino you put over it blue and that it works well with "Linda's Pink Shino." I've had the recipe for a couple years but just recently found a post on Potters.Org from John Baymore regarding this recipe. He said there's no big magic in the recipe and in fact, it isn't even his recipe. He found it in the book Clay and Glazes for the Potter by Rhodes. Whoever the source, this is a great slip for cone 10 stoneware and looks to have a lot of potential for Raku fired pottery. I can't wait to try it again.

A couple other notes: I found a studio to rent about 5 miles from my house. I started moving stuff into it a couple weeks ago and fired up the raku kiln last weekend. If all goes well I'll move an electric kiln and a wheel into it this weekend. Also I've been invited to participate in the 2nd Annual Viroqua Empty Bowls Project. The first one was held last October, I believe. There is an organizational meeting tonight in Viroqua at the Drifless Cafe. Stay Tuned. More to Come.

Thursday, April 03, 2008

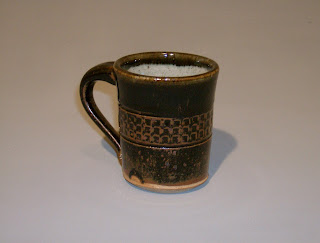
Temmoku Glazed Coffee Mug

I really liked the textured pattern on this mug and the Temmoku glaze really brought out the band of stamped impressions.

The impressions were created using a square leather tool stamp before the handle was added.

Stonware, cone 10 reduction fired.

The interior of the mug was glazed with Viterbo Chun.

BSU Temmoku Glaze Recipe
Potash Spar 3368gr, Flint 2176gr, EPK 800gr, Whiting 1400gr, Red Iron Oxide 1000gr.

Viterbo Chun Glaze Recipe
Potash Spar 42, Flint 29, Whiting 19, Talc 4, Kaolin 3, Colemanite 3. Add: Bone Ash 2 and Red Iron Oxide 1.

Tuesday, April 01, 2008

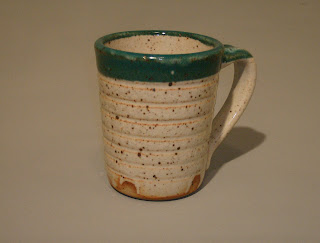
Carbon Trap Coffee Mug


Its a good thing I took photos of my last batch of coffee mugs. I made about 30 and they're all gone. This was one of my favorites. I just like the earthiness of the glaze, it was a good size (10-oz.), and it just felt really good in the hands.

This mug was glazed with a base coat of Carbon Trap and then the Rim was dipped in BSU Gloss Turquoise. This kiln was not heavily reduced. Had it been, the carbon trap would have trapped jet black carbon into the glaze.

Carbon Trap Glaze Recipe, cone 10 reduction

SodaSpar 30%, Neph. Sy. 30%, Spodumene 30%, EPK 10%, Add: Soda Ash 5%

BSU (Bemidji State University) Gloss Turquoise, cone 10 reduction

Custer Spar. 5570gr, Whiting 1000gr, EPK 300gr, Barium Carb. 480gr, Zinc Ox, 200gr, Flint 750gr, Cobalt Carb 40gr, Chrome Ox 80gr.

Friday, March 28, 2008

What Goes Into Making A Mug?


I get this question everytime somebody picks up one of my mugs and this step by step process of what goes into making a mug is an adaptation from Sam The Cat Lady's description.

1. Drive to studio--1/2 hour each way.

2. Dig out tools, bats, water bucket and prepare to throw.

3. Weigh out clay for each mug.

4. Wedge (knead) clay.

5. Center clay on wheel and throw mug shape.

6. Remove from wheel and let dry 24-48 hours.

7. Clean up mess.

8. Put mug back on wheel and trim.

9. Clean up mess.

10. Hand pull the handle (basic shape).

11. Attach handle to top of mug and let dry approx 1/2 hour.

12. Hand pull handle to final shape/form.

13. Attatch base of handle to mug.

14. Let mug dry approx. 3-4 days. If mug or handle cracks, re-cycle clay and start all over.

15. Bisque fire mug in electric kiln approx. 12 hours.

16. Prepare glazes, mix and sieve as necessary.

17. Clean up mess.

18. Wax the bottom of mug so it does not stick to kiln shelf.

19. Choose glaze, design, and glaze mug.

20. Clean up mess.

21. Let mug dry thoroughly.

22. Clean up glaze drip marks and wipe bottom clean.

23. Fire mug to 2400F. This takes approx 12 hours.

24. Wait 12-14 hours to kiln to cool down to under 400 degrees.

25. Remove from kiln and inspect the mug. If mug is cracked or glaze turned out butt-ugly, start the whole damn process over.

26. If mug has miraculously survived to this point, hand sand the bottom baby-butt smooth so it doesn't scratch or mar any tabletop surface and put up for sale.

27. Last but not least, try not to attack the foolish person who innocently asks "Why does this mug cost so much?"

Thursday, March 27, 2008

Clayart Mug Exchange


Once a year potters from all over the world flock to NCECA (National Council On Education For The Ceramics Arts). This year its in Pittsburgh, PA. Potters who participate in ClayArt, a list serve for potters, get together at this convention and exchange a piece of pottery. For potters that do not attend the convention, ClayArt promotes the Mug Exchange for stay at home potters. This year my exchange partner is Penni Stoddart from London, Ontario. This is the mug I am sending to her.

Cone 10 stoneware coffee mug glazed with Viterbo Rutile Blue.

Viterbo Rutile Blue Glaze Recipe

Dolomite 790gr, Custer Spar 1500gr, Whiting 555gr, EPK 840gr, Flint 1315gr, Add: Rutile 400gr, Cobalt Carb. 50gr, Copper Ox. 30gr.

Tuesday, March 25, 2008

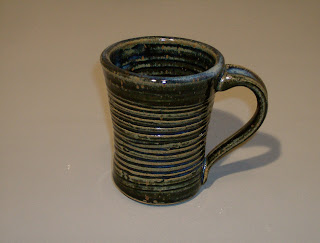
Mugs Mugs Mugs


Just some of the mugs that I've made the past month or so. Although I have neglected posting to my blog, I have not neglected my pottery.

Many of my new mugs have a lot of texture on the exteriors. I used found objects to stamp and impress images onto the surface as well as a couple different types of leather stamping tools. I also used the point of a can opener to create a nice triangular boarder around the mug.

I spent a couple hours yesterday glazing them. The glazes I used were Meloy White, Rutile Blue, BSU Temmoku, K-Shino, BSU Turquoise, and Viterbo Chun.

Once glazed they were loaded into the kiln and will be fired today.

Monday, January 14, 2008

Empty Bowls Project Update

A quick update from the Viroqua Empty Bowls Project held last October (Oct. '07 blog archive). I just recently found out that originally they were hoping to get about 200 bowls donated from local area potters. Well, they took in about 300 bowls and raised 8,000 dollars in three hours. The proceeds went to the purchaser's choice, either the local Food Pantry, International Hunger-Relief Organizations, or the Empty Bowls Project. Now we have a goal to beat for the 2nd Annual Viroqua Empty Bowls Project.

Sunday, January 13, 2008

Foiled Experiment


Curses! Foiled Again.

I know it has been a while since I posted but bad weather delayed my last firing several times and then I just didn't update my blog.

Remember the tin foil saggar experiment with the cups? Well, here they are. I suppose it wasn't a complete failure, as I believe that I learned a lot from the firing.

First of all I didn't use heavy duty foil and probably not enough of it. When I shut off the gas and removed the lid from my raku kiln there wasn't much of a sign of the tin foil, just some ash residue around the base of the cups. I think this was because I fired the kiln too hot. I had another piece in the kiln, glazed with a Raku Clear Crackle glaze, and I fired the kiln till that piece was done. That piece is in the forground. I'll explain about that in a bit.

Anyway, with the cups, I think I fired too hot and did not use heavy duty tin foil. One artist I read about on the internet said she used a pyrometer and took her kiln to a certain temperature. I'm going to have to check back into that and perhaps modify my garbage can raku kiln with a port for the pyrometer. But, I see potential for the use of ferric chloride and cobalt sprays.

I wasn't too happy with either cup when I pulled them from the kiln and just tossed them into a snow bank. As they were sizzling I decided to toss a splash of ferric chloride on that cup just to see what would happen. I think some neat overlapping designs of verying intensity can be achieved this way. The cup that was sprayed with cobalt is a beautiful blue. I'm going to have to try both sprays again with pots that have been burnished.

Oh that broken piece in the forground, I accidently dropped it on my way to the car. Dang slippery ice! It was either the pot or me. Anyway. I was building several tall slab built vases and wanted to create contrasting paterns of glazed and unglazed surfaces. I loved the results, before I dropped the piece, but I had a bad problem with the vases cracking on the seams where I joined the pieces together. This was the only piece that made it through both the bisque fire and the raku firing, then I dropped it and broke it. I want to continue with these vases but am going to take a break (OOPS! Bad pun) from them for a while.

I have more research to do with the tin foil saggars, have a bunch of pots to burnish for my next barrel firing, and have a lot of exciting new projects to try. One of the projects is a wall sculpture based on a Mondrian painting. I also want to try making some terra sigillata to enhance my barrel fired pots, and I also have several other "secret" projects in my sketch books. Too much to do. We'll see what I can get done and in what order. Uffda!