Saturday, December 24, 2005

The Fleet Is In

The Fleet Is In. Now being displayed for the next month at Viterbo University, first floor, Fine Arts Building.
A collection of whimsical, nautical, toylike teapots. Detailed photos can be viewed from my blog site archives.
Each boat is hand constructed using a low-fire terra cotta clay body and finished with commercial glazes. To increase the toy-like appearance I have also added hand modeled additions made from simple plaster press molds, such as toy soldiers for the "P-Tea-109" and little fighter jets for "Sea Power."
Stop by and see the fleet, if possible, or view some of the boats in my archives.
Happy Holidays.

Friday, December 23, 2005

Favorite Four

2005 was an exciting year in clay for me. Although I was pulled in many dierections by the creative possibilities of clay and my total output of finished pieces was smaller than usual, I am very happy with the end results.
My four favorite pieces are the wood-fired tea bowls above. They are now part of the California Collection (gifts to my mother and brother who live in California).
My first experience with wood firing, thanks to Tony Ferguson, has focused my creative energies into the process of firing and the desire to build my own kilns. I am currently building a propane, fiber lined, Raku Kiln and also preparing to build a small wood-fired brick kiln.
My progress on the kilns will be posted on my blog. Oh! If you're interested in wood-fired pottery, you must check out Tony's WebSite www.aquariusartgallery.com

Saturday, December 17, 2005

Kiln Building

My first Raku kiln. What a dandy. All materials used in the construction of this little kiln were either scrounged or borrowed, with the exception of the propane used to fire the kiln.

I borrowed approximately 50 hard fire brick from the University Ceramics Dept. The weed burner was borrowed from my friend John R. The 20lb. propane tank was scrounged from a gas barbeque grill. And a broken piece of kiln shelf was scrounged for my shelf. The top is a piece of ceramic fiber board that my friend John scrounged from scrap material at his place of work(a furnace/boiler A/C repair company). I cut a round flue hole in the top board and used another scrap as a damper.

I started with two pieces of kiln shelf to level the ground and to act as the floor of the kiln. I then stacked the hard fire brick in a small square on top of the kiln shelves, 7 rows high. I didn't need to but I mixed up a 50/50 batch flint and kaolin, added some water to make a mortar, and applied it to the outside of the kiln. It was actually a good idea but it was a chore to scrape and wire brush the bricks when I returned them to the college.

This is my first attempt at kiln building and I learned a great deal. It only cost 16 bucks for the propane. I like wood firing and I am going to use this kiln as a model for a wood burning kiln that can be used both for raku and stoneware. I'll add on a 36" fire box covered with either kiln shelf or fiber board and eventually use all insulated fire brick rather than hard brick.

Next kiln to be built---a Fiber lined, garbage can, Raku Kiln.

Thursday, October 20, 2005

First Wood Firing


My first wood firing. Many Thanks to Tony Ferguson for his invitation. It is a firing that will no doubt be one of my most memorable.

Early Friday morning began by cleaning out the Anagama kiln. There was some old ash and a bunch of wads that had to be chipped out. Then the brick floor needed a little bit of clean-up with a grinder to remove any fused wads. Once I got the kiln cleaned out we unloaded all the pottery and arranged the pots in an order/priority of how they would be loaded into the kiln. I had about 18 tea bowls that needed to be glazed, so while Tony was doing some other chores I glazed my bowls with some glazes he had brought down from Duluth--A couple of Shinos and a Tea Dust Temmoku.

The loading process began about 1 pm in the afternoon and basically consisted of me handing Tony, who was inside the kiln, the pots as they had been previously arranged. It took a lot longer than we thought.

Monday, October 17, 2005

Loaded!

Loading the kiln took over five hours and we didn't finish up till about 7pm Friday night. Tony actually did all the loading hunched over on his knees. I just handed him the shelves and the pots as called for.
The shelves were by far the heaviest of the work and careful placement on the stilts was critical. The placement of each new shelf brought moans, groans, and grunts out of the archway. Those shelves were heavy.
The kiln took a little longer than normal to load because of one problem piece. It was a tall vase form. The wads that were glued to the bottom of the vase made the piece too tall to fit on the top shelf. So, in and out of the kiln it was passed. Each time I would file a little bit off the wads and it seemed like it was never enough, but we finally got the vase loaded.
Finally loaded, the next step was to carefully and skillfully brick up the front of the kiln. There had to be a small stoke hole in the center and there also couldn't be any large gaps between any of the bricks and the arch. Soft brick was sawed and sanded to plug the larger gaps and ceramic fiber was used to seal the cracks. Once that was completed a layer of mud-type mortar was trowelled over the brick to completely seal the cracks between the brick.

Stoking!

Stoking the kiln does not stop until the kiln reaches temp, approximately 2,300 degrees, and the proper cone falls. My solo experience started about 5 in the morning and didn't end till early afternoon when Tony gave me a break. Even then we still stoked till 7 pm Sunday night.
I stoked the kiln about every 2 minutes, usually with one large piece of wood approximately 36 inches long and anywhere from 8 to 12 inches wide. It was excruciating and non-stop. The routine of stoking became robotic and the intense heat didn't really matter, due to lack of sleep. No time to pee, no time to smoke. It was just stoke, stoke, stoke.

Sunday, October 16, 2005

Red Hot Pots

I believe this picture was taken at the beginning of my morning shift, approximately 5:30am. Temperature approximately 1700 degrees. At this temperature the glazes are fluid and they seem to magically dance over each piece of pottery. It is very hynotic. About 3 to 4 hours into my shift I start talking to myself. My knees hurt and my back aches. The heat is doing something to my brain. After 6 hours I don't feel much of anything. Must be going on pure adrenaline.

Finally Done

Finally Done. Thirty hours of stoking. Drank three gallons of water. Seems like no sleep for three days. Three cords of wood burned. Dulled three chainsaw blades. Lost ten pounds. Beat Tired. Feel run over by a freight train. It took me one week to recover from the experience, But 18 tea bowls--Priceless!

Saturday, September 10, 2005

I LIKE CLAY!


I like Clay!
It is an addiction, an artistic medium, that allows me the freedom to explore creative energies and urges within me. It allows me the the freedom to be spontaneous and make fun toylike sculptural teapots, such as "Tug-N'-Tea," (see blog archives).
I can also take that same ball of clay and make a set of coffee mugs or a set of bowls. Furthermore, clay opens my eyes to different aesthetics when it comes to beauty, form and function. There was a time I would never have thought the shino glazed tea bowl above was beautiful. In fact, I think it is downright gorgeous! I love the imperfection of the form, the soft appearance of the pinholed glaze. And, it feels sooooo good to hold and drink from.
I can use different clays, I can use different glazes, I can go in different directions and do anything I want on any given day, just with a ball of clay.
Finally, clay allows me the flexibility to create my own unique interpretations of everyday items, functual and non-functual, in the world around me.
Am I a potter? Am I an artist? Am I a craftsman? At the moment I do not debate those questions. I just like clay.


P-Tea-109


The Making of P-T-109

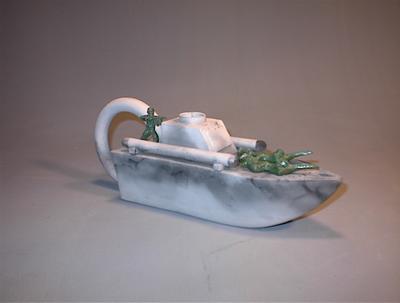
I am finally finished with P-Tea-109 and since so many of my friends are interested in how I made this teapot, here it is.
Before I start working with clay I actually build a scale model of the boat using thin cardboard. I cut out all the pieces, such as the sides and top, and then tape all the pieces together to form the model. These individual pieces will later become templates that I'll use to cut out my clay peices.
I use a low-fire, terra cotta, earthenware clay and start the building process by rolling out slabs of clay approximately 1/4 inch thick. Once these slabs have hardened a bit I use my cardboard templates and cut out the sides of the hull, the deck, the stern etc.... All these pieces are scored with a fork like tool, a liquid clay slip is applied, and the pieces are all "glued" together to form the shape of my boat (a rough shape).
This rough shape is then refined using a variety of shaping tools such as trim tools and rubber ribs to smooth the surfaces. This is the "modeling" part of the process which continues until I am happy the teapot.
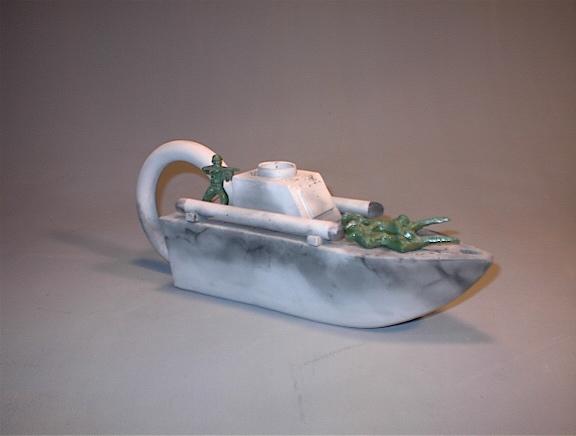
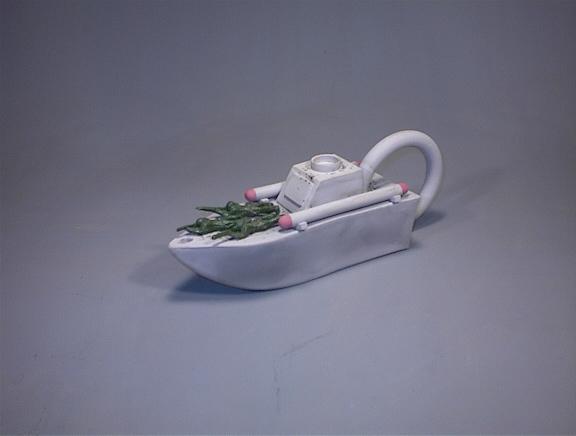
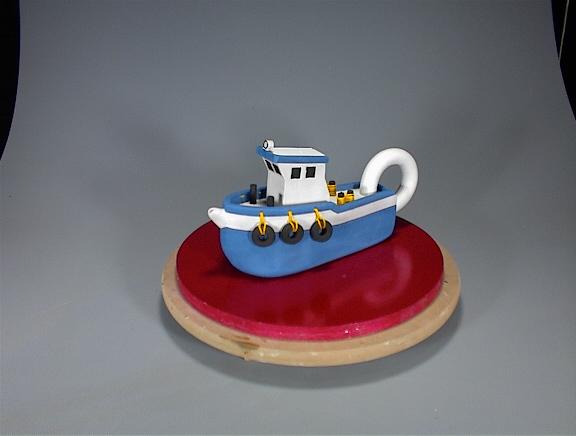
Once the teapot has thouroughly dried it is bisque fired and then decorated with underglazes. Underglazes are kind of like paint and applied like such. In this case I used just two colors, gray for the boat and red for the tips of the torpedo tube ends.
The handle was simply made using an extruder, forming the circular shape and attaching to the back of the boat.
The army men were made from plaster press molds that I made from plastic toy soldiers. These were also bisque-fired and "painted" with green underglaze.
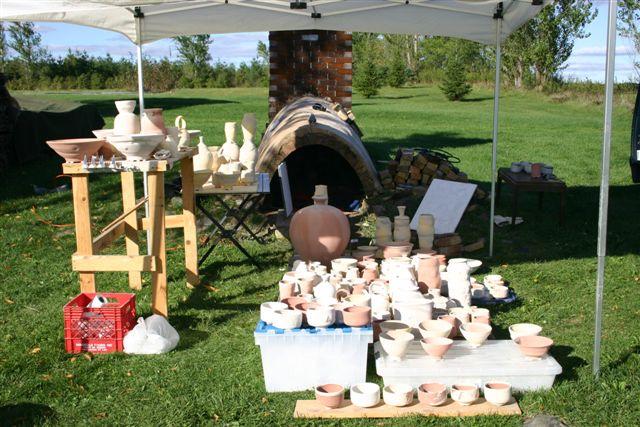
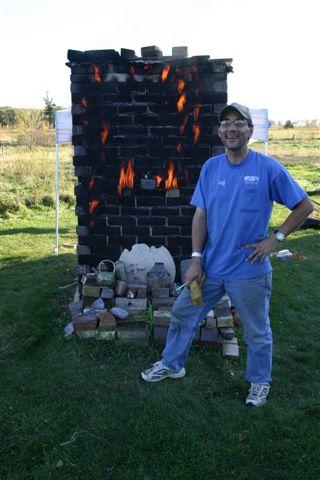
The final firing of the boat involved using a saggar filled with pinecones and sawdust. A saggar is simply a box type form made out of firebrick. The teapot is placed in the saggar (which is inside the kiln), the pincones and sawdust are filled to the top of the sagger and a kiln shelf is placed on top to act as a lid. The kiln is then fired. The sawdust and pinecones burn up creating the random smoke patterns on the boat. The pine cones were used to create spatters of spots that resemble bullet holes or "battle wounds." Unfortunately these do not show up in this photo.
P-Tea-109 was saggar fired twice, as I was not happy with the appearance of the first firing. The results of the first firing can be seen as an earlier post to this blog.
Keep checking my blog site. More to come shortly, or at least as soon as I can get them done and posted.

Thursday, August 25, 2005

A Few of My Favorites

The teabowl in the top left corner is a great example of a traditionally glazed shino bowl as it is characterized by a thick off-white glaze that has a citron skin texture inside and outside of the form. In addition, the form is not perfectly round, the rim is uneven and the foot was hand carved and irregular, all traits that were highly favored by the Japanese Tea Masters.
The blacks that can be seen are carbon deposits that were trapped inside the molten glaze, a completely random process.
The tea bowl in the upper right hand corner is an Americanized version of a shino glaze. This glaze has been modified to have a smooth melt and exhibits very little pin-holing. I dipped this teabowl in a blue gray slip while the clay bowl was still in the leather hard stage.
The patterned line is a random spot of light carbon trapping and around the top rim specks of gold, almost like gold dust, are trapped within the glaze.
Keep an eye on the blog as I will be posting more photos of individual tea bowls with a brief description of my glaze and decorating process.

Shino Success


I just finished firing 75 shino glazed tea bowls. What a success! In addition to the 75 tea bowls, I also fired 2 coffee mugs (gifts for friends) and about 50 test tiles of more shino glaze recipes. I kept about 60 and took the hammer to the others.

Friday, August 12, 2005

Teapot Flotilla Newest Arrival

The newest addition to jeff's Teapot Flotilla has arrived at homeport.
The 12-inch, 4-1/2 cup capacity teapot was christened "P-Tea-109" on August 11, 2005
Although "P-Tea-109" has officially entered Tea Service, the boat will be making a short return trip to Saggar Fired Boatworks for a minor glaze treatment tuneup.
This tune up is purely cosmetic and will by no means affect any of its formal functions or operations once it returns to the teapot fleet.
The addition of "P-Tea-109" brings the total number of the flotilla to three strong. "Tea-4-2005," a luxury cruise ship whose inspiration came from the "QE2" is expected to join the fleet in the next two weeks.

Sunday, July 31, 2005

Wabi Sabi


I have found a new sense of beauty in a simple form and a simple glaze thanks to Wabi Sabi and the Japanese style tea bowl (Chawan).
What the heck is Wabi Sabi, you might ask? Actually, it is proably best explained by Leonard Koren--"Wabi Sabi is a beauty of things imperfect, impermanent, and incomplete. It is a beauty of things modest and humble. It is a beauty of things unconventional....The closest English word to Wabi Sabi is probably rustic...Things Wabi Sabi are unstudied and inevitable looking....unpretentious...Their craftmanship may be impossible to discern." (from "Wabi Sabi for Artists, Designers, Poets, and Philosophers")
So what am I rambling on about and whats this got to do with my teapot boats? I don't know yet. I'm just letting people know that I'm making a heck of a lot of tea bowls and have been bitten by the Shino bug (the type of glaze I am experimenting with). Oh, I'm still working on the boats. I think the next boat posted will be "P-Tea-109.

Saturday, July 30, 2005

Tug-N-Tea


This teapot is actually still a work in progress. I am extremely happy with the boat itself but have decided to experiment with the glaze treatment.
The Tug was painted with teal blue and white underglazes and fired to cone 05. After the boat was fired I used yellow nylon fiber twine to attach the tires and wrap the posts.
Although many people have made favorable comments about the teapot, I feel that the boat seems too "toy-like," and therefor needs a slight make-over to change the appearance.
The make-over, or experiment, will be to apply a copper carbonate solution, with a sponge, to the hull of the boat. Then I will re-fire the piece inside a sager (a little enclosed box made of fire bricks) with some pine cones around the base of the boat.
If all goes well the copper carbonate solution will make the hull look rusty and weathered. The areas where the pine cones touch the boat I hope will pit the surface of the underglaze and the smoke from the burning pine cones should further enhance the old weather beaten look of the hull.
As I said, Tug-N-Tea is still a work in progress. If my experiment is a failure I can always just repaint the boat with Teal and White underglazes.

Sunday, July 24, 2005

First Step


My first steps as a Blogger.
I have know idea what I'm doing.
Lordy, Lordy.

I actually added the picture to my blog after my first steps. But, What the heck. I'm still learning. The name of the boat teapot is called "No-Time-4-Tea."
I have started a series of boat teapots, hand constructed, made from terracotta, and painted with commercial underglazes and glazes.
My objective with this Blog, CleanMud, is to post thoughts and photos of my work hoping to get feed back from friends and visitors to my site. Good or bad, I will welcome the criticism and your thoughts.
I will post new pieces of my pottery as frequently as I can so visit often. Sincerely, Jeffrey R.