Tuesday, July 17, 2007

2nd Barrel Firing


I know. This is the same photo of the pots I posted last week, but I'm still working on them.

These are the babies that are going into the second Barrel-Firing, which seems to be set back farther on a daily basis due to weddings, weekend commitments, end yes--even work.

I did get these pots trimmed last Friday and thought I was going to burnish them all this weekend, but I was called into work on Sunday and only managed to get two of them burnished yesterday. Stay tuned--I'm still working on this post.

July 31st--Too much work makes Jeff a cranky person, but the good news is that the pots above have been burnished. It only took two weeks and even my friend John burnished one. His first attempt was a beautiful success. Now we just need to find time to fire-up the barrel.

Wednesday, July 11, 2007

Raku Glaze Recipes


Raku Glaze Recipes, raku glaze recipes, raku glaze recipes. Thats what I've been working on lately.

I am compiling a nice data base of all the raku glaze recipes I have collected over the years and will probably have over 300 glaze recipes when the database is completed.

If anybody is looking for a particular raku glaze recipe, maybe I have it. I'd be glad to share it. Or if anybody would like to send me their favorite glazes, I'd be glad to add them to the database.

Anyway, enough of glaze talk. Last weekend my buddy John took a picture of me and Rusty. I can't believe its been almost two years since I built this kiln. I wish I had kept a firing log to give me an idea of how many times I've fired it up and how much gas I've used. Believe it or not I'm still on the 80-pound tank of propane. I've had it about four months and I've been firing almost every weekend.

In the back ground are my newest kilns--barrel kilns. The crappy 'ol rusty one behind me is John's old burn barrel. Although we got a brand new nice yellow one a few weeks ago, I didn't want to ruin a good barrel in case my first barrel firing was a failure so I used John's burn barrel for the first firing.

Since the barrel firing was a great success we'll take John's old crappy barrel to the dump and drill holes in the nice new yellow one.

Countdown to the next barrel firing has begun. Stay tuned.

Tuesday, July 10, 2007


Right off the wheel.
I need some more pots to barrel fire. These are about 8 to 10 inches tall.
With these pots I start with about a 4-pound ball of clay and wedge the clay to make the clay consistent throughout and to remove any air pockets, or bubbles. Wedging is just like kneading dough for breads, pizza, pasta etc.
Once the clay is wedged I center the ball of clay on the wheel and proceed to throw, pull and create my pot.
The final step before I remove the pot from the wheel is to smooth the entire surface with a thin metal rib. Ribbing or smoothing the pot makes it much easier to burnish the "leather hard" clay. Burnishing is the most time consuming part of the process and is what will ultimately give the barrel fired pot its polished, marble-like, appearance when pulled from the ashes.
After all the pots are burnished they will be bique fired in an electric kiln and then they will be ready for the barrel firing. If all goes well, and weather permitting, I hope to load and light the barrel in two weeks.

Wednesday, July 04, 2007

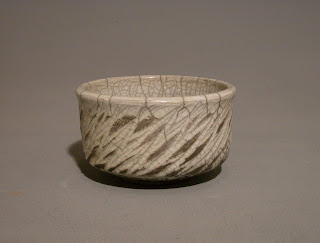
Soldner's Clear Crackle Glaze


This is a great example of Paul Soldner's Clear Crackle Raku Glaze. It is also a pretty nice tea bowl too.

The crackles come from pulling the piece of pottery out of the hot raku kiln and placing it in another container full of burnable materials, in this case torn up news papers and sawdust.

Once the pottery is placed in this reduction chamber, the burnable materials ignite, a lid is placed on the reduction chamber and smoke fills the cracks in the glaze.

The recipe for Soldner's Clear Crackle is 80% Gerstley Borate and 20% Nepheline Syenite.

Tuesday, July 03, 2007

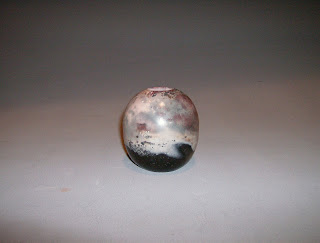
Same Pot


Yes this is the same pot I posted photos of earlier, once in the burnished leather hard stage and the other in the bisque fired stage.

Burnishing the pot in its leatherhard stage gave it a smooth shiny surface and it retained that surface after the firing, but to give it a higher gloss I polished the pot with a bit of paste wax.

One thing I learned after the firing was that the copper carbonate if applied directly to the pot during the "loading" stage will mar the smooth shiny surface. You can see the greenish powder sprinkled on the pots in an earlier post and if you look closely at the top rim of this pot you'll see the effects of the copper carbonate.

In this first firing I also only had two burnished pots. The rest were unburnished, and although they had the same beautiful flash marks from the fire, the surface was rough and had a mat finish.