Tuesday, December 18, 2007

Tin Foil Saggar Firing Notes


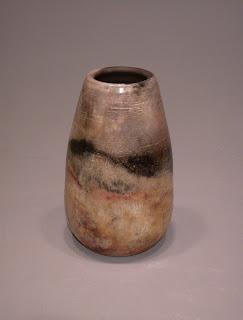
I don't know what the heck happened with this photo, but I'm not taking another one. Basically I just wanted to record what I'm doing so that if all turns out I'll remember what the heck I did.

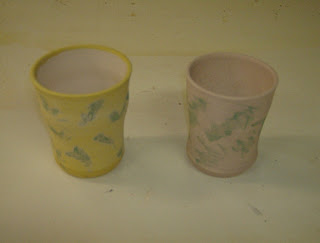
These are two pieces of bisqueware that I have prepared for tin foil saggars. I didn't Throw the forms. These are just a couple of pieces that were going to be thrown out at the end of the semester. These cups had not been burnished.

The claybody is just a regular cone 10 stoneware, and probably bisqued to about cone 08.

The cup on the left was sprayed with a 50/50 mix of Ferric Chloride and water using a regular spray bottle. I think it was an old Windex bottle. The green markings are actually brush marks of Copper Carbonate and water, approximately 8 ounces water and 1 Tablespoon of Copper Carb.

The cup on the right was sprayed with a Cobalt Carbonate and water mixture, approximately 1 Tablespoon Cobalt Carb. and 8 ounces water. The same brush marks of the Copper Carb. and water were applied.

The next step is to wrap these pieces up in heavy duty tin foil. What I've read is that you crumple up the tin foil, uncrumple it and then wrap up the bique ware. In this case I am not adding any organic materials, although I might add some when it comes time to wrap them up. I'll keep notes. Stay tuned.

Many thanks to Aura Lee from Oregon. She has been reading my blog and also said she enjoyed reading it. Yeah! That's what I'm talking 'bout. Anyway she asked about my red raku glaze. I think the one she inquired about was a teabowl posted in Jan. 2007. I called it "Cabernet Red." No secrets here.

Cabernet Red Raku Glaze Recipe: as strange as it sounds it is approximately one handful of Burgundy Mason Stain to 3/4 of a plastic ice cream bucket of Soldners Clear Crackle Raku Glaze. I think I mixed a 2,000 gram batch of the clear, but it was about 3/4 full--80% Gerstley Borate, 20% Nepheline Syenite.

And once again, my raku firing has been delayed again. I usually get pretty fired-up when it comes to Raku-ing in the winter but lately it has been windy and cloudy. Oh! And cold too. I think the sun is supposed to come out today. Maybe today is the day.

Saturday, December 15, 2007

Building A Raku Kiln


Once again, studying my site meter, I noticed that there is a huge search demand for people interested in building a garbage can raku kiln. So, I thought I'd just let people know if they hadn't found it on my blog that they need to search my archives for January and Febuary 2006.

This is an older photo of me firing up my first kiln but everything will look the same today when I fire up my new raku kiln, except maybe the sun. At least I hope to fire it up. Right now its 10 degrees and overcast.

I'm anxious to try tin foil saggers so today I am going to run around town and pick up some supplies. I haven't been able to find any Ferric Chloride but I was told to try etching solution, which I can buy at Radio Shack. I'm also going to try to find some seaweed (seaweed in La Crosse?????). Anyway I have some shopping to do.

I also have two vases to fire that I had previously glazed with Soldner's Clear Crackle. Lots to do. Don't know how much gas I have in my 80-pound tank????

Friday, December 14, 2007

Rutile Blue Glaze


I've been scrutinizing my site meter information a lot lately and I noticed that somebody came across my sight by doing a google search for Rutile Blue Glaze. Well, if you're still searching maybe you'll find this recipe.

Rutile Blue Glaze

Cone 10 reduction

Dolomite 790, Custer Feldspar 1500, Whiting 555, EPK 840, Flint 1315, Add: Rutile 400, Add: Cobalt Carbonate 50.

This is the recipe used at Viterbo College in La Crosse, WI. In the future I'll try to include the glaze recipes in the photos I post.

Upcomming projects: Tin Foil Saggars, more raku, and more barrel firing.

Thursday, December 06, 2007

Pots by Jeff

Pots by Jeff. A group photo.

I don't have a favorite one. I like them all. I like the fact that each pot is "one of a kind," and that each pot tells its own unique story of how the fire created the markings and designs. Photos don't do these pots justice. These pots beg to be picked up. They really need to be touched and studied to understand the full story of their creation. Only then is their full beauty revealed. That's not a bunch of crap either. That's the way I feel and what I believe.

Tuesday, December 04, 2007

Barrel Fired Vase


This vase is approximately 14 inches tall and I didn't try any crazy experiments with this one. The only thing I did was fill the interior of the vase with sawdust and laid the pot on its side in the bed of sawdust.

Once I placed all all the pots in the bottom of the barrel I sprinkled an equal amount of MiracleGrow and Copper Carbonate around the pots. I then placed small pieces of scrap lumber around the pots and then started piling on the wood, smaller then heavier pieces till the barrel was full.

Once the fire was lit and the wood started to turn to coals and start dropping to the bottom of the barrel I began adding more pieces of split hickory to the barrel. I probably added about 10 pieces total, maybe one piece every 10-15 minutes. From that point on I just let the fire die down and out.

Twentyfour hours later there was only about 3 inches of ash on the bottom and the pots were still hot. I had to pull them out with leather gloves. I didn't know what to expect till I scrubbed the burnished pieces with some water and a green scrubby pad. Once I scrubbed them off I applied a small amount of Minwax Paste Finishing Wax and buffed each pot to a high glossy finish.

Saturday, December 01, 2007

Barrel Firing Notes


Another experiment from my last barrel firing. This is the vase that I wrapped steel wool around the bottom third of the pot.

Before placing the pot in the barrel I filled the interior with sawdust. My professor at Viterbo University, Gerrard Ferrari, commented that he preferred a black interior to compliment the colors on the outside of the pot. My previous pots were white and light gray on the interiors.

Once the vase was filled with sawdust I placed it in the barrel right side up in the sawdust at a slight angle. Most of the steel wool was surrounded in the bed of sawdust.

I thought the steel wool would produce some really interesting patterns on the pot and I also thought the patterns would produce blacks and grays--black where there was air between the pot and the wool and gray where the wool was pressed against the pot. Well, it didn't turn out that way.

The reddish line markings one third up the pot is where the steel wool ended. I'm thinking perhaps the steel wool created air pockets that produced the pinks and reds and just above that is the black produced by the top layer of the sawdust. I'm happy with the pot and will continue to experiment with the wool.