Friday, July 30, 2010

Mouse hole/Grate system


Yesterday I decided that the coffin kiln needed a modification. At first the fire box was just a box with a flat floor. Now it has a mouse hole and a grate system. The bricks in the grate are spaced 1-inch apart and the dimensions of the firebox will now be 29 inches long and 17-1/2 inches tall. The ware chamber is now 34 inches long and 20 inches tall. The walls are one brick thick but I'll be adding a layer of home made insulation to the exterior walls and then adding another course of brick. I hope to start mortaring it together tomorrow.

Tuesday, July 27, 2010

Wood Kiln Number One


I finally got all my brick laid out for my wood fired kiln. It took the whole weekend playing around, stacking and unstacking, and just getting things "better." Here it is, although I will be making a base of 36 cinder block to restack it on.
Ok, the dimensions: Total length is 8 feet long. The fire box is 18 inches wide, 20 inches tall, and 31 inches long. The ware chamber is 18 inches wide, 37 inches long and 20 inches tall.
The top of the kiln will be spanned with 1-inch thick kiln shelves and covered with a layer of soft insulating brick. I might place a piece of 1-inch fiber on top of that.
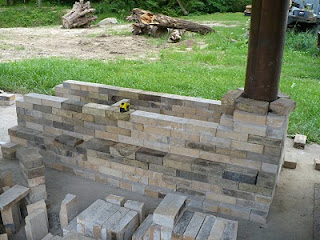
This photo shows that I have started to add a second layer of fire brick to the outside walls but I will be replacing this second exterior layer with some red house brick. A friend of mine has a couple pallets of brick that he built his house with so I am going to place these bricks on the outside.
Don't know what else to say about this kiln. I'm just going to fire it up and see if I can get her to cone ten. We'll see how it fires. If it works I'll just buy some more brick and start on a permanent anagama.
The chimney portion is bacically 9 inches deep by 18 inches and it is tappered to accomodate a 6 foot tall stainless steel pipe, 10 inches in diameter.
I used a variety of fire brick that I have collected over the past couple years. There are some Rockspar, Empire S, AP Green Empire D, Warco XX, Mex-R-Co Mo-rex, and some fire brick with a PCE rating of 29 that I have purchased over the years.
Any comments or suggestions would be greatly appreciated. I'm also on face book and have a photo album there of this kiln.

Thursday, July 08, 2010

Ramona Raku Kiln


This is my fourth garbage can raku kiln I have made since 2006. I have the complete steps with photos posted on this blog dated Jan. 2006. My first kiln lasted about 2 years. It seemed like I was firing it up every weekend all year long and it also sat outside in the yard. I called it Rusty Raku. One day I forgot to plug the hole and some critters got in and tore up all my fiber. So I built another.

The second kiln lasted about a year but was taken out by a major flood, the kind they say happens once in 100 years. Nothing to cry about. I built another. Less than one year later that once in a 100 year flood struck again, although not as bad, but it still took out my kiln. That was was my fault though because I had a hasty trip to make to the west coast and I forgot to bring my kiln into the studio. Anyway, I built another and am getting pretty good at it.

I call this one Ramona Raku. She is lined with two layers of one inch fiber which is held in place with a combination of sodium silicate and ceramic buttons that I made from heavily grogged raky clay. Looks great and I'm sure it will fire a lot better than my previous kilns, as they only had one layer of fire. Once I clean up my burner I'll fire her up and post some photos. Stay tuned.