Tuesday, October 03, 2006

Horsehair Pottery Update

More on the orgins/history of Horsehair Pottery--

A recent comment was just posted on my Flickr Photo Site. ClayHorse, another Flicker potter, has just informed me that she recently learned that Horsehair Pottery was invented by Native Americans of the Southwest as a means to honor their fallen war horses.
Thanks ClayHorse.

Monday, October 02, 2006

Rajah's Horsehair

Another successful raku firing in the Valley. Details to Follow. Stay tuned.

So whats up with horsehair? I'm not sure if this is a true story, myth or what, about the origins of Horsehair Pottery. But, this is what I've been told.

Once upon a time in New Mexico, or there abouts, a beautiful Native American potter was uncovering her earth kiln to see all the wonderful new pots she had created. The pots were still hot, I mean they were HOT, and while she was bending over removing one of the pots her pony tail accidently brushed over the pot. It sizzled and shriveled and burned just enough to leave behind wonderful carbon traces on the pot. And thus, Horsehair pottery was born.

Myth? Fact? I don't know, but it makes one dang good story.

Oh, one last thing--No horses were harmed or mistreated in anyway, shape, or form, in the process of creating this beautiful teabowl.

Wednesday, September 27, 2006

Horsehair Teabowl


This Teabowl was made from a heavily grogged white stoneware clay body and bisque fired to approximately 1600 degrees.
Once bisqued the bowl was placed on a banding wheel and a coating of liquid wax was applied to the exterior. This was done so a neat glaze line at the rim could be easily achieved. The interior and rim were then glazed with Ferguson's Turquoise Raku Glaze.
The teabowl was then fired in a fiber-lined raku kiln until glowing hot and the glaze was liquid-glassy, approximately 1900 degrees.
At this time the teabowl was removed from the kiln and individual strands of horsehair were applied to the exterior of the surface. The hair imediately begins to burn and shrivels up resulting in a small deposit of smoke and carbon, leaving a permanent trace of the horsehair.
The ashes are washed off once the piece is cool and when the bowl is completely dry the exterior is polished with paste wax and buffed to a soft satin luster finish.

Saturday, September 09, 2006

Hand Carved Chawan


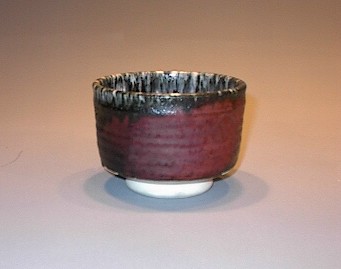
Chawan? Whats a Chawan? Well, by simple definition, for many western potters, it is Japanese for teabowl. But, I think Chawan has a much deeper meaning.

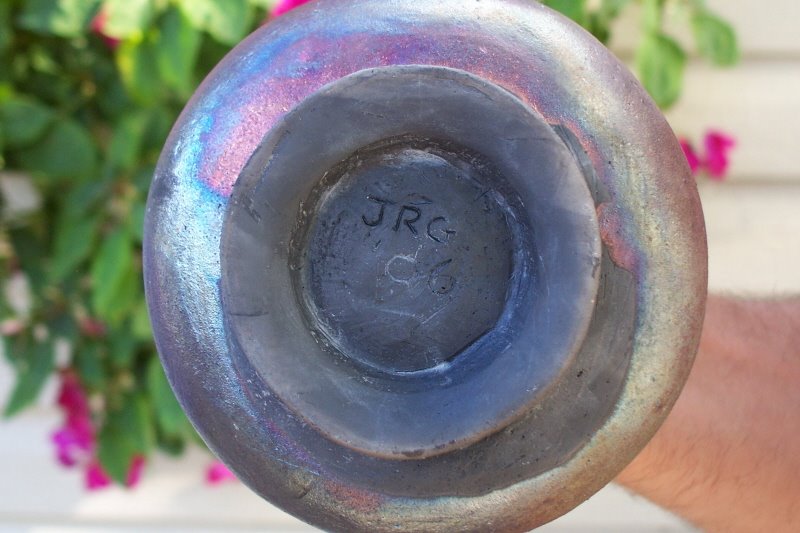
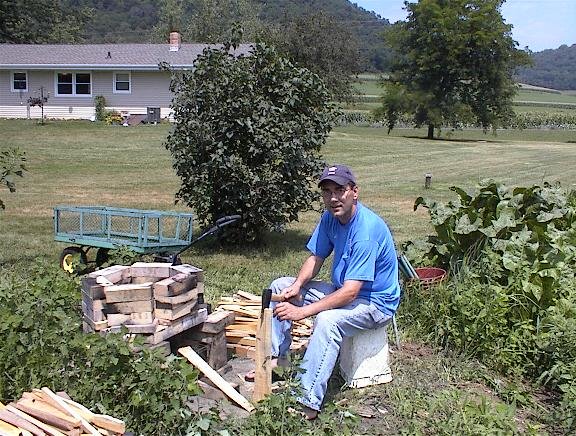
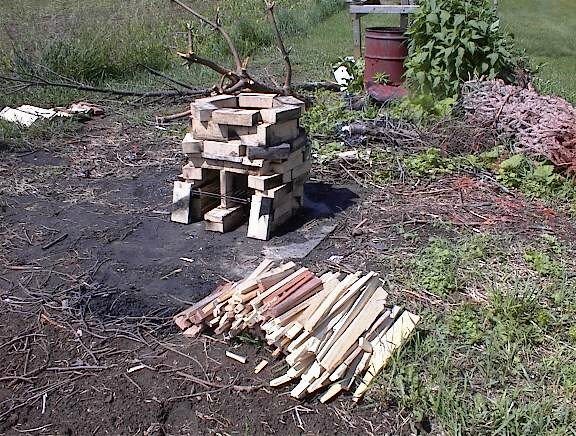
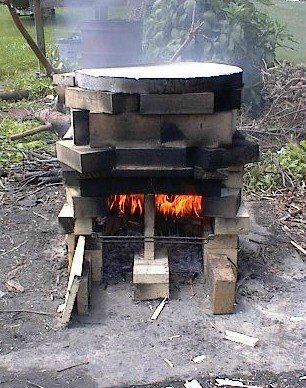
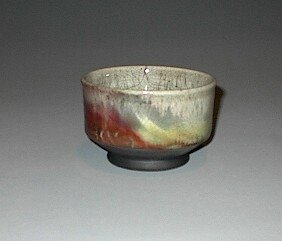
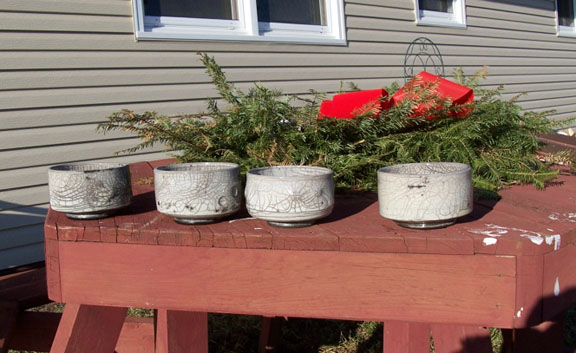
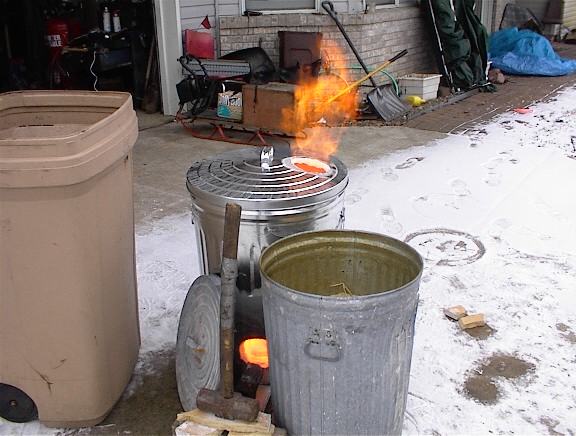
I know very little of the Japanese Tea Ceremony but Chawan were treasured by the ancient Tea Masters. Even today the Chawan is a special and treasured breed of ware. Pictured in this post is what I call my first hand carved Chawan. It was Raku fired in my crude, brick , raku wood kiln.

Aoyama Wahei wrote in Japanese Ceramics Now that "a Chawan has certain rules that must be kept in order for the bowl to be classified as a chawan. For example, many advocates of tea, along with potters themselves, claim that the chawan must have a balance between several elements, such as height, width, depth, lip, body, and foot-ring. A lack of these elements will make the bowl either a plate or a mutli-purpose bowl, but not a tool that is appropriate for drinking frothy green tea in the tea ceremony."

Furthermore a good chawan should reveal a strength and spontaneity of the potter who created the bowl and should be interesting when viewed from all angles. Even the foot-ring will reveal the skill and state of mind of the potter who carved the bowl.

I don't have enough knowledge yet, or the space, to continue my rant about what a chawan is, or go into the significance of the chawan and the Japanese Tea Ceremony, but I can safely say that a chawan isn't your grandma's tea cup.

The Footring


On Chawan the foot of the bowl (Kodai, pronounced "koudai") receives a lot of attention and importance to not only the potter, but the collector or tea drinker as well.

First of all the footring is usually the only place that the claybody of the bowl can be viewed. A lot can be revealed by studying the the clay, in some cases where the clay actually came from. It also is a nice contrast to the smooth glazed surface.

A good footring should balance the bowl not only when placed down, but in the hands as well--it shouldn't be too small or too large for the chawan. And, the footring reveals much, if just studied. Turn the chawan over. Look at the foot. It should be spontaneous but also have the skill and confidence of the potter who created the bowl.

Friday, September 01, 2006

John's First Bowl


John's first bowl, Raku and Wood Fired. Yahoo!

I gave John an 8-pound brick of clay, a carving tool, a couple of wooden trim tools, a wooden rib, and told him to "go at it." I suppose I should have given him some guidance or at least explained to him how to use the tools, but everything worked out.

I also gave him a hard time about not helping with the wood splitting but I take that back, as John did more than his fair share of stoking the kiln in the hot afternoon sun. Next time we fire at night.

Congratulations John!

Saturday, July 22, 2006

Wood Fired Pottery

Ahh...
The great Joy of wood fired pottery. For the people who collect it or the people who admire it, they have it easy. Creating it is the hard part, I mean hard on the body--Uffda! I must say that I find no joy in collecting, sawing, splitting and stacking wood for 3 hours in near 100 degree heat. But, this is part of the process which ultimately leads to an insane adventure with fire and earth.

Tomorow I will be firing a few of my tea bowls which I hand carved from 8 pound blocks of clay, and one bowl that my friend John carved.

John has never made anything out of clay but has always been interested in my pottery and the processes involved with firing the pots. He has helped me modify my gas raku kiln and has come up with some great ideas for firing.

Anyway, I just handed him a block of clay and a few carving tools and said "there is a bowl inside that clay so use the tools and release it." I'm not sure how long it took him to carve the bowl but he did it and seemed to be quite pleased with himself. I was quite suprised, as I gave him no suggestions, help, or advise of any kind.

So we're both fired up about firing our pots, although I have to say that he gave me no help in sawing and splitting all the wood.

Friday, July 14, 2006

Raku Wood Firing


Raku Wood Firing--The First Step


Yesterday I took the first steps in preparing for another Raku Wood Firing--gathering the wood. Fortunately I have a few sources for wooden pallets. They're free and all I have to do is go get 'em, saw the planks off them, and split them into small pieces. Sounds like a lot of work--scratch that! It is a lot of work and with the gasoline prices at 3 bucks a gallon I wouldn't be doing it except I can pick the pallets up on my way home from work.

A bright spot in the day--Yesterday I managed to hook-up with another potter who is creating a links list of fellow blogging potters. Her name is Mary Anne Davis and her blog can be found on my list of links. She also has a wonderful web site full of beautiful modern ceramic table art. Go see her pottery, fantastic stuff. Better get going. I've got wood to split.

Sunday, June 18, 2006

Wood Fired Tea Bowl


Success! WhaaHoo! A Raku, Wood Fired, Tea Bowl. I love the red. The outside of the bowl has some real nice fire flashings of black.

Dimensions approx. 4 and 3/4 inches high and 5 and 3/4 inches in diameter.

Stay tuned for more tea bowls. I'm out of bisque ware to fire and I have to collect and split more wood.

Friday, June 16, 2006

Raku Kiln

My first Wood-Fired Brick Raku Kiln. I got interested (more liked "Hooked") on Wood-Firing thanks to Tony Ferguson and his invitation to help fire his Anagama Kiln last
October (check out my blog archives for details). This kiln is basically Nesrin During's design that Steven Branfman describes in his book "Raku, A Practical Approach, 2nd Ed."

The main differences are that I used hard fire brick instead of insulated soft brick. And, instead of kiln shelves for the lid of the kiln I used a scrap piece of 2-inch fiber board.

Wood Fired Raku Kiln


I scrounged all my materials for this kiln.

I didn't have access or the money to buy a bunch of insulated soft brick so I used hard fire brick for my kiln, about 50 full and 10 split brick. The bricks are very loosely stacked and the fire box and firing chamber are one in the same.

I used an old refrigerator grate in the fire box to hold the wood, and the kiln lid is a scrap piece of hard fiber board that was given to me by a local furnace repair business.

The wood is from shipping pallettes that I get for free. I just have to pick them up and saw them up with a skill saw. I then split the wood into small pieces.

It takes approximately 3 pallettes and a couple hours to fire the kiln. I haven't yet fired another batch after the first initial firing but imagine subsequent firings would take about a half hour.

Sunday, May 07, 2006

New Raku Kiln Lid

Since I had some extra Kaowool, I decided to build a new lid for my raku kiln. Believe it or not, I couldn't find one store that would sell me just the garbage can lid. So, I had to buy the whole works again. I had heard from many sources that I should put the hole in the center, so I did. I cut the hole in the lid with a pair of tin snips, painted a coat of sodium silicate on the inside of the lid, set the Kawool in place and further secured it with 1-1/2 inch squares of rigid fiber board buttons threaded with nichrome wire.

New Raku Kiln Lid

I'm not sure if this kiln fires any more efficiently with the hole in the center. I didn't notice any difference in firing times for finished product. But one thing for sure---it is a lot easier looking into the kiln with the hole off-center. My favorite addition to the new lid is the two heavy-duty handles, which makes removal much easier.

Wednesday, April 26, 2006

Horse Hair Raku


My first Horse Hair Raku Tea Bowl.

Tuesday, March 21, 2006

Raku Teabowl


This teabowl has beautiful copper red flashings all around the outside of the bowl. The inside was glazed with a Clear Crackle Glaze. The outside was first glazed with the Clear Crackle and then glazed again with a Turquoise Crackle.

I think the clear glaze I use is Called Soldner's Clear Crackle. 80% Gerstley Borate, 20% Neph. Sy.

For the Turquoise Crackle glaze I just added 10% Zircopax and 2% Copper Carbonate to the Soldner's Clear.

Sunday, March 12, 2006

Raku Tea Bowl

Ferguson's Turquoise Crackle Glaze. Fired in heavy reduction during the last 10 minutes of firing. The turquoise has a nice soft crackle appearance and the copper red metallics are hard, brilliant, and shiny. As with most my tea bowls, the dimensions are approximately
3-3/4 inches tall by 4-3/4 inches wide.

Raku Tea Bowl


Turquoise Raku.
After about a dozen firings I am finally learning how to fire my new kiln and am very happy with the results I am getting. This turquoise glaze has become one of my favorites because it can produce a lot of different colors, depending on how the kiln is fired. Under normal firing conditions this glaze will always come out a blue turquoise. When the kiln is heavily reduced near the end of the firing the glaze will yield a crackled turquoise with multicolored metalic flashes. When the kiln is fired in heavy reduction throughout the firing process the glaze will be a shiny metalic copper, so shiny you can see your reflection in the glaze. I have also had this same glaze turn out the most beautiful oxblood red I have ever seen. Although, I have only been able to get that red once. But, I'm still trying.

Sunday, February 26, 2006

Raku In Wisconsin

Raku in Wisconsin
Early February
Well below Zero
All for a dozen test tiles
Crazy Huh?
Yahoo!

Raku Burner System

It doesn't look like much, but this is my Raku Burner system. It is called a "Big Bertha," model #166. It is made by L.B. White Co. Inc. in Onalaska, WI. Cost is approximately 80 dollars new. I borrowed this one from a friend of mine, but a good source for burners is eBay, under "weed burners." Real Cheap on eBay.
The burner consists of a torch head, an orifice, a handle or shaft, a manual valve, a hose and a regulator.
Thanks to LB White for the specifications and part numbers.

Model: 166 (Big Bertha)
Heat Output: 500,000 BTUH
Operating Fuel Pressure: 25PSIG
Hose: 550-20703 1/4 inch OD x 10 feet
Regulator: 550-21788 25PSI
Operating Pressure/Fuel 25 PSIG LP Vapor

Many thanks to Frank Colson who informed me that building a kiln without a burner system really is "Kiln Building For Dummies."

Tuesday, February 07, 2006

Tea Bowl Close Up


Nice Crackle Pattern.

Clear Crackle Glaze

70% Gerstley Borate

30% Neph. Sy.

Second Firing


Second Firing and I'm a "Happy Camper." I fired these with the help of my Friend John Roesler. Firing time was approximately 1/2 hour using a 20lb tank of propane. It was sunny and about 25 degrees out. Had no propblem with the tank freezing up. Oh! Thanks to Carol for the photos.

Sunday, February 05, 2006

First Firing

I had to fire my kiln immediately after completion. It was 24 degrees and pretty windy. In fact it was just cold and windy. The plastic garbage can helped to serve as a wind break. The sawdust filled reduction can and the lid served the same purpose. The sledge hammer was placed on top of the kiln shelf pieces to hold the burner in place.

In 25 minutes I was pulling glowing red tea bowls from the kiln and placing them in the reduction can.

The Finished Raku Kiln

To finish the kiln just cut out the fiber from the flue and the burner port. I used the utility knife and cut from the outside in, leaving about an 1/8 of an inch edged between the fiber and the metal.

If you have all the materials gathered together before you start, I think most people can build the kiln in about 3 hours.

I was firing immediately after completion.

Step 6--Attaching the Buttons

I thought this step was the only difficult part of the project. I drilled two small holes into the can for each button. It was threading the wire through the holes that was difficult. Once threaded I just twisted the wire tight with a pair of small pliers.
For the lid I threaded the wire from the outside of the lid, through the holes and through the fiber. I then just pierced the fiber button through the wires and twisted tight with the pliers. I trimmed the long ends with a pair of wire cutters. This was a lot easier than threading from the inside out.

Step 5--The Buttons

I scrounged a piece of fiber board from a friend of mine who worked for a furnace/AC repair place. Using a utility knife I cut out about 20 squares that measured 1-1/2 by 1-1/2 inches. The board was 1-inch thick.

I used High Temp. Wire, 8 inches long for each button. The wire I used was the thicker gauge wire made by Kemper. I think it was about 5 dollars for 10 feet of it. I bought 3 packages and only used one for this project.

Anyway, kind of bend the wire in half and gently poke the two ends through the fiber square. It goes through really easy. I actually only used 8 buttons for my entire kiln but might have to add more later. I used four for the kiln lid and four for the interior of the kiln. This seemed to work just fine for my first firing.

Step 4--The Kiln Lid

Using the marker, trace around the edge of the garbage can lid and cut out with the utillity knife. Turn the lid upside down and carefully tuck the fiber round into the bottom side of the lid

The fiber will be held in place by either handmade ceramic buttons with High Temperature kiln wire or by buttons cut out of insulating fiber board. I choose the fiber board because I had heard that the ceramic buttons tend to break after repeated firings.

A picture of my fiber buttons will be posted in the next step.

Step 3--The Kiln Bottom

This is the easiest part of building the fiber lined garbage can raku kiln. Place the can on the fiber and trace around the perimeter with a magic marker. I set the can on the edge of the end of the roll and the side. This allowed me to save about a 4 inch by 4 foot pieces of fiber for future use in some other project. "Waste not, Want not."

Cut two rounds pieces out for the bottom of the kiln. This makes it possible to use a single piece of fiber for the main interior part of the kiln. Once the pieces are cut, gently place each round in the bottom of the can, one piece on top of the other.

Sunday, January 29, 2006

Step 2--Cutting Fiber

For my Raku Kiln I purchased 1 roll of KaoWool off of eBay--Real Cheap. It is 1 inch by 24 inches by 25 feet. This is more than enough for the project. The main piece for the kiln measured 5 feet in length and I cut 2 circles for the bottom of the can and one circle for the lid.
Working with this fiber is hazardous to your health. Make dang sure you wear a respirator when working with it. I also found that a thin pair of garden gloves helps as well. The stuff is itchy and irritable, just like fiberglass. I started cutting the fiber with scissors but found that a sharp utility knive worked much much better. The carpenter's square was not necessary but looks good in the photo.

Friday, January 20, 2006

Raku Kiln Building for Dummies

The first step in making a fiber-lined garbage can raku kiln is obtaining a garbage can. I bought a new one at our local hardware store. It is a 31 gallon galvanized garbage can that cost $10.99.
This size can seems like a good choice because it is 26 inches deep on the inside, which makes installing the ceramic fiber a bit more easier.
The only tools needed for the first step is a drill, tin shears, a rounded edged file, and of course safety glasses.
Cut out a 5 inch circle out of a piece of cardboard as a template for the burner port and the flue. Using the template and a magic marker, draw a circle 3 inches above the bottom of the garbage can.
Next, put on your safety glasses and drill a hole on the marked circle. This is a starter hole to get the tin shears into. Tin shears cut through the garbage can really easy. Just cut out your marked circle.
I used the rounded edged file to file down any sharp jagged edges.
This first step took about 15 minutes to complete.