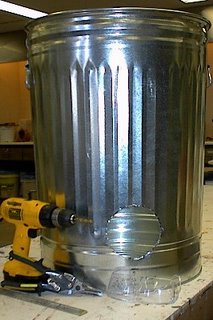
 The first step in making a fiber-lined garbage can raku kiln is obtaining a garbage can. I bought a new one at our local hardware store. It is a 31 gallon galvanized garbage can that cost $10.99.
This size can seems like a good choice because it is 26 inches deep on the inside, which makes installing the ceramic fiber a bit more easier.
The only tools needed for the first step is a drill, tin shears, a rounded edged file, and of course safety glasses.
Cut out a 5 inch circle out of a piece of cardboard as a template for the burner port and the flue. Using the template and a magic marker, draw a circle 3 inches above the bottom of the garbage can.
Next, put on your safety glasses and drill a hole on the marked circle. This is a starter hole to get the tin shears into. Tin shears cut through the garbage can really easy. Just cut out your marked circle.
I used the rounded edged file to file down any sharp jagged edges.
This first step took about 15 minutes to complete.
3 comments:
Hi, I found your site from the Tileworld blog. Interesting raku kiln you've got going here, I hope you post the rest of the construction photos too. I have one question: Are you concerned that the galvanized can will put out toxic zinc fumes during the firing? I have heard that from someone on Clayarts but don't know if its true.
Regards,
Ivy
Hi...thanks for documenting this project. great photos. How are the firings going? I am making an almost identical kiln but with a 20 gal trash liner. I believe Frank colsons rocky raku is only 10 gal. Also...love your finished pieces...great work! Jim from Sedona, Az.
You don't seem to have comments on your blog any longer, but I thought I would post to this old one to see if you get it. Thanks for the info on wood fire and raku kilns you are building. I hope to try some of this in the winter. You can see my blog at bluestarrglalery.blogspot.com/
Post a Comment