Monday, April 27, 2009
How To Make A Chawan
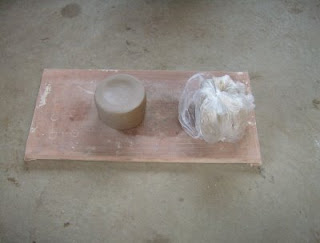
Not a whole lot to say in this post but this is step one in how I make my chawans (teabowls). I start by wedging up about 3-1/2 pounds of clay. Once that is completed I pound and shape it into a nice round disk approximately 5 inches wide by 3-3/4 inches tall. I also gently roll the clay disk on its' side, on my canvas covered board, to get a nice round form for the exterior of the teabowl. I also have another piece of clay ready to carve covered up in the plastic once I complete this bowl.
Sunday, April 26, 2009
Tools Of The Trade
This bowl is really coming along and I'm almost done. In this photo you can see what types of tools I use to carve my chawans. I need to thin-out the walls a little bit and then carve the footring, called the "kodai" in Japanese. Even though the kodai is hidden from view until after the tea has been drunk, it is a key element of the chawan and can reveal many things about the maker, such as skill and mindset. Since it is the only part of the bowl that is not glazed it also reveals the "tsuchi-aji" (clay flavor). You can see the tru color and texture of the clay by examining the kodai,
Friday, April 24, 2009
Hand Carved Chawan
I started carving this chawan last weekend and just finished up yesterday. I probably have about eight hours into the bowl but I think it is the best tea bowl I have made to date. I definately have a lot of heart and soul into this chawan and can't wait to fire it. There is just something about it. First of all it looks good and when you hold it in your hands it feels good. I'll end up raku-firing this but I don't know what type of glaze I am going to use. And speaking of firing, I'm going to have to wood-fire this. Something about this bowl just says "wood-fire me."
Thursday, April 23, 2009
Classical Birdfeeder
When I got back into clay, after a 10-year hiatus, this is the first thing I made. I still had all my clay tools but had no clay, glazes or underglazes, so I got on the phone and ordered some materials to get me back into clay. Kind of odd because although I ordered the stuff to start making things, I had no way of firing them. I didn't even think of that. I must have been caught up in the excitment of getting muddy again.
Ok. The stuff was ordered and it would take a week to deliver. In that time I was constantly wondering what I was going to make. Not only did I not have a kiln, I also did not have a potter's wheel so I was going to be limited to handbuilding whatever project I decided to tackle. I sat on the deck trying to sketch out some ideas in my sketch book and realized we didn't have a birdfeeder to feed any of the birds chirpping about the deck rails--Tah-Dah! A Birdfeeder was going to be the first project.
Still at the sketchbook, nothing seemed to be working for me and eventually I ended up looking at drawings of a pitched roof with four supporting columns. Thank goodness the clay gods stepped in and I had an epiphany--The Parthenon of Ancient Greece! Unfortuantely, after looking at a photo of the temple, it seemed to be too big of an unertaking for me so I started looking at other photos of Greek Temples. Turned out that all of the temples seemed to intimdate the hell out of me so I looked at my last drawing, the one with four columns and a pitched roof, and said I'll just make this simple but "Greek-like." And, it worked.
Once I had created my temple I still had no way to fire it. A couple months later I ended up enrolling in a pottery class at the college, fired the feeder and a bunch of other projects, and the rest is ancient history.
The birdfeeder is made out of a lowfire talc clay body and I used a red iron wash for the roof and and used a more diluted soultion for the base. I then brushed three coats of lowfire clear glaze on everything but the top part of the roof. It has been outside in the elements ever since and gets better looking with time. If you click on the photo to enlarge it you can see that lichen has started to grow on the feeder making it look even more "ancient." Well, thats the story. Hope I didn't bore you, but I really thought the whole thing was worth documenting.
Cheers!
Chawan Is Looking Good
Wednesday, April 22, 2009
Making a Chawan, Step One
Not a whole lot to say in this post. I am working backwards as far as posting so my blog post go in order from step one to completion.
I started my chawan by wedging approximately 3-1/2 pounds of clay. Once the wedging was completed I pounded it and shaped the ball of clay into a small form that was approximately 5 inches wide by 3-3/4 inches tall. I also rolled the ball of clay over my canvas covered board to get a nice round form for the outside of the bowl. The piece of plastic to the right of the ball of clay is another wedged and rolled out piece of clay for my next teabowl.
I wanted to start carving right away so I left the first wedged round of clay out on my board overnight. This made the clay hard enough but yet still moist enough to carve with my tools.
Monday, April 20, 2009
Back In The Studio Again
The clay body is lowfire terra cotta and It is really sucking-up my underglazes. This has proven to be a pain-in-the-butt to paint. I've forgotten how many coats of white underglaze it has taken me to cover up the red clay. All I can say is, I've got a lot of time into this piece.
Today I'll paint three coats of clear gloss over the piece and hopefully fire it this coming weekend. Will post a photo of the finished work when I get it done.
This past weekend I also started hand carving a few Chawans, (teabowls), which I think are my best to date. If all goes well, and weather permitting, I'll raku-fire these this coming weekend. I'm hoping to have some firing company as well. More info to follow.
Wednesday, April 08, 2009
Raku Kiln Number 3
I was too poor and cheap to buy a new galvanized garbage can so I used one that had been previously used as a post-firing reduction chamber.
I had just recently purchased 50 square feet of kaowool fiber from E-Bay. I thought it was a steal at 120 dollars, that included shipping. It was 1-inch thick, 8 lb. density, and 24-inches by 25-feet long.
I also found a box of homemade ceramic buttons that I made over a year ago and a package of high temp wire. Its amazing what you can find when you clean up the studio,
(It was Spring Cleaning Time). I'll get to the buttons a bit later. Ok, on to the construction description.
As you can see in this photo I traced a 5-inch circle on the bottom of this can. Then I drilled a starter hole on the line and used some tin shears to cut out the hole for the burner port. Once the hole was cut out I used a metal file and filed off any of the sharp burrs left behind from the shears. I also did the same proceedure on the garbage can lid for the exit flue.
Next I rolled out some of the fiber and traced the bottom of the garbage can on the fiber with a black magic marker. Then I cut the circle out with razor-blade type box cutter. I cut two of these circles and placed both of them, one on top of the other, into the bottom of the can. The reason for two is because with two inches of fiber on the bottom, only one piece of fiber, 24-inches tall, is needed to line the kiln. It is a perfect fit.
Ceramic Buttons
For my last two fiber kilns I used high temp wire and pieces of 1-inch by 1-inch fiber board to secure the fiber to the garbage can. About a year ago I read an article about somebody using ceramic buttons. I tried google searching for ceramic buttons and had no luck finding any. I probably couldn't afford them anyway so I made my own.
These buttons were made from a regular raku clay body. I rolled out a slab of clay about 1/4-inch thick and used a 2-inch cookie cutter to cut out the forms. I then rolled out a coil of clay, cut little pieces off and slip and scored them to the 2-inch rounds. Once they were dried I used a small drill bit to drill a hole through them so I could thread the high temp wire through the buttons.
The article I read regarding these buttons warned that sometimes these buttons would occasionally break due to the stressful nature of rapid raku firing so I made several extras just in case.
Raku Kiln Chamber
This kiln is not constructed with two layers of 1-inch fiber. The Garbage can is not a straight cylander, it tapers in towards the bottom. So rather than trying to taper the fiber to fit, I used a strip of fiber 1-inch by 3-inches and glued it to the trash can with sodium silicate. This made it really easy to use one piece of fiber 24-inches tall for the interior without haveing to make any "pain inf the butt" cuts.
I used three ceramic buttons with high temp wire to secure the fiber to the garbage can. I didn't use any at the bottom of the can but can add them later if needed.
Two holes for each button, slightly larger than the high temp wire, were drilled into the can and the buttons and wire were feed from the inside out. This proved to be a little challenging, patience helps. Once the wires were fed through the holes, the ends were twisted from the outside with pliers to tighten and secure the buttons.
Raku Kiln Lid
I'm not really sure if this lid is really "finished." I painted a thick layer of sodium silicate on the garbage can lid and then placed the round piece of fiber into the lid and used a rubber kitchen spatula to kind of tuck in the edges.
Once I fire-up the kiln for the first time I'll find out whether or not I need to add any additional buttons to hold the fiber in place. If any additional buttons are needed, I'll add them. Each button takes just a few minutes to install.
Finished Raku Kiln
The finished product.
I really like this style of a kiln mainly because of its portability. It is very light weight and remarkably durable. I once even transported this kiln, the small propane tank and burner, and all the rest of the materials to a friends' house for a raku party in the back of a 4-door Oldsmobile.
This is a large garbage can but a smaller can would probably be more than adaquate for most people or for beginning raku fanatics.
Sorry Natalie
My little clay partner Natalie has been to the studio. Sorry I missed you Nat. She is just dying to get her hands muddy again. It has been a long unproductive winter. I have been to the studio, but usually stop in after work, and that is before school lets out. Once again, sorry Nat. Hope to see you this weekend.
Jeff.
Sunday, April 05, 2009
A New Raku Kiln
Yes, I'm building a new propane fired raku kiln. Winter has been dragging on too long and I haven't spent any time inthe studio making anything. The weather was about 50 degrees F yesterday. A good day to work. Anyway, last Spring our second 100 year flood in two years took out both my raku kilns. I actually found one tangled up in some tree branches but "Alas, poor kiln was dead." Too much mud and water ruined the fiber-lined interior. This kiln was the one that was fired from the bottom and sat atop a modified turkey cooker. I never did see any advantage using the "updraft" kiln and it was just another piece of equipment to haul around so I went with the standard garbage can kiln with the hole in the side and a hole in the top.
To save money I bought 50 square feet of 1 inch 8lb. density kaowool fiber for just over 100 dollars on e-bay. I had a pretty new 31-gallon metal garbage can in the basement and I am going to use a lid from the very first kiln that I made. I didn't get too far yesterday. I had to clean the inside of the can with a wire brush, cut the side hole, and layered two pieces of the fibre into the bottom of the can. I used two layers on the bottom because the can is 26 inches tall and by using two pieces I can use just one piece of 24-inch wide fiber to finish the interior of the kiln.
Well anyway, thats as far as I got yesterday. Planned on finishing today but we're expecting 6-7 inches more snow today and don't know if I want to drive to the studio. We'll see. Stay tuned to the blog as I will be posting photos of the new kiln building project.