Friday, October 26, 2007

Barrel Fired Vase


Another Saturday and not enough time in the day to get all the things done that I'd like to. Oh, I should mention that I posted the photo of the vase yesterday but didn't have time to write anything. Anyway.....

First thing is to make clay. I need some clay for throwing and I need a batch of heavily grogged clay for my barrel and raku firing.

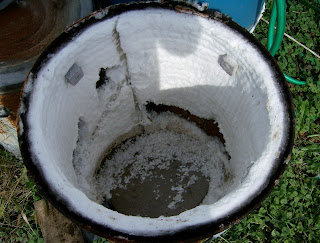
Speaking of witch (it is Halloween, kinda), I need to start working on my new raku kiln. The burner system was finished last weekend and a photo posted last week. Today I need to line a garbage can with fiber. I also need to make some ceramic buttons to hold the fiber in place.

If that isn't enough for the day, I need to throw some more pots. And, before I forget.....
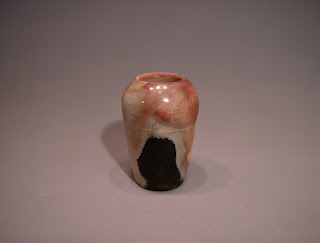
This is a vase from my last barrel firing. It's about 8-9 inches tall. I like it. Pretty much the whole vase is this marble peachy rosey marble color, except for the black spot in the front. That was where I laid the piece down in the sawdust.

I haven't heard anything about how well the Empty Bowls Project did in Viroqua. I only stopped for about an hour. Lots and Lots of bowls and a good crowd of people. As soon as I get word about the final results of the event I'll get them posted. Enough for now, time to get muddy.
Tuesday, October 23, 2007

Barrel Fired Tea Caddy


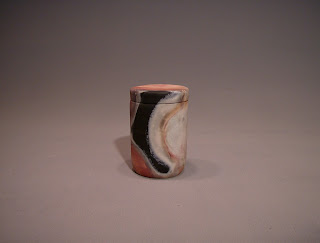
This barrel fired tea caddy is my favorite piece from my second firing.
Approximately five inches tall, 3 inches diameter.
To get the flame patterns on this piece I wrapped wire around the ouside of the pot. This also kept the lid secure. Then I placed the tea caddy on its side in a bed of sawdust on the bottom of the barrel kiln.
Miracle-Gro and copper carbonate was then sprinkled around the pot.
The barrel was then loaded with hickory, lit and burned to ashes. The pot was removed the next morning.
This piece will be on exhibit at Viterbo University in La Crosse, WI. for the next three months, Fine Arts Building, 3rd floor.
To see more barrel fired pots and photos of the firing go to my flickr site

Monday, October 22, 2007

Raku Burner System

New and improved Raku Burner System.

This was the base of one of those deep-fried oil turkey cookers. The legs were unscrewed from the top ring and the ring was lowered about four inches. I used vise-grips to clamp the legs back in place and then drilled new holes into the shorter legs. I used the original screws to secure the legs back onto the top ring. Next I bent down the legs to serve as supports for the kiln.

The burner came from my old kiln. The only difference is that a 90 degree brass elbow was screwed onto the burner to create an updraft burner.

The turkey burner was removed from the unit and 3 inches were cut out from the mounting cross member. The burner was then slid right into place.

Next step is to line another garbage can with some fiber.

The Death of Rusty Raku

Poor 'Ol Rusty is done.

Sometime in the past week some dirty little critters sqweeked through the plugged up burner port and chewed up the fiber.

This Fiber-Lined Garbage Can Raku Kiln was pushing two years old and has held up well, being exposed to all the Wisconsin elements.
I'm not sure how many firings I did in this kiln, but it was a heck of a lot.

Now its on to the next kiln design. Stay tuned.

Thursday, October 18, 2007

Empty Bowl Project Viroqua, WI


Saturday Oct. 20th from 4-9 pm the Viroqua Empty Bowls Project will be serving Soup and Bread to combat world hunger and poverty, and to teach about the connection art has in society.

Local area potters have made the bowls and donated them to the project. Participants in the event are asked to make a minimum donation of 20 dollars. When the meal is done, you get to keep the bowl. The diners can also choose where they would like their donations to go: local food pantries, international hunger relief, or the Empty Bowls Project.

Here are some of the bowls I am donating. The front left and right bowls are glazed with BSU Temmoku and the rims were dipped in Mamo White. The texture comes from porcelain slip which is brushed on the bowl when the bowl is still wet and on the potter's wheel.

The other bowls I used a combination of BSU Temmoku, Wax Resist, and Oxblood. The kiln was not heavily reduced but flashes of red mark each of these bowls.

Tuesday, October 16, 2007

Rutile Blue Tumblers


More tumblers, different glaze. This glaze is Viterbo's Rutile Blue. Once again those are my paw prints on the bottoms of the cups.

A Gift to Josh B., Meteorologist, WKBT La Crosse. Cheers!

Upcoming projects/events......I'm still waiting to light the barrel kiln. Weather forecast is good for next weekend. Will also fire-up the Raku kiln as well.

I've also just recently added the 500th HighFire Glaze to my Glaze Data Base. I bet by the time I'm done, I will have 1,000 glaze recipes

Also coming up is the Empty Bowls Project in Viroqua, Wisconsin. Saturday Oct. 20th, 4pm to 7pm. More info and photos coming about this one.

Thursday, October 11, 2007

More Tumblers


More Tumblers, or flat-bottomed cups without handles or feet.

I really like this glaze. The base glaze is BSU Temmoku. Once that is applied I drip hot wax over the cups (A technique called wax resist). Then I apply a coat of Oxblood glaze over the Temmoku. The Oxblood glaze runs off the wax revealing the base glaze.

The interior is glazed with Mamo White.

Anyway, I like this combination of glazes because it reminds me of tiger stripes. This combination of glazes can also produce two entirely different results. I have found that if I load the kiln with lots and lots of Oxblood glazed pieces, the Oxblood will produce brilliant deep reds when heavily reduced. But if I only have a few Oxblood glazed pieces in the kiln, I end up with the glaze you see here.