Tuesday, August 30, 2011

Insulation


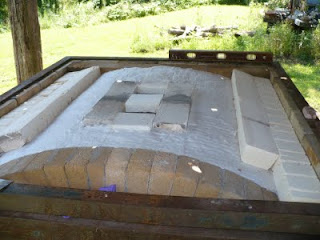
I had a bunch of fiber from old raku kilns so I used it up. This is a well insulated roof. On the top of the arch brick I laid down an inch layer of fiber. Then I laid down two rows of 3-inch soft brick around the edges. I then leveled it off with crushed pieces of insulated fire brick. And finally, on top of that to level it all off I put down another inch layer of fiber. To finish it off I will cover it with metal.

Wednesday, August 24, 2011

Burner Pins

HELP!
I need to find two of these GACO burner/mixer pins for my venturi burners. I can find them for 1/2 base but I need 3/4-inch screw in base. Can any of my friends/readers out ther point me in some possible directions on where to find them.
Thanks.

Tuesday, August 23, 2011

Burner/Mixer Pins


Cleaning the burner mixer pins has definately been the easiest part of getting this kiln into operation. Just going to polish these up with some WD-40 and a small wire brush. Will unscrew the orifices and clean them with the proper sized torch head cleaner.

During the moving of the kiln we accidently broke two of these mixer pins from the burner system. Just a minor set back but I still haven't found the replacements yet, but think I moight have found a company in New Mexico that sells them. If not, I'll just make my own.

Burner/Mixer Pins

Separating the burner mixer pins from the venturi base plate wasn't an easy job but made much easier with the help of a big-ass pipe wrench, a vise, and some WD-40.


Once I got the base plate broke loose from the pin I sprayed the WD-40 on the pin and worked the plate back and forth with the wrench until I could turn it and spin it with my hands.

Kiln Burners


To clean the burners I completely disassembled them and then used power tools with wire brush attatchments. This really knocked the rust down and smoothed them up real nice, inside and out.

Saturday, August 20, 2011

Slow Going


Everything about getting this kiln into operation is slow going. I suppose its because after I work a ten-hour shift at my "paying" job and by the time I get to the studio, I don't feel like working more than an hour or two.

I wanted to finish the top of the kiln yesterday but this is as far as I got after an hour and a half. Although I had previously crushed the IFB, they were not crushed into small enough pieces and I had to crush them again. Two beers later and when I took this photo all I kept thinking about the song lyrics "breaking rocks in the hot sun, I fought the law and the law won."

Working overtime at the "paying" job today and tomorrow but hope to have the crushed IFB done today. And hopefully tomorrow I can finish the damper/flue bricks. I need to sand them down a little bit so that they're flat and even.

Wednesday, August 17, 2011

Nuts!


I'm working on the kiln's burner system now. There are ten of these venturi burners and all of them were filled with nuts. Somewhere out in the woods is one pissed off squirrel.

Once the nuts and other debris was cleaned out of the burners I put a round wire brush on the end of an electric drill and cleaned the hell out of the inside and outside.

The otherday I removed the pilot ring and cleaned every pilot hole, 187 of them.

During the move we accidently broke two of the mixer pins, (the threaded piece at the end of this burner), so I'm trying to hunt down two replacements. Also will need a new thermocoupler. Once I get that done I'll reassemble everything and set it up under the kiln for operation.

Monday, August 15, 2011

Kiln Insulation


Laid down the fiber, one-inch 8lb. density. I had a bunch of replacement IFBs for an electic kiln so I decided to place them around the edges. Had enough to go two rows on each side and they seemed to fit together well so I used them up.

I cut the center flue bricks out of K26 IFBs and set them in place. I had to order some kiln cement so I'll cement them in place when that arrives.

I plan on filling in the rest with an even layer of crushed IFB and will eventually cover the top with some 16 gauge sheet metal.

Thursday, August 11, 2011

Fixing Up The Kiln


A little bit of work needs to be done to the top of the kiln. Will be putting a layer of brick around the flue holes first. Then I was thinking about putting down an inch layer of fiber over the arch. Not sure yet but I have bunches of broken up IFBs and was considering covering the fiber, to the left and right of the damper, with that and evening it out to the top of kiln.


Friday, August 05, 2011

Free Kiln For The Moving


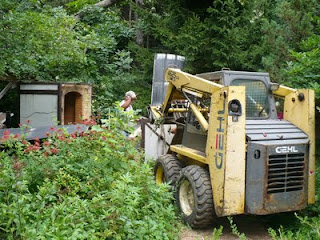
This is about an hour into the project. The first step was to demolish the structure that the kiln was in. Once all the debris was moved aside it was time to fork it and move. Didn't happen that way. The damn thing weighed 3,ooo pounds and the skid steer couldn't lift it. So the door was removed to make it lighter. Even then the skid steer could barely fork it. It was pushed to its limit for sure.

The Tough Part


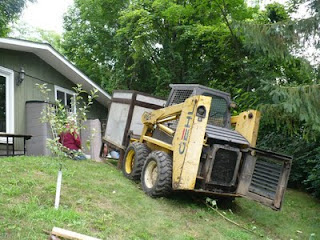
This was the tough part and when I really thought we might loose the kiln. I really thought it would roll right off the skid steer. Although it might look like the skid steer has this kiln off the ground a good deal, it isn't. The damn thing was too heavy. Instead of just forking and driving the kiln up the hill we lifted the kiln up a couple of inched and slid boards under the metal base of the kiln and then pushed it up the hill. Slow going but it worked like a charm.

Loaded


Finally loaded (the kiln). Beer Break! Only took about 3 hours. Now its just a short five mile trip to the studio.

Needs A Door


Needs a door but not before a quick beer break. One of the several people who made this move possible. Thank you Greg Gerke, "the Crazy Carpenter."

Kiln In Place


Well, the kiln is in place. A million thanks to my friend Darrel and his buddies who spent all afternoon moving this beast. Next step is to work on the burner system. Needs a good cleaning and looks like it needs a new pilot igniter.