Friday, August 30, 2013

Kiln Gods

Been firing up my little kiln quite frequently lately. Each time I fire it I always create a little kiln god to watch over the firing. Here are a few of my latest.
I'm really not sure of the history of kiln gods but from my understanding they originated in ancient times when pottery first came about.
Kiln gods that I have made in the past usually were left to dry on top of the kiln while it was firing and then tossed into the reclaim bucket when the firing was complete. But lately I have been saving them, bisque firing them in my next firing, and painting them with underglazes and glazes them to give them more life.
I don't think kiln gods are based on religious beliefs. Mine are not. They are just a fun little project to make and kind of like a good luck charm, something like a rabbit's foot or a four leaf clover.

Thursday, August 29, 2013

Raku Fired Horse Hair Pot

This is another pot that I fired last weekend. I'm real happy with the horse hair markings.
I applied terra sigalatta to this pot when it was leather hard and then buffed it to a high sheen. I bisque-fired this to cone 04, which was too hot, but I was filling my kiln with 04 bisque pieces and this one filled up the kiln.
The result of the higher heat was the loss of some of the sheen of the burnishing but I'm still happy with the results.

Tuesday, August 27, 2013

Horse Hair Vase

I had a good weekend. This is one of my favorite horse hair pots that I fired this past weekend.
This pot was pulled from the raku kiln while glowing hot, set on an insulated fire brick, and then strands of horse hair were brushed and placed on the hot pot to burn.
Once the pot was cool to the touch I gently scrubbed the pot clean of and residue from the burnt horse hair. After that I applied a thin layer of polishing wax and buffed it to a high glossy sheen.

Tuesday, August 13, 2013

Mishima Decorated Platter


 One of my favorite pieces I pulled out of the kiln this weekend. The platter itself is made of low-fire white earthenware clay.
Once the platter was thrown and trimmed I used a can opener tip to impress the triangular points into the rim. Old timers call the can opener a "church key." The straight lines on the outer edge of the platter was made using a flat head screwdriver.
Very time consuming but the end result is a beautiful design and pattern. Once the platter was bisque fired I had no idea how I was going to glaze it. Somehow for some unknown reason, Mishima popped into my head.
Mishima is actually a Japanese island that produces a type of pottery surface design /drawing by inlaying a slip of contrasting color into lines incised in leather-hard clay.
In the case of my platter I applied three coats of Amaco Teal Blue Velvet underglaze to the entire platter, front and back. Once that had dried I used sand paper to remove the underglaze from the rim of the platter. The sanding removed the underglaze on the high parts of the rim and left the underglaze untouched the the recessed indentations made by the can opener and flat head screwdriver.
When the sanding was completed I applied three coats of Duncan Super Clear over that and fired the platter to cone 04.

Thursday, August 08, 2013

Camo Ashtray

What can I say? Somebody asked me to make them a couple camouflage pattern ashtrays. Give the people what they want.
This ashtray is made out of low-fire white earthenware clay. Hand painted with Amaco Velvet Underglazes with 3 coats of Duncan Clear Glaze over that and fired to cone 04.

Wednesday, August 07, 2013

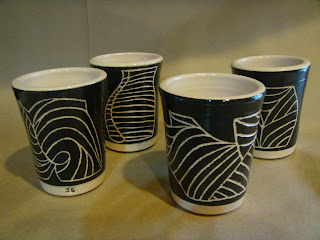
Earthenware Tumblers

I finally got my new electric kiln wired in my studio. These were some of the first pieces out. Made them quite a while ago but I'm real happy with the abstracted carvings. Two carvings on each tumbler.

Perfect tumblers for Beer or Bloody Marys.

White earthenware clay. Amaco Black Velvet Underglaze with Duncan clear over that.