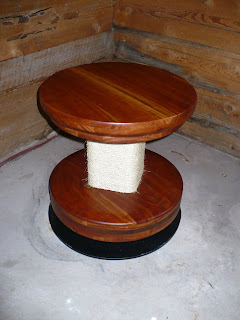
Tuesday, June 28, 2011

Finished Product


Well, it took a long time but I finally finished my kick wheel. I'm not really sure of the "proper" name for this style of wheel. I would call it a "kick wheel." I have heard others refer to it as a "Korean Style Kick Wheel." And, I suppose if you make pottery on this type of wheel in the Onggi tradition it would be called an "Onggi" wheel. What ever the proper name, this wheel turned out much better than I could have ever imagined.


I was going to try it out yesterday but just couldn't bring myself to throwing a bunch of clay on this beautiful wheel so I threw some pots on my stand-up treadle wheel.


Yes it is pretty but I made it to use so today after work I'm throwing some mud on it.

Thursday, June 23, 2011

Korean Style Kick Wheel

I finally got off my dead ass and had the local machine shop fabricate the shaft and baseplate for my Korean Style Kick Wheel.

I did make some changes to the wheel design. I did keep the 1-inch flange bearing on the underside of the wheel head but decided to go with a 1-1/4-inch flange on the bottom.

The baseplate is 22 inches in diameter and I had the machine shop cut the 3/8-inch steel plate round just because I thought it would look better.

There is a 6-inch square steel plate welded to the base. A hole was drilled through both plates and the shaft was inserted and welded into that. The square plate was added just for strength. For my next wheel I am not going to weld the 6-inch plate to the base. I will have holes drilled and tapped to accept stove bolts to attatch the shaft to the base. If you decide to build one you'll see why.

Anyway, this wheel is pretty sweet. The last thing I have to do is re-drill the hole in the bottom of the wheel so that it will accept the 1-1/4 inch shaft. Originally it was built for a 1-inch shaft.

If you hadn't read all the previous posts about the building process of this wheel and are interested in building your own wheel, just search my archives on this blog.

Tuesday, June 21, 2011

Clay Extruder


I decided my studio was too small to mount this big beast on a table top so I decided to buy a piece of straight pipe, drilled some holes in it, and mounted it to the wall. Worked out very well.


I'm also going through the process of giving my studio a make-over/remodel job. Basically about the only things I want in this room are my three wheels, my two work tables, A shelf for ware and a bisque kiln in one corner of the room.


Under the tables I'll keep basic tools, some clay buckets, and low fire glazes and underglazes. All my bucket glazes were moved to the basement. Actually a lot of stuff was moved to the basement.


I moved out an old pot bellied stove that was in one corner of the room to make way for the kiln. Next step is to put up some cement board and a venting system and get it wired.


Plan on finishing the paneling and doing some trim work around the windows and doors. Also have s little bit of insulation to put up and will do a little bit of painting. Probably a lot more work to do but this will at least give me a nice space to work in without bumping into anything. I posted a photo album on my facebook page of the mess I've created. One look at it will reveal why I had to do it.


Gonna' miss the beer fridge, but it won't be too far away.

Wednesday, June 08, 2011

Clay Extruder/After photo


A little bit of elbow grease, a can of spray paint, ($3.79), and 2 new bolts, ($0.79).


Not a bad. This extruder is supposed to be mounted to a table or work bench but I am going to make a new mounting bracket and secure it to a wall in my studio.

Clay Extruder

My friend Ryan gave me this old clay extruder. I thought maybe it was due for the scrap yard but after examining it more closely I decided to knock the rust off, clean it up, and add some new pait to it.


Wednesday, June 01, 2011

Sitdown Motorized Potter's Wheel


Well, after hours of internet image searching I found a picture of the "unknown" potter's wheel. At least I'm pretty sure this is the wheel. Still don't have a name for it yet but did find out it has a variable speed, pedal operated, Dayton split phase motor. Still seeking more information and comments about it.