Friday, December 11, 2009

Korean Potter's Wheel


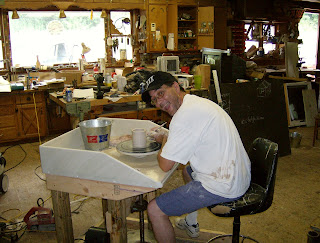
Well, I've finished the wood/carpentry work on my Korean potter's wheel. This is about 45 pieces of cherry wood, 5 pieces of black walnut, and 4 pieces of pine (the four supports) all glued together and sanded. I've got to say--It is really pretty--REALLY Pretty.

The hardest part was placing the four support dowels and I couldn't have done it without the help of my friend Darrel--He is the the "Wood Man," and it was his shop where I did all this work.

Anyway, this wheel, whether you call it an Onggi Style Potter's wheel, or a Korean Style Potter's wheel, is 17 inches tall. The wheel head is 18-3/4 inches in diameter and the flywheel is 19 inches in diameter.

The next step is having a machine shop weld my 1-inch cold rolled steel to a round piece of 3/8 inch steel and when that is complete I'll be making pots on this beauty.

Thursday, December 03, 2009

Handmade Pottery Tools


Yesterday I made a bunch of new pottery tools from scrap wood laying around the shop. I made the two ribs (upper left) out of a piece of pine molding that I cut to size and sanded . They're each about 5-1/2 inches long.

I also made a bunch of different types of trimming sticks. I made them out of left over cherry wood from my Korean kick wheel, which I'm still working on. The trimming sticks are about 10 inches long. I really like the size of these and have come to the conclusion that the ones you buy are too short and not as comfortable.

The bigger tools are my "Onggi" tools that I plan on using when I start throwing on my Korean Kickwheel. The calipers are about 10 inches long and made out of oak. These are really sweet. Nice looking, nice and smoooth, and feels good in the hands. I used a galvanized wing nut on this pair because it was the only thing I had handy at the shop. I'll replace this with a brass wing nut and use brass in all the future calipers I make. No particular reason for the brass other than it just looks better.

The Korean kick wheel is coming along. I now have the flange bearings for the wheelhead and the flywheel and tomorrow I'll get the the piece of 1-inch cold rolled steel for the shaft. The next step is to drill a hole in the center of the flywheel and then drill and set the dowel rods which will connect the wheelhead and the flywheel. Hopefully I'll get this done this weekend. Stay tuned.

Tuesday, November 24, 2009

Korean Kick Wheel


I'm still working on my new wheel. Yesterday I spent about 2 hours hand sanding the outside edges of both the wheel head and the flywheel. I'm actually not done with the sanding and I'm hoping that I only have another hour at it. I'm using fine grit sandpaper now to eliminate any remnants of the bandsaw. It is also really making the wood grain pop out and man is it smooth.

Both the flywheel and the wheel head have been tapered, or "shaped" to change the profile. Not neccessary but I thought it added a lot to the wheel as a whole. The name of the machine used to make the tapers is called a "shaper." Basically it is an oversized upside down router.

I'm still waiting for a friend of mine to give me some 2-inch diameter dowel rods. I am going to use these as the supports between the wheel head and the flywheel. When I get the dowels, we won't need the bucket and I'll post a photo when the next step is complete. Once I complete the wheel I'll post a complete materials list and the final dimensions.

Wednesday, November 11, 2009

Onggi Wheel


I made a lot of progress this past weekend. I finally got all my pieces glued together and sanded smooth. I had to spend antoher $4.18 on more glue. I now have about 12 and a half dollars and about 18 hours into the project.


The wheel head is stacked on top of the flywheel in this photo. It is 4 layers of cherry wood. The bottom layer, the fourth one down is about an inch smaller in diameter than the rest of the pieces.


The flywheel was originally 4 layers thick but I added another layer to the flywheel to make it approximately 3-1/2 inches thick. Once the boards were all planed they were a little thinner than I had originally planned on. So, I used a piece of walnut, not only to add some more weight to the fly wheel, but also to give the wheel a little more character. I thought it would make a nice contrast once oiled up and polished between that and the lighter cherry wood.


The next step, I think, is to add four round 2-inch dowel rods. These will be used as supports between the wheel head and the flywheel,. They will be drilled into each piece approximately 1-1/2 inches and glued in place.
Although I do have a drawing that I am working from, I'm basically just building this off of images and bits of information I have found on the internet. If anybody wants to share any information they have about this type of wheel I'd love to hear from you. I am still keeping a photo-diary of each of steps of this building process on my facebook page, if you're interested.

Tuesday, November 03, 2009

Korean Kickwheel


I have about ten hours into the kickwheel now and have spent 10 dollars on Elmer's wood glue. In fact, I need to pick up some more glue after work today. I should mention that I did not have to pay for any of the cherry wood I have used. I would guess that if I had to buy it, select cherry wood would cost about 300 dollars.
Anyway, I have cut all the rounds out for the wheel head and the fly wheel. Here I have glued the pieces together. After this I will have to glue these two pieces together. The wheel head will be a little over 3 inches thick.
After I planed all the pieces for the fly wheel I decided to add one more layer of wood to make it about 3-1/2 inches thick. I dedided to use walnut and add it to the middle layer of the flywheel. I think the contrasting colors of wood will really look nice. I'm keeping a good diary and posting step-by-step photos on my facebook page. Seems like I'm making some good progress now.

Tuesday, October 27, 2009

Korean Kick Wheel

I started building a Korean style kick wheel a couple weeks ago. A friend of mine gave me about 25 board feet of cherry wood and I started cutting it up. I have all the pieces glued together now and am going to be planing each layer this week. I've run out of photo space on blogger but if you are a facebook member you can follow my progress in my Korean Kick Wheel photo album. When I get it all done I'll also post the photos somewhere else for public viewing.

Thursday, October 15, 2009

Homemade Studio Equipment

Last weekend I built some new equipment for my studio. I built a mini slab roller that works really well, I made a couple plaster reclaim slabs, a nice photo shoot table and even threw some coffee mugs on the kickwheel that I built. I posted photos on my other blog site, Coulee Region Art. If you'd like to see the photos just follow the link and then click on the photo of me at the wheel.

Wednesday, September 16, 2009

Black Coffee Mugs 1992

Who is the person that has a neighbor that has a set of black coffee mugs with unglazed bottoms and is marked Jeffrey R. Guin 92? This comment/question was posted on this post last week. I would love to find out where the mugs are today. You can email me at jguin@wkbt.com
Looking forward to hearing from you.

Wednesday, September 09, 2009

Raku Kiln Fire Box


Well here is the fire box for my wood burning raku kiln. This picture does not show the roof but the roof will be a piece of 1/4 inch stainless steel plate. I found it in a scrap pile and it happened to fit pretty well. I'll try it and see how it works.
Anyway, the box is made out of hard fire brick laid on a base of cinder block, which sits upon a slab of concrete. I used half in rebar for the grate. I've decided to add a few more bars spaced about two inches apart. Next step is to build the firing chamber. Stay tuned.

Friday, August 28, 2009

Homemade Pottery Wheel


Well, here is the finished product. A homemade pottery wheel for under five dollars. Except for the stainless steel drain hole in the upper right hand corner of the table top the entire wheel was constructed with recycled or reclaimed found materials.

This was a really fun project, so much so that I am going to build another wheel with a slightly different design.

If you would like to see additional photos of the building process you can check out my slide show at my other blog that I write for work (my paying job), Coulee Region Art.

Saturday, August 22, 2009

Build Your Own Potter's Wheel


The potter's wheel works. This wheel was constructed out of materials found lying around the shop. The only thing that was purchased was a stainless steel drain hole that was mounted in the right hand corner of the table top to make cleaning easier. I'll post some step by step photos of the construction a bit later. There is still some tweeking to do. It still needs some paint and a spring operated footpedal for the motor assist but otherwise the wheel is done.

Wednesday, August 05, 2009

Raku Vases


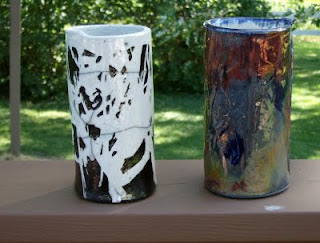
Here are a couple of raku fired vases that I fired about a week ago. These are slab constructed and I used a wax resist technique in the leathaer hard stage to create some interesting texture. Click on this link to see a photo of the wax resist in the leather hard stage. I used black underglaze on the vase on the left and then glazed it with a clear crackle raku glaze. The vase on the right was glazed in an unknown glaze that I had in the studio, but it is very similar if not "reynolds wrap raku glaze."

Saturday, August 01, 2009

Kids Day


Friday was kids in the studio day. Natalie made a small bowl on the wheel all by herself. Pretty amazing for a first day on the wheel. I can remember learning to center--took me quite a bit longer. She just did it on her own with no help or direction. Anyway, today is "clean up the studio day."

Will also be firing up the raku kiln. Both Natalie and I have a few things to fire.

Tuesday, July 21, 2009

Barrel Fired Bottle


Here is a photo of one of the bottles from my last barrel firing. This bottle was burnished with a metal spoon while it was in its leather-hard state. Burnishing with a spoon takes a long time to do. Too long. I'm going to have to try terra sigalata. I've heard this will buff up to a nice high sheen real easy and real fast. Once again, no glazes on this bottle. the colors come from a mix of miracle grow and copper carbonate, which I sprinkle throughout the bottom of the barrel prior to firing. I think the next barrel firing I do I'm going to have to try firing a piece or two in a saggar.

Tuesday, July 14, 2009

A Successful Barrel Firing


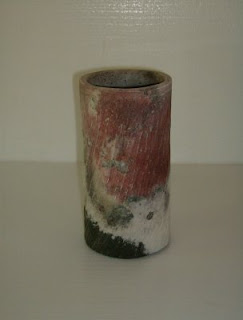
Last Saturday I had a very successful barrel firing, or at least one that I was very happy about. This is one of the hand constructed vases that I fired. All the pots had the exact same colors, the red, the pink, black and white, but had different flame pattern markings. Two of the vases I fired did break which isn't that uncommon. I do pile about two hundred pounds of wood on top of the pots.
I really like these hand constructed vases. I've got to get some more clay and start cranking these forms out. I plan on raku-firing a couple that I didn't put in the barrel last Saturday. I have one barrel fired vase that didn't have the markings I was happy with so I plan on refiring it in the raku kiln. I am going to glaze it with a clear crackle glaze. I'm interested to see if the red will stay on the pot. I'm sure the blacks will burn out but I just want to see what happens.
I also learned some new tricks with this last firing and will reveal them after my next firing.

Sunday, July 12, 2009

Barrel Firing July '09


I think yesterday's barrel firing went well. It just felt good. Cool Photo huh? My friend Allen Kantowski took the picture. You can see one of my vases in the center of this photo. I fired four vases and one large bottle form. They're all under the wood and buried in the hot coals.

Anyway, I did a few things different this firing. As usual I filled the bottom of the barrel with about six inches of sawdust. I like black interiors rather than light colored so I packed the vases and the bottle with sawdust. Once that was done I placed the pots in the bottom of the barrel. I layed the bottle on it side, placed two of the vases in an upright position and leaned the other two at an angle against the inside of the barrel wall.

Then I sprinkled quite a bit of copper carbonate around the pots and then a bunch of generic Miracle-Grow type fertilizer. I used a variety of wood for this firing. I used a lot of scrap wood from the wood shop. There was some oak, there was some cedar, pine etc... Some of the pieces were 2 by 2, some were 2 by 4inches, and some were like board shelves, all in lenghts of about 1 to 1-1/2 feet long. I loosely placed this wood around the pots and then stacked up a little pyramid. Then I loosely filled the rest of the barrel with some pretty big honking slab-cut logs with the heavy bark still on them. I filled the barrel to the top and then lit it on fire using my propane raku burner. It didn't take long to get it started with the burner but I only lit the tops of the top pieces.

It was a pretty quick firing. The photo above was taken about 2 hours into the firing. Another thing I did differently on this firing is at the point where the photo was taken I sprinkled more copper carbonate and fertilizer around the pots and then sawdust on top of that to add some flame. At this point you could see the multi-colored flames swirling around the pots.

I'll find out the results of the firing later today when I drive out to the studio.

Thursday, June 25, 2009

Wax Resist Vase


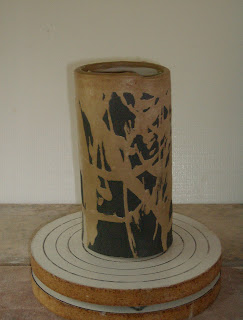
In my last post this same vase was pictured, the only difference is that in this photo I used black underglaze and painted the recessed areas. This vase is in its leather hard stage.
Oops. I suppose I should explain about the wax resist. Once the vase was leather hard I used hot wax and dripped it over the pot. I used a cheap 2 inch paint brush to accomplish this. Once the wax was dried I used a wet sponge and rubbed over the unwaxed parts of the vase. This created the recessed areas. I didn't know how I was going to fire it. The next day I was looking at it and I thought to myself "black underglaze," so I did that.
I still don't know how I'm going to fire this piece yet but I'm going to try this method of wax resist and "sponging" on another vase or two.

Tuesday, June 23, 2009

Handbuilding Again


For the past couple months I've been caught up carving my tea bowls. Now I'm moving on and getting back into handbuilding again. Here are a few of the vases I've started.

I've made my own little slab roller and I roll out a slab for the cylander and the bottom. The final cut measurements for the cylander are 12 inches by 8 inches. I then use a piece of 3 inch pvc pipe that is wrapped with a single page of newspaper and then roll the slab around the pipe. The ends are slipped and scored and pressed together. I then set the cylander upright and pull out the pvc pipe. The newspaper is carefully removed from the inside. I cut the bottom to fit, slip, score, attatch and now I have my basic vase form.

I've learned a few little tricks while making these and they're actually getting easier and faster to make. If anyone has any questions just ask and I'll answer. I'm not quite sure how I'm going to fire these vases but I think I will try firing some in my barrel kiln, raku some and even fire some with commercial glazes in my electric kiln. Anyway, that is what I've been up to lately.

Oh! I also want to put a plug in for my other blog, Coulee Region Art. This is the one that I write for WKBT News Channel 8. Please check it out. There is all kinds of interesting information and resources on it, and I'm also trying to post another month of growth in viewers/readers--8 months in a row. It is really gaining a loyal following. Thanks.

Tuesday, June 16, 2009

W.R.A.P. Honorable Mention 2009


These are the three pieces I entered in the Wisconsin Regional Art Program Exhibit at The Pump House Regional Art Center.

Of course I was hoping for "Best of Show." They actually paid a cash award for that. But, I did win #1 Honorable Mention. That recognition was bestowed upon the raku fired tea bowl on the left.

This was actually one of my favorites when it comes to tea bowls. I loved the exterior metalics/lustres and the interior crackle pattern was outstanding. This piece also sold for 45 dollars to a person from New York. The gallery took 40 percent but it still felt good selling a piece from the exhibit.

Saturday, May 30, 2009

Wisconsin Regional Art Program - La Crosse


This is one of my entries for the WRAP exhibit here in La Crosse, WI. It is a tea caddy to compliment my two raku fired tea bowls. This piece was barrel fired. Anyway, back to the Wisconsin Regional Art Program.
WRAP was establisheded in 1940 and encourages Wisconsin citizens with a serious interest in art to make art purely for the love of it rather than fame and fortune. Its main purpose is to encourage nonprofessional artists to develop their abilities by providing workshops and exhibits.
This regional exibit is being held at The Pump House Regional Art Center, here in la Crosse. The Wisconsin Regional Artists Association (WRAA) co-sponsors the statewide exhibit and conference in Madison in September. One third of the regional entries will move on to the statewide exhibit.

Sneek Peek 2


I really had a hard time picking out two tea bowls that I wanted in the WRAP show. I fired my raku kiln for a week straight I bet. I ended up with a lot of bowls. The good news is I kept track of how many firings I can get to a twenty pound propane tank--8 full firings and I still had enough in the tank to light-up my barrel kiln the other day. Anyway, I decided to put this tea bowl in the show because it was a great example of my carving abilitiles, it had the perfect clear crackle pattern on the inside, and the exterior glaze was just too good to pass up. Unfortunately I do not have the recipe for the exterior glaze. I had two small buckets of dry glaze mixed up, but over the course of the winter the recipe tags disappeared. I didn't want to waste the materials so I mixed them together to see what came out of the kiln. I'm actually really happy with the glaze because I can produce a few different colors and effects depending how I fire and reduce. But, once the glaze is gone, its gone.

Friday, May 29, 2009

Barrel Firing Again

Yes! I'm barrel firing again. I think it has been a year since I last lit a barrel. I've been lighting-up my gas raku kiln almost everyday for the past week and I've had some pretty awesome results. You can see a few of the tea bowls on my flickr site. I'll post a few more next week.

Anyway, back to the barrel firing. I'm participating in Wisconsin's Regional Art Program Exhibit, which starts in a week. I need to drop off three of my peices to the Regional Art Center tomorrow morning. I have picked two of my raku bowls but really wanted to include a piece of my barrel fired pottery. I've been anxiously waiting for a day to light it up but the weather has not been too cooperative the past two weeks. If it wasn't raining it was too too windy . Yesterday was a bit windy but the deed had to be done.

I started right after work. At 2:45pm I filled the bottom of the barrel with about 4 or 5 inches of sawdust, placed the pots in the bottom, sprinkled my magic dust around the pots, and loaded the barrel full with an assortment of really nice wood from the wood shop. There were lots of scrap pieces of oak, cherry, maple, birch, you name it. The best part about the wood, outside of the fact that it was free, was that it was clean and free of dirt.

Usually I fill the barrel full of wood and then build a pyramid with more wood that sticks up about 24 inches above the rim of the barrel. Because it was a bit windy I didn't stack a pyramid and loaded the wood about 6 inches from the top of the barrel. The Fire was lit with my raku torch at 2:15pm. At 6:15pm there was very little flame and the barrel was half full of glowing coals. The coals will burn through the night and die out. Friday afternoon after work I'll see what the burn has produced.

Thursday, May 28, 2009

Hand Carved Tea Bowl


This is one of my favorite tea bowls that I have made. First of all I carved it out of a solid round of clay. I've been carving all my bowls lately. It took quite a bit of time but there is something about the process of carving and actually visualizing a tea bowl in the solid mass of clay. It is also one of my favorites because it just feels so good in the hands. The glaze is Soldner's Clear Crackle, 80% gerstley borate, 20% nepheline syenite. I have a few other new tea bowls that I have posted on my flickr site.

The Kodai

The kodai or the footring is said to reveal a whole lot about the potter who made the bowl. What does it say to you? I can see a lot of me in this hand carved kodai. I signed the bottom with a gold pen. I never really liked signing my work. I'm not sure why. When I first started ceramics I made a small plaster stamp with my initials JG on it. I loved the stamp but people who wanted to buy my work always wanted me to sign it. I can't even read my signature so I know other people can't. Oh well.

Wednesday, May 20, 2009

Remember Me?


Remember me? Uffda! It has been a long time since I first started this porcelain mask. I'm thinking last October, and it sat around on the drying shelf until now. This mask made it through the raku firing just fine. It is broken in half because of my stupidity. Oh well. I'll start another one soon and do it again. I did post a short slide show of my raku firing process on the blog that I write for work. Just click on the link to view the post. Raku Firing Process.

Monday, April 27, 2009

How To Make A Chawan


Not a whole lot to say in this post but this is step one in how I make my chawans (teabowls). I start by wedging up about 3-1/2 pounds of clay. Once that is completed I pound and shape it into a nice round disk approximately 5 inches wide by 3-3/4 inches tall. I also gently roll the clay disk on its' side, on my canvas covered board, to get a nice round form for the exterior of the teabowl. I also have another piece of clay ready to carve covered up in the plastic once I complete this bowl.

Sunday, April 26, 2009

Tools Of The Trade


This bowl is really coming along and I'm almost done. In this photo you can see what types of tools I use to carve my chawans. I need to thin-out the walls a little bit and then carve the footring, called the "kodai" in Japanese. Even though the kodai is hidden from view until after the tea has been drunk, it is a key element of the chawan and can reveal many things about the maker, such as skill and mindset. Since it is the only part of the bowl that is not glazed it also reveals the "tsuchi-aji" (clay flavor). You can see the tru color and texture of the clay by examining the kodai,

Friday, April 24, 2009

Hand Carved Chawan


I started carving this chawan last weekend and just finished up yesterday. I probably have about eight hours into the bowl but I think it is the best tea bowl I have made to date. I definately have a lot of heart and soul into this chawan and can't wait to fire it. There is just something about it. First of all it looks good and when you hold it in your hands it feels good. I'll end up raku-firing this but I don't know what type of glaze I am going to use. And speaking of firing, I'm going to have to wood-fire this. Something about this bowl just says "wood-fire me."

Thursday, April 23, 2009

Classical Birdfeeder

This birdfeeder has been sitting on our deck for the past six years and over that time I never gave it much thought. It was almost like it wasn't even there. Quite often it didn't even have bird seed in it (sorry birds). Yesterday I happened to take a closer look at it and thought to myself "Hey Man! This is really a cool birdfeeder." Anyway, on to the story behind the feeder.

When I got back into clay, after a 10-year hiatus, this is the first thing I made. I still had all my clay tools but had no clay, glazes or underglazes, so I got on the phone and ordered some materials to get me back into clay. Kind of odd because although I ordered the stuff to start making things, I had no way of firing them. I didn't even think of that. I must have been caught up in the excitment of getting muddy again.

Ok. The stuff was ordered and it would take a week to deliver. In that time I was constantly wondering what I was going to make. Not only did I not have a kiln, I also did not have a potter's wheel so I was going to be limited to handbuilding whatever project I decided to tackle. I sat on the deck trying to sketch out some ideas in my sketch book and realized we didn't have a birdfeeder to feed any of the birds chirpping about the deck rails--Tah-Dah! A Birdfeeder was going to be the first project.

Still at the sketchbook, nothing seemed to be working for me and eventually I ended up looking at drawings of a pitched roof with four supporting columns. Thank goodness the clay gods stepped in and I had an epiphany--The Parthenon of Ancient Greece! Unfortuantely, after looking at a photo of the temple, it seemed to be too big of an unertaking for me so I started looking at other photos of Greek Temples. Turned out that all of the temples seemed to intimdate the hell out of me so I looked at my last drawing, the one with four columns and a pitched roof, and said I'll just make this simple but "Greek-like." And, it worked.

Once I had created my temple I still had no way to fire it. A couple months later I ended up enrolling in a pottery class at the college, fired the feeder and a bunch of other projects, and the rest is ancient history.

The birdfeeder is made out of a lowfire talc clay body and I used a red iron wash for the roof and and used a more diluted soultion for the base. I then brushed three coats of lowfire clear glaze on everything but the top part of the roof. It has been outside in the elements ever since and gets better looking with time. If you click on the photo to enlarge it you can see that lichen has started to grow on the feeder making it look even more "ancient." Well, thats the story. Hope I didn't bore you, but I really thought the whole thing was worth documenting.
Cheers!

Chawan Is Looking Good

This bowl is really coming along and I'm almost done. In this photo you can see what types of tools I used to carve this chawan. I need to thin-out the walls a little but and then carve the footring, called the "kodai" in Japanese. Even though the kodai is hidden from view until after the tea has been drunk, it is a key element of the chawan and can reveal many things about the maker, such as skill and mindset. Since it is the only part of the bowl not glazed it also reveals the "tsuchi-aji" (clay flavor). You can see the true color and texture of the clay by examining the kodai.

Wednesday, April 22, 2009

Making a Chawan, Step One


Not a whole lot to say in this post. I am working backwards as far as posting so my blog post go in order from step one to completion.

I started my chawan by wedging approximately 3-1/2 pounds of clay. Once the wedging was completed I pounded it and shaped the ball of clay into a small form that was approximately 5 inches wide by 3-3/4 inches tall. I also rolled the ball of clay over my canvas covered board to get a nice round form for the outside of the bowl. The piece of plastic to the right of the ball of clay is another wedged and rolled out piece of clay for my next teabowl.
I wanted to start carving right away so I left the first wedged round of clay out on my board overnight. This made the clay hard enough but yet still moist enough to carve with my tools.

Monday, April 20, 2009

Back In The Studio Again

The weather is starting to feel and resemble Spring again and therefore I've been spending more time at the studio. I've even started a few new projects and am finishing up a few older ones. I'm almost done with my "American" version of an ancient South American stirrup jar.

The clay body is lowfire terra cotta and It is really sucking-up my underglazes. This has proven to be a pain-in-the-butt to paint. I've forgotten how many coats of white underglaze it has taken me to cover up the red clay. All I can say is, I've got a lot of time into this piece.

Today I'll paint three coats of clear gloss over the piece and hopefully fire it this coming weekend. Will post a photo of the finished work when I get it done.

This past weekend I also started hand carving a few Chawans, (teabowls), which I think are my best to date. If all goes well, and weather permitting, I'll raku-fire these this coming weekend. I'm hoping to have some firing company as well. More info to follow.

Wednesday, April 08, 2009

Raku Kiln Number 3

As most of my friends know, last years' flood took out my raku kiln. Here is a description of how I built raku kiln number 3.

I was too poor and cheap to buy a new galvanized garbage can so I used one that had been previously used as a post-firing reduction chamber.

I had just recently purchased 50 square feet of kaowool fiber from E-Bay. I thought it was a steal at 120 dollars, that included shipping. It was 1-inch thick, 8 lb. density, and 24-inches by 25-feet long.

I also found a box of homemade ceramic buttons that I made over a year ago and a package of high temp wire. Its amazing what you can find when you clean up the studio,
(It was Spring Cleaning Time). I'll get to the buttons a bit later. Ok, on to the construction description.

As you can see in this photo I traced a 5-inch circle on the bottom of this can. Then I drilled a starter hole on the line and used some tin shears to cut out the hole for the burner port. Once the hole was cut out I used a metal file and filed off any of the sharp burrs left behind from the shears. I also did the same proceedure on the garbage can lid for the exit flue.

Next I rolled out some of the fiber and traced the bottom of the garbage can on the fiber with a black magic marker. Then I cut the circle out with razor-blade type box cutter. I cut two of these circles and placed both of them, one on top of the other, into the bottom of the can. The reason for two is because with two inches of fiber on the bottom, only one piece of fiber, 24-inches tall, is needed to line the kiln. It is a perfect fit.

Ceramic Buttons


For my last two fiber kilns I used high temp wire and pieces of 1-inch by 1-inch fiber board to secure the fiber to the garbage can. About a year ago I read an article about somebody using ceramic buttons. I tried google searching for ceramic buttons and had no luck finding any. I probably couldn't afford them anyway so I made my own.

These buttons were made from a regular raku clay body. I rolled out a slab of clay about 1/4-inch thick and used a 2-inch cookie cutter to cut out the forms. I then rolled out a coil of clay, cut little pieces off and slip and scored them to the 2-inch rounds. Once they were dried I used a small drill bit to drill a hole through them so I could thread the high temp wire through the buttons.

The article I read regarding these buttons warned that sometimes these buttons would occasionally break due to the stressful nature of rapid raku firing so I made several extras just in case.

Raku Kiln Chamber


This kiln is not constructed with two layers of 1-inch fiber. The Garbage can is not a straight cylander, it tapers in towards the bottom. So rather than trying to taper the fiber to fit, I used a strip of fiber 1-inch by 3-inches and glued it to the trash can with sodium silicate. This made it really easy to use one piece of fiber 24-inches tall for the interior without haveing to make any "pain inf the butt" cuts.

I used three ceramic buttons with high temp wire to secure the fiber to the garbage can. I didn't use any at the bottom of the can but can add them later if needed.

Two holes for each button, slightly larger than the high temp wire, were drilled into the can and the buttons and wire were feed from the inside out. This proved to be a little challenging, patience helps. Once the wires were fed through the holes, the ends were twisted from the outside with pliers to tighten and secure the buttons.

Raku Kiln Lid


I'm not really sure if this lid is really "finished." I painted a thick layer of sodium silicate on the garbage can lid and then placed the round piece of fiber into the lid and used a rubber kitchen spatula to kind of tuck in the edges.

Once I fire-up the kiln for the first time I'll find out whether or not I need to add any additional buttons to hold the fiber in place. If any additional buttons are needed, I'll add them. Each button takes just a few minutes to install.

Finished Raku Kiln


The finished product.

I really like this style of a kiln mainly because of its portability. It is very light weight and remarkably durable. I once even transported this kiln, the small propane tank and burner, and all the rest of the materials to a friends' house for a raku party in the back of a 4-door Oldsmobile.

This is a large garbage can but a smaller can would probably be more than adaquate for most people or for beginning raku fanatics.

Sorry Natalie


My little clay partner Natalie has been to the studio. Sorry I missed you Nat. She is just dying to get her hands muddy again. It has been a long unproductive winter. I have been to the studio, but usually stop in after work, and that is before school lets out. Once again, sorry Nat. Hope to see you this weekend.

Jeff.

Sunday, April 05, 2009

A New Raku Kiln

I know. I've been bad, naughty, and have not posted anything for two months. I have been putting a lot of time and effort into the art blog that I write for work called Coulee Region Art. This is a pretty cool blog site, although it is written for people in this immediate area. Each week I spotlight a local artist with a brief biography, post a photo of their work in a permanent slide show and also post a permanent link to their website if they have one. I also post things on upcoming events such as workshops and exhibits. I even put a slideshow of my first Anagama wood firing experience with potter and educator Tony Ferguson. Before I drift too far from intended topic, A New Raku Kiln.........

Yes, I'm building a new propane fired raku kiln. Winter has been dragging on too long and I haven't spent any time inthe studio making anything. The weather was about 50 degrees F yesterday. A good day to work. Anyway, last Spring our second 100 year flood in two years took out both my raku kilns. I actually found one tangled up in some tree branches but "Alas, poor kiln was dead." Too much mud and water ruined the fiber-lined interior. This kiln was the one that was fired from the bottom and sat atop a modified turkey cooker. I never did see any advantage using the "updraft" kiln and it was just another piece of equipment to haul around so I went with the standard garbage can kiln with the hole in the side and a hole in the top.

To save money I bought 50 square feet of 1 inch 8lb. density kaowool fiber for just over 100 dollars on e-bay. I had a pretty new 31-gallon metal garbage can in the basement and I am going to use a lid from the very first kiln that I made. I didn't get too far yesterday. I had to clean the inside of the can with a wire brush, cut the side hole, and layered two pieces of the fibre into the bottom of the can. I used two layers on the bottom because the can is 26 inches tall and by using two pieces I can use just one piece of 24-inch wide fiber to finish the interior of the kiln.

Well anyway, thats as far as I got yesterday. Planned on finishing today but we're expecting 6-7 inches more snow today and don't know if I want to drive to the studio. We'll see. Stay tuned to the blog as I will be posting photos of the new kiln building project.

Wednesday, February 04, 2009

Slide Shows

Maybe I haven't been posting as often on this site is because I am also blogging at work (my paying job) for a site called Coulee Region Art. I have posted two slide shows that I'd like people to check out. One is a mini slide show of some of my work and another is a slide show of some of the local area artists that I have been spotlighting in the blog.

Also, here are a couple more Raku Glaze Recipes.

Shroom Brown Raku Glaze Recipe.
Frit 85
Ball Clay 7.5
Calcium Carbonate 7.5
Add: Copper Oxide 1.50%
Add: Tin Oxide 5%

Tomato Red Raku Glaze Recipe.
Borax 50
Gerstley Borate 50
Copper Carbonate 20
Red Iron Oxide 5

Tuesday, February 03, 2009

Raku Glaze Recipes

I know I haven't posted anything lately. Actually I haven't been doing anything in the studio to talk about. Weather has been a burden on everything and my truck has been giving me headaches for the past two weeks. Worked on that all weekend and it is still running like crap. Might be time for some professionals pretty quick. Anyway, since I have nothing else to post I thought I'd continue with my Raku Glaze Recipes, but before I do I'd like to say thanks to Linda Star, Anna, and Ang. It is always nice to read comments that they post on my blog site. I appreciate it. Thanks.

Black Raku Glaze Recipe.
Gerstley Borate 80
Cornwall Stone 20
Copper Oxide 4
Cobalt Oxide 3
Iron Oxide 4

Black Magic Raku Glaze.
Colemanite 80
Custer feldspar 20
Copper Carbonate 10
Red Iron Oxide 5
Cobalt Carb. 1

Wednesday, January 21, 2009

Incense Bottle No. 2


Another barrel fired incense bottle. This one was burnished with crisco cooking oil and a metal spoon. Originally this bottle was about 18 inches tall. The neck was very thin and tall but I broke the rim when I was burnishing it. I decided not to to throw it out, cut the neck down and fired it anyway. When someone asked me if I had another incense bottle I said "yes I do. What do you think about this one?" Alas, the incense bottle is gone.

Thank goodness the weather is getting better. This week the temperatures could reach 20 degrees, and the sun was out yesterday. Hoping to get into the studio this weekend and do some work.

I've been posting some slide shows on the blog that I write for work, Coulee Region Art. Last Friday I started a weekly post called "Spotlight." It has become a big hit, literally, receiving lots of hits. Anyway, each Friday I am spolighting local area artists, briefly introducing them with a mini bio and then posting a photo of their work into a permanent slide show. I have also created permanent links to the artists individual web sites. There seems to be lots of interest as I am receiving referals and requests on a daily basis via email. The whole thing is actually very exciting as I am getting to meet several artists and getting to look at a lot of art. Anyway, check out "Spotlight."

Friday, January 16, 2009

Raku Tea Bowl


Nothing fancy about this teabowl. Thrown on the wheel, faceted, and hand-carved foot, but it sure feels good in the hands. I think the simplicity and plainess of this bowl makes it extra special. The glaze is Soldner's Clear Crackle-- 80% Gerstley Borate and 20% Nepheline Syenite. This one is also going to my mother.
I'm finally starting to get responses from local area artists in regards to my other blog site "Coulee Region Art." Each week I would like to highlight about ten local artists and create a permanent link to their web site. In addition to that I have created a slide show in which each artist is represented. The slide show links have been a huge success and have generated a lot of page views. The slide show of the anagama firing genereated almost 1,000 page views in just 4 days.
Not much else going on. I haven't made anything lately and have only been to the studio a couple times in the past two weeks. The MidWest has been hammered with lots of snow and seriously cold weather, minus 20 degrees the past two days. Warmer temps are on the way so hopefully I'll be able to get some work done in the studio.

Wednesday, January 14, 2009

3110 Turqoise Raku Glaze


This is one of my favorite raku glazes and it can produce a lot of different effects, most of which you can see in this tea bowl. The turquoise is a nice crackle glaze. Before glazing I splashed some hot wax on the tea bowl, as seen in the very front. The glaze did not stick to the wax and after the firing, in the post firing reduction phase, this area turned black. If you click on this photo the enlarged area will show the beautiful oxblood red around the edges between the black and turquoise. The heavy reduction in the kiln during firing also produced a rough bronze on the interior of the bowl.
I don't think I have posted a photo of this tea bowl but thought I'd better since this is being shipped out west to my best patron--my mother. The glaze I have posted before but here it is again.
3110 Turquoise Raku Glaze
Frit 3110 100
Tin Oxide 3
Copper Carbonate 3
Bentonite 3
Also, don't forget to check out my other blog "Coulee Region Art."