Sunday, November 27, 2011

New Plan

New plan. I had originally planned on installing a Skutt electric kiln in my studio but changed my mind when I found out how much it would cost to run the 240V electric into the room.
I had this old Cress electric in the basement but it needed a new lid and new elements. I think I'm going to re-build this kiln but make it smaller, but that is another project. Back to the new plan.
The new plan is the Cress is being moved out and the Skutt is coming down stairs. I have 240V already wired and all I need to do is take the cone sitter out of the Cress and install it into the skutt.

Tuesday, November 15, 2011

Moldy Porcelain

Ok! So I mixed up a bunch of reclaimed porcelain and bagged it all up and set it in a sunny corner of my studio. I probably should have put it in a covered container because now all my bags of porcelain have been attacked by this lovely green colored mold that smells AWFUL!
Any ideas about killing this lovely green colored mold? I was thinking about trying some bleach. Thought that should do it but Have no idea how much to use.
Anybody out there have any ideas?

Thursday, November 10, 2011

New Addition to the Studio


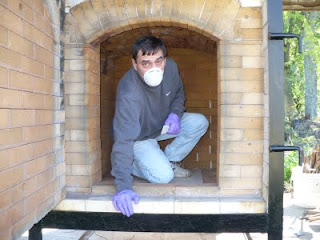
Newest addition to the studio. Looks a little rough on the outside but it only cost 50 dollars and I got a lot of nice kiln shelves and boxes and boxes of all kinds of kiln furniture. The inside is in great shape and the only thing I need to do is replace the kiln sitter tube assembly. I need the tube, the firing gauge and the cone supports but I have an old kiln in the basement that I can scavange these parts from.
I plan on installing cement board in the corner and then I need to have a 240V line run to that part of the studio.

Wednesday, November 02, 2011

Torso Lamp


With a little help from photoshop I have come up with what the finished product is going to look like. I think it is going to make a fantastic lamp.
I think I am going to go with a jet black gloss glaze. Not sure about the lamp shade yet. We'll have to see what kind of shade I can find in La Crosse. My mother said this was a silly idea and said "who is going to want a lmap like that?" Well, believe it or not I've already had two people say they're interested in it. So HA!

Thursday, September 29, 2011

Torso Sculpture


Started a new project a few days ago and things are going well. I wanted to make a torso sculpture in the round just to see if I could do it. I can do it. I'm not sure what made me think of it but from the start I had planned on making a table lamp out of this sculpture. We'll see if it makes it through the firings and then I'll buy the lamp shade.

Oh! Still working on the kiln. I ordered some ITC and a couple of venturi burner/mixer pins from Laguna Clay last week. Should have been here by now. Once I get that stuff I'll have a propane tank delivered and get the gas works hooked up. Getting there but going too slow for me.


Thursday, September 15, 2011

Still At It.


I'm not sure the "how or why" of it but there were some small gaps between the soft brick on the interior of this kiln. I am thinking that it has been this way since the original owner built the kiln. There was some fiber in a few of the gaps but I pulled it out and decided to plug all the gaps with new fiber. I cut 1 inch fiber into 2-1/2 inch strips and then kind of peeled the fiber apart into thinner pieces. I then used a plastic flexible putty knife to tuck the fiber into the gaps. Worked real well but was hard on the knees.
My friend Darrel also ran the copper gas line for me, about 50 feet of 1/2 copper and buried it about a foot deep. Next step is to order the 120 pound propane tank and set that in place. Still at it but getting closer.

Tuesday, August 30, 2011

Insulation


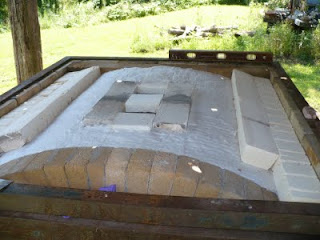
I had a bunch of fiber from old raku kilns so I used it up. This is a well insulated roof. On the top of the arch brick I laid down an inch layer of fiber. Then I laid down two rows of 3-inch soft brick around the edges. I then leveled it off with crushed pieces of insulated fire brick. And finally, on top of that to level it all off I put down another inch layer of fiber. To finish it off I will cover it with metal.

Wednesday, August 24, 2011

Burner Pins

HELP!
I need to find two of these GACO burner/mixer pins for my venturi burners. I can find them for 1/2 base but I need 3/4-inch screw in base. Can any of my friends/readers out ther point me in some possible directions on where to find them.
Thanks.

Tuesday, August 23, 2011

Burner/Mixer Pins


Cleaning the burner mixer pins has definately been the easiest part of getting this kiln into operation. Just going to polish these up with some WD-40 and a small wire brush. Will unscrew the orifices and clean them with the proper sized torch head cleaner.

During the moving of the kiln we accidently broke two of these mixer pins from the burner system. Just a minor set back but I still haven't found the replacements yet, but think I moight have found a company in New Mexico that sells them. If not, I'll just make my own.

Burner/Mixer Pins

Separating the burner mixer pins from the venturi base plate wasn't an easy job but made much easier with the help of a big-ass pipe wrench, a vise, and some WD-40.


Once I got the base plate broke loose from the pin I sprayed the WD-40 on the pin and worked the plate back and forth with the wrench until I could turn it and spin it with my hands.

Kiln Burners


To clean the burners I completely disassembled them and then used power tools with wire brush attatchments. This really knocked the rust down and smoothed them up real nice, inside and out.

Saturday, August 20, 2011

Slow Going


Everything about getting this kiln into operation is slow going. I suppose its because after I work a ten-hour shift at my "paying" job and by the time I get to the studio, I don't feel like working more than an hour or two.

I wanted to finish the top of the kiln yesterday but this is as far as I got after an hour and a half. Although I had previously crushed the IFB, they were not crushed into small enough pieces and I had to crush them again. Two beers later and when I took this photo all I kept thinking about the song lyrics "breaking rocks in the hot sun, I fought the law and the law won."

Working overtime at the "paying" job today and tomorrow but hope to have the crushed IFB done today. And hopefully tomorrow I can finish the damper/flue bricks. I need to sand them down a little bit so that they're flat and even.

Wednesday, August 17, 2011

Nuts!


I'm working on the kiln's burner system now. There are ten of these venturi burners and all of them were filled with nuts. Somewhere out in the woods is one pissed off squirrel.

Once the nuts and other debris was cleaned out of the burners I put a round wire brush on the end of an electric drill and cleaned the hell out of the inside and outside.

The otherday I removed the pilot ring and cleaned every pilot hole, 187 of them.

During the move we accidently broke two of the mixer pins, (the threaded piece at the end of this burner), so I'm trying to hunt down two replacements. Also will need a new thermocoupler. Once I get that done I'll reassemble everything and set it up under the kiln for operation.

Monday, August 15, 2011

Kiln Insulation


Laid down the fiber, one-inch 8lb. density. I had a bunch of replacement IFBs for an electic kiln so I decided to place them around the edges. Had enough to go two rows on each side and they seemed to fit together well so I used them up.

I cut the center flue bricks out of K26 IFBs and set them in place. I had to order some kiln cement so I'll cement them in place when that arrives.

I plan on filling in the rest with an even layer of crushed IFB and will eventually cover the top with some 16 gauge sheet metal.

Thursday, August 11, 2011

Fixing Up The Kiln


A little bit of work needs to be done to the top of the kiln. Will be putting a layer of brick around the flue holes first. Then I was thinking about putting down an inch layer of fiber over the arch. Not sure yet but I have bunches of broken up IFBs and was considering covering the fiber, to the left and right of the damper, with that and evening it out to the top of kiln.


Friday, August 05, 2011

Free Kiln For The Moving


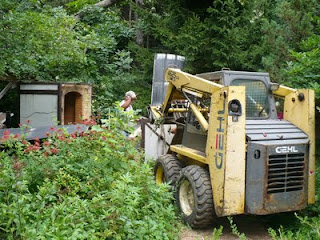
This is about an hour into the project. The first step was to demolish the structure that the kiln was in. Once all the debris was moved aside it was time to fork it and move. Didn't happen that way. The damn thing weighed 3,ooo pounds and the skid steer couldn't lift it. So the door was removed to make it lighter. Even then the skid steer could barely fork it. It was pushed to its limit for sure.

The Tough Part


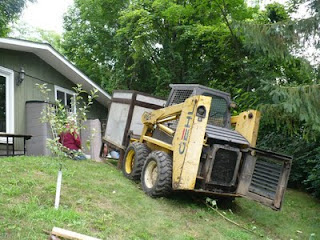
This was the tough part and when I really thought we might loose the kiln. I really thought it would roll right off the skid steer. Although it might look like the skid steer has this kiln off the ground a good deal, it isn't. The damn thing was too heavy. Instead of just forking and driving the kiln up the hill we lifted the kiln up a couple of inched and slid boards under the metal base of the kiln and then pushed it up the hill. Slow going but it worked like a charm.

Loaded


Finally loaded (the kiln). Beer Break! Only took about 3 hours. Now its just a short five mile trip to the studio.

Needs A Door


Needs a door but not before a quick beer break. One of the several people who made this move possible. Thank you Greg Gerke, "the Crazy Carpenter."

Kiln In Place


Well, the kiln is in place. A million thanks to my friend Darrel and his buddies who spent all afternoon moving this beast. Next step is to work on the burner system. Needs a good cleaning and looks like it needs a new pilot igniter.

Saturday, July 16, 2011

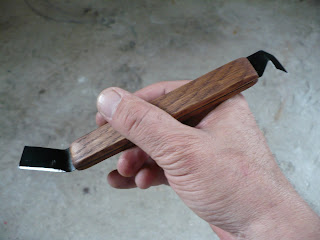
Kanna Trimming Tool


Here is a photo of my newest trimming tool. It is a Japanese style trimming tool called a Kanna. This one is 8-inches long with a wooden handle.


The blade is just 3/4-inch steel strapping band that I cut with tin shears and then bent in a table vise. I used a Dremmel tool with a stone tip to shapen the edges. The two halves of the wooden handle are oak, which were glued to the metal blade and then stained and polished.

Friday, July 15, 2011

Tea Bowl Profile


I really hate cutting pots in half but it does provide some good insight. My facebook buddy and tea bowl sensei Cory Lum asked me to post this picture so he could see how my carving/trimming skills are.

I was really really suprised that this bowl was thrown and trimmed so evenly. After I trimmed it with the new kanna that I made, I held the bowl in my hands and I just had a feeling that this bowl was "good." It just felt good.

I didn't have any bowls wet enough to cut in half with a cut off wire so I used a hack saw blade and gently cut the leather hard bowl in half. I was pleasantly suprised. In fact so much more I even sawed some more tea bowls. I think I'm at a point now, after examining the profiles of these bowls, that I will not have to saw any more in half.

A Different Foot


I kind of like this hand carved foot. Its different. Kind of reminds me of a sea shell, and its kind of interesting. Once I carved the circular line to the center, I used a kanna to recess the the center of the sea shell shape.

Foot #1


I used a kanna to trim the foot of this bowl and then used a serated metal rib to finish the interior or the foot. I like this type of foot.

Foot #2


My feet are getting better. Hand carved, smooth on the bottom and rough in the center.


Foot #3


I'm getting much faster at trimming my feet.

Wednesday, July 13, 2011

Chawan Halved


This is the way my bowls start out. I asked my FaceBook friend Cory Lum to give me some pointers and critique my work and he gladly accepted my plea. Cory asked me to post a few photos and here they are. So, basically this is for Cory and to help him out check out his video of making and trimming a chawan as well as his etsy site.

Still Carving Kodai


I'm still working on carving the kodai. Like I said before, it either makes or breaks the piece. I carved this foot last Friday. Since then I have thown a bunch more chawan and have improved my carving. Will post more photos soon.

Hand Carved Kodai


Friday, July 08, 2011

Chawan


I've been throwing tea bowls (chawan) lately. I've mentioned in earlier posts that its easy to throw a cylander that is round with a smooth even lip and a perfectly trimmed foot but in reality the pot or form itself has no character. Here is a link to some of my earlier thrown tea bowls. Yeah, they're nice wood fired pieces but I feel that the only interesting thing about them is the glaze.


This is one of my latest tea bowls. Initially wheel thrown and then altered. The base and foot were hand carved. This is much closer to what I would call a chawan. I think it has character. It pleasing to hold and interesting to look at. Plan on making a bunch more today.

The Kodai


The kodai, pronounced "koudai," is a very important part of the chawan and contains a wealth of information when looked at closely.

For instance the hand-carved foot reveals the skill and spirit of the potter. It also is the only unglazed spot on the piece that reveals the nature of the clay body. The only other thing I can say about the kodai is that it ultimately "Makes" or "Breaks" the piece. If its "bad" even an idiot will know it.

I'm still carving kodai and a lot of them look like shit as far as I'm concerned but I'm keeping the pieces to test some glazes on. The kodai pictured here is one of my better ones. I'll keep practicing.

Wednesday, July 06, 2011

Chawan


These are my latest tea bowls (chawan). I am quite pleased with this last batch. In the past all my tea bowls have been too "anal," according to other potters. I can throw bowls to a set dimension with perfect smooth interiors and exteriors but that is not a chawan. Plus, they really are uninteresting forms with no character. Throwing "loose," as other potters call it, has always been difficult for me. I don't know why. Thanks go out to my FaceBook friend Cory Lum who posted a video of how he throws chawan. It helped me a great deal. Now I just need to practice hand-carving the feet. They're not bad (maybe they are) but they still need some work.

Tuesday, July 05, 2011

Pinch Pot Fish


I got a little bored this weekend in the studio. And I remembered that I recently saw a YouTube video of some guy making a pinch pot fish. Just thought I'd give it a try. They don't take long to make and would be a great project for little kids. Actually, its a fun adult project too.

Didn't get my kiln moved into the studio yet but I did throw tea bowls on all three wheels that I made.

Tuesday, June 28, 2011

Finished Product


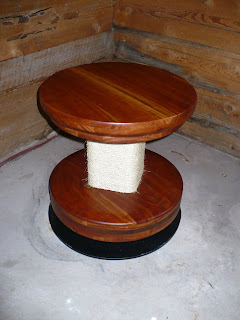
Well, it took a long time but I finally finished my kick wheel. I'm not really sure of the "proper" name for this style of wheel. I would call it a "kick wheel." I have heard others refer to it as a "Korean Style Kick Wheel." And, I suppose if you make pottery on this type of wheel in the Onggi tradition it would be called an "Onggi" wheel. What ever the proper name, this wheel turned out much better than I could have ever imagined.


I was going to try it out yesterday but just couldn't bring myself to throwing a bunch of clay on this beautiful wheel so I threw some pots on my stand-up treadle wheel.


Yes it is pretty but I made it to use so today after work I'm throwing some mud on it.

Thursday, June 23, 2011

Korean Style Kick Wheel

I finally got off my dead ass and had the local machine shop fabricate the shaft and baseplate for my Korean Style Kick Wheel.

I did make some changes to the wheel design. I did keep the 1-inch flange bearing on the underside of the wheel head but decided to go with a 1-1/4-inch flange on the bottom.

The baseplate is 22 inches in diameter and I had the machine shop cut the 3/8-inch steel plate round just because I thought it would look better.

There is a 6-inch square steel plate welded to the base. A hole was drilled through both plates and the shaft was inserted and welded into that. The square plate was added just for strength. For my next wheel I am not going to weld the 6-inch plate to the base. I will have holes drilled and tapped to accept stove bolts to attatch the shaft to the base. If you decide to build one you'll see why.

Anyway, this wheel is pretty sweet. The last thing I have to do is re-drill the hole in the bottom of the wheel so that it will accept the 1-1/4 inch shaft. Originally it was built for a 1-inch shaft.

If you hadn't read all the previous posts about the building process of this wheel and are interested in building your own wheel, just search my archives on this blog.

Tuesday, June 21, 2011

Clay Extruder


I decided my studio was too small to mount this big beast on a table top so I decided to buy a piece of straight pipe, drilled some holes in it, and mounted it to the wall. Worked out very well.


I'm also going through the process of giving my studio a make-over/remodel job. Basically about the only things I want in this room are my three wheels, my two work tables, A shelf for ware and a bisque kiln in one corner of the room.


Under the tables I'll keep basic tools, some clay buckets, and low fire glazes and underglazes. All my bucket glazes were moved to the basement. Actually a lot of stuff was moved to the basement.


I moved out an old pot bellied stove that was in one corner of the room to make way for the kiln. Next step is to put up some cement board and a venting system and get it wired.


Plan on finishing the paneling and doing some trim work around the windows and doors. Also have s little bit of insulation to put up and will do a little bit of painting. Probably a lot more work to do but this will at least give me a nice space to work in without bumping into anything. I posted a photo album on my facebook page of the mess I've created. One look at it will reveal why I had to do it.


Gonna' miss the beer fridge, but it won't be too far away.

Wednesday, June 08, 2011

Clay Extruder/After photo


A little bit of elbow grease, a can of spray paint, ($3.79), and 2 new bolts, ($0.79).


Not a bad. This extruder is supposed to be mounted to a table or work bench but I am going to make a new mounting bracket and secure it to a wall in my studio.

Clay Extruder

My friend Ryan gave me this old clay extruder. I thought maybe it was due for the scrap yard but after examining it more closely I decided to knock the rust off, clean it up, and add some new pait to it.


Wednesday, June 01, 2011

Sitdown Motorized Potter's Wheel


Well, after hours of internet image searching I found a picture of the "unknown" potter's wheel. At least I'm pretty sure this is the wheel. Still don't have a name for it yet but did find out it has a variable speed, pedal operated, Dayton split phase motor. Still seeking more information and comments about it.

Tuesday, May 31, 2011

New Old Wheel


A new addition to my studio. This is a really cool table top potter's wheel that was given to me by my friend Ryan. I think the only things missing from this wheel is the manufacturer's name plate and the motor. Can anybody out there tell me anything about this wheel. Would love to know who made it and the approximate age.


I'm thinking this is just a simple table top motorized potter's wheel but perhaps it had another function. There are 4 screw holes along the top of the rim that I have no idea what their purpose is. Kind looks like steel rods or pins can be inserted into the holes and then there is a set screw on the outside to secure the rods or pins. Anyway, any information on this wheel would be greatly appreciated.

Tuesday, April 26, 2011

Ceramic Adhesives


Ok! I finished my adhesive testing, and no I didn't sniff them. Some potter friends of mine told me to use epoxy. Non-potter friends but who are extremely talented in their own industrial occupations told me to use E6000. I researched the E6000 on the internet and everything I read said there wasn't anything that this stuff wouldn't bond. The propaganda was just too good so I bought a tube of it to try thinking this was the stuff. I do have to say it is damn good stuff for certain applications and I do believe E6000 will bond anything together but if you looking for something with load bearing weight capabilities, don't use use it. As you can see in the photo to the right, it can't take the weight. After 4 minutes this hanging cement block crashed to the floor.


The other adhesive was Gorilla Epoxy. It was the only epoxy WalMart had so I bought it. It set up in 5 minutes and when I hung the cement block up in the air., it was rock solid. In fact its still hanging. I'm sure regular epoxy will work just as well, but I'm sticking with Gorilla Epoxy to mount the hardware to hang my wall sculpture.

Thursday, April 21, 2011

Getting Closer


Getting a bit closer to firing although it seems like it is taking forever for this sculpture to dry.


I made the decision to raku fire this. Don't know how I'm going to do that since this torso will not fit in my fiber raku kiln. I guess I am going to have to try to fire it in my brick kiln and hope it survives and comes out the way I planned.


Oh, the way I planned..... I painted the body of the dancer with black underglaze. I wanted this completely black and if I raku fire this I wasn't sure if the post reduction firing would make it as black as I had in mind. This will take care of that. The leotard dance suit will get a coat of Ferguson's Turquoise Raku Glaze, which should turn out a brilliant gloss turquoise and after a post reduction firing should have a very nice raku crackle pattern. Anyway, thats the plan. Will figure out the firing details in the next couple days.

Tuesday, April 19, 2011

Another Torso


I finished another torso this weekend. The second torso sculpture went quite fast. I think I only have about four hours into it at this point.


The torso on the left is actually a dancer wearing leotards. The torso on the right is just a naked torso. I think I am going to use slips and underglazes on both.


The big problem I have now is how I am going to display the torsos. Originally the plan was to make them as wall hangings but they are kind of large and heavy and I didn't thing I could make anything out of clay that would support the sculptures. Now I am thinking about trying epoxy glue and some wire and picture frame hardware. The torso on the right I would like to try to mount it to a brass pole that is attatched to a thick square piece of marble, so that it stands upright. Once again I'm thinking about using epoxy. If anyone has any suggestions for me I'm very much interested in hearing them.

Monday, April 11, 2011

Torso II


I finished the torso sculpture this weekend. Right now it is 31 inches tall. I need it to shrink at least another inch to fit in my bisque kiln. Two inches would be better. Was thinking about making this a wall hanging piece to be Raku fired in my wood burning kiln. Planning on using a Turquoise crackle glaze on the body suit and either a clear crackle or maybe just black glaze on the skin. Will fire it in my brick wood burning kiln that I made last fall.


Need to finish the fiber lid for my brick kiln and get this fired and finished by May 1st. I'm hoping to enter this piece in an exhibit at our local Regional Arts Center. If it does well there it will go on to a State Exhibit later this year.

Friday, April 01, 2011

Torso Update

Haste makes waste. Alas, poor torso is dead. I should have waited for some help. I was turning my sculpture over so I could do some work to the other side and it slid right off my plywood board and flattened itself out all over the floor. Damn! Now I have to start all over.

Tuesday, March 29, 2011

Gettin' Muddy Again


I didn't realize it has been so long since I last posted. It has also been too cold in my studio to tackle any new pottery projects but I did get my hands muddy again this past weekend.


This is my newest project. Pretty ambitious but all is going well. This torso is about 36 inches tall and I was thinking about making a wall hanging out of it. Plan on cleaning it up a bit today after work and we shall see what happens.


In my last post I was restoring an old book press. Thought I could press clay tiles with it. Since it was too cold to throw pots I started carving lino-prints and even a couple wood blocks. Figured that book press would work great to press those prints. My carving skills need some work but I did a pretty good job. Never seen it done before but thought I'd give it a try. Need to buy some ink and some paper and then I'll press some prints.


I guess I've just been too busy with work and too busy dealing with all this crappy winter weather to post anything. As far as the torso, I was thinking about firing it up in my raku kiln.

Friday, January 28, 2011

Tile Press


This is my latest project. I don't know what this is but my buddy Darrel thought if I cleaned it up I could use it as a press to make ceramic tiles.
Sounds good to me and by the looks of it will work quite well. I think the only thing I need to do if I want to make large tiles/slabs is to get two pieces of steel about 36 inches long and the width of this press, one for a bottom base and one for the top.
We'll find out how it works once I get it all cleaned up. Stay tuned.

Tuesday, January 04, 2011

Treadle Wheel

Spent the weekend cleaning this stand-up treadle wheel with a wire brush, sand paper, and spray paint. I used red and gray paint because they were the original colors.
I don't know much about it. It appears to be home-made and there are no signs or marks on it that would indicate being manufactured, but it seems pretty dang smooth. I did try throwing some clay on it when I first got it. All I can say is it is going to take some practice. Does anybody have some helpful hints for me?

Before