
I kind of like this hand carved foot. Its different. Kind of reminds me of a sea shell, and its kind of interesting. Once I carved the circular line to the center, I used a kanna to recess the the center of the sea shell shape.


 I finally got off my dead ass and had the local machine shop fabricate the shaft and baseplate for my Korean Style Kick Wheel.

 My friend Ryan gave me this old clay extruder. I thought maybe it was due for the scrap yard but after examining it more closely I decided to knock the rust off, clean it up, and add some new pait to it.


 Spent the weekend cleaning this stand-up treadle wheel with a wire brush, sand paper, and spray paint. I used red and gray paint because they were the original colors.
 The wood kiln is nearing completion. It is looking pretty good and I'm pretty happy about it so far. Here are a few random thoughts about the kiln building process to date.

I'm getting closer to finishing the mortaring. Here is the chimney and flues. One mistake I made was that I did not tie in the first layer of bricks that sit atop the flue brick into the walls of the kiln. I say "Just deal with it."
The measurements at this point are: inside is 23 inches wide and 18 inches tall. The chimney is 8 inches deep and 23 inches wide. This is the point where I am going to start tapering my chimney to get to a 9 by 9 inch hole.
The flues are 7 inches tall. The center flue is 2.5 inches wide and the others are 1-3/8 inches. I didn't follow any principles from any books regarding flue size and intake holes. I just built them based on photos I've seen of other kilns and figured better too big than too small.
Today, if the rain holds off, I hope to finish the tapered chimney and the front of the kiln.

Changes, changes, changes. I spent the last two years bugging people about kiln design and construction, looked at bunches of books, plans, etc.....and have come to the conclusion--If you want to build a kiln "JUST START BUILDING!"
I'm serious. Nothing goes according to "plan" and if you stick to that plan and are convinced to follow that plan and make it work---well, more power to you. Its just a big headache. In fact its just a pain in the ass. Have an idea and just start building and solve the problems as they come up.
In this case I've finally started mortaring the brick. Mix is one part sand, 2 part fire clay. I've never really mortared brick before so I took it slow mixing up very small batches in a 5 gallon bucket, although I only mixed about 1/2 gallon of mortar at a time when I first started. Stuff drys fast and I was by myself--a true tyro.
As I was saying. Just build it. The dimensions have changed everytime I put them on paper. Once the bricks were stacked and mortared my dimensions are: 32 inches wide and 81 inches long (outside dimension). Ware chamber is 18 inches tall in this photo but will be 20.5 inches, and 23 inches wide when complete, (approx 9.5 cubic feet). And its 35-1/2 inches long. The fire box is 24 inches long by 23 wide by 20-1/2 inches tall.
I'm still planning on one-inch thick kiln shelves for the roof, layered with soft brick and fiber on top of that.
Still working on the front part of the kiln. Right now I am going to tie-in all the brick and create a door with some air holes in the front.
I should mention that the base is 36 cinder blocks and on top of that a bunch of house brick, then the fire brick. The exterior of the kiln will have a 2 inch layer of insulating material of some sort. Oh! and I did incorporate 2 peek-holes on each side. One in front of the fire box area and one higher against the back wall. I plan on using soft brick to fill these holes.
I'll post some info on the chimney and flues in my next post. But this is where I'm at, at the moment, But, everything is subject to change.


This is my fourth garbage can raku kiln I have made since 2006. I have the complete steps with photos posted on this blog dated Jan. 2006. My first kiln lasted about 2 years. It seemed like I was firing it up every weekend all year long and it also sat outside in the yard. I called it Rusty Raku. One day I forgot to plug the hole and some critters got in and tore up all my fiber. So I built another.
The second kiln lasted about a year but was taken out by a major flood, the kind they say happens once in 100 years. Nothing to cry about. I built another. Less than one year later that once in a 100 year flood struck again, although not as bad, but it still took out my kiln. That was was my fault though because I had a hasty trip to make to the west coast and I forgot to bring my kiln into the studio. Anyway, I built another and am getting pretty good at it.
I call this one Ramona Raku. She is lined with two layers of one inch fiber which is held in place with a combination of sodium silicate and ceramic buttons that I made from heavily grogged raky clay. Looks great and I'm sure it will fire a lot better than my previous kilns, as they only had one layer of fire. Once I clean up my burner I'll fire her up and post some photos. Stay tuned.
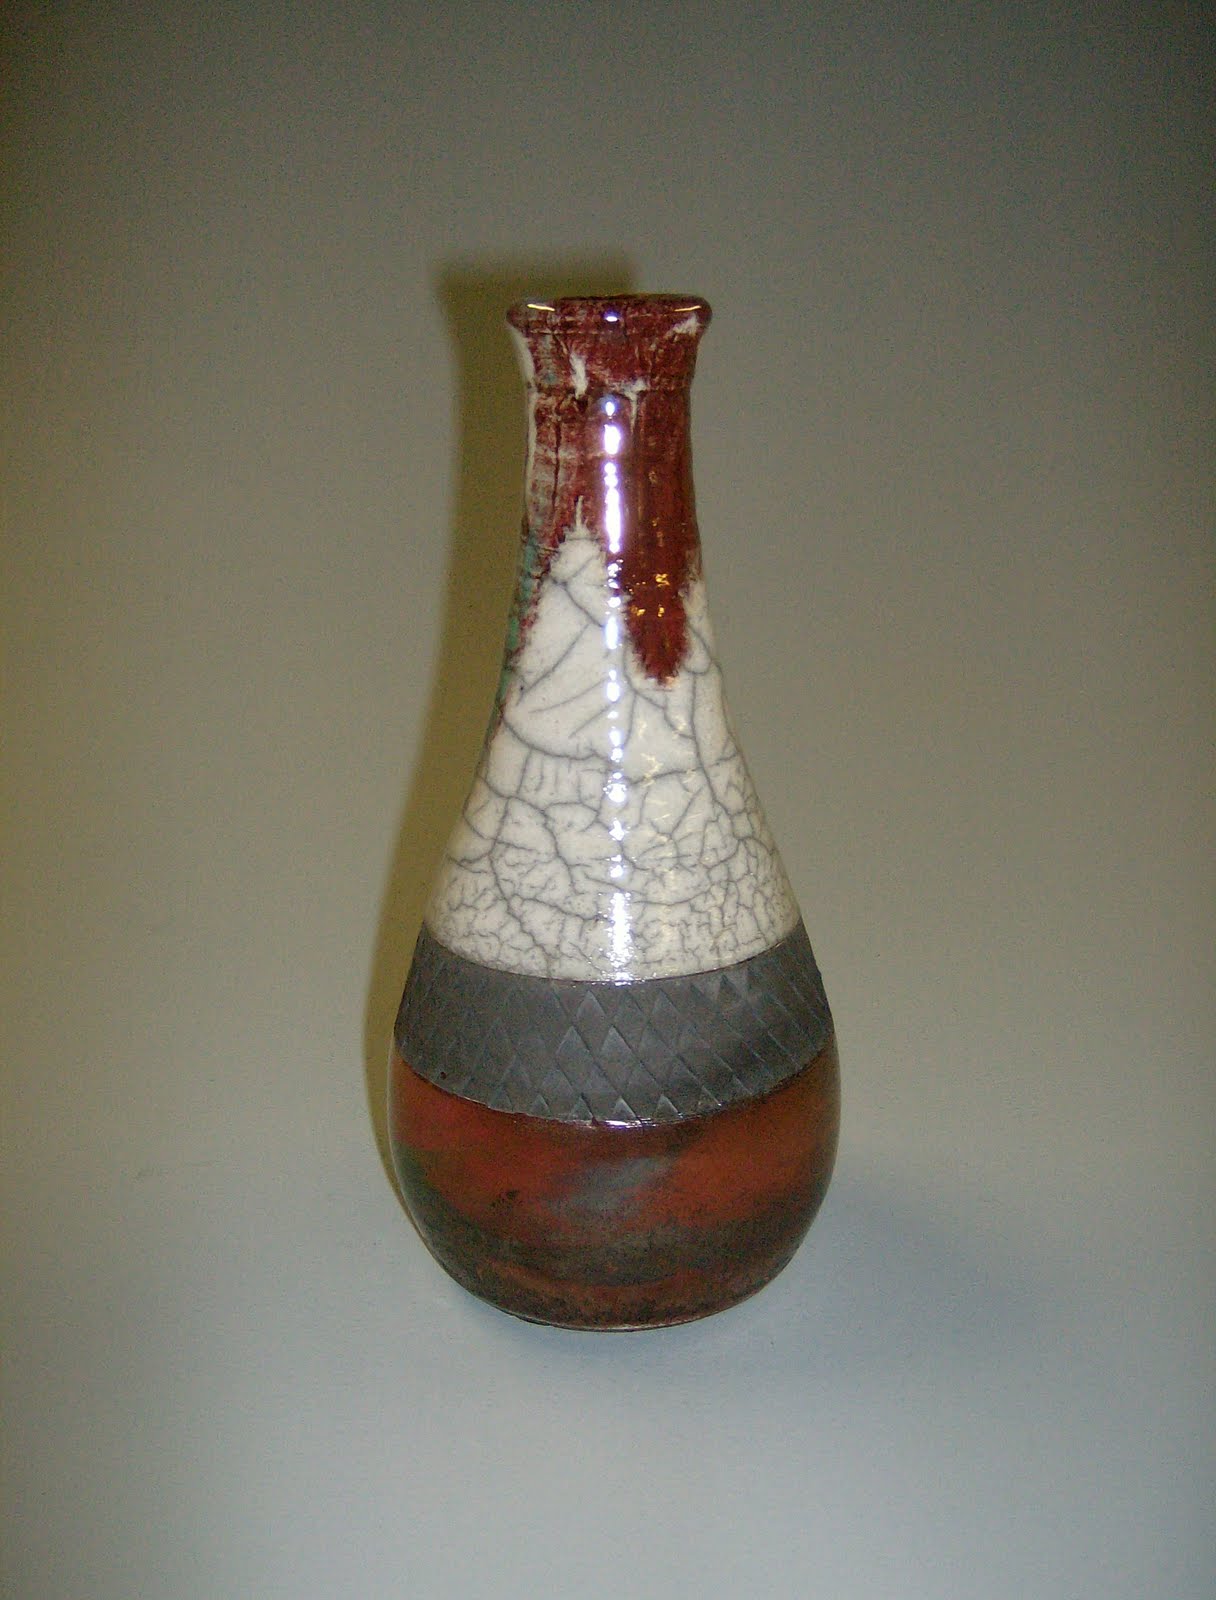
Raku fired incense bottle, approximately 12 inches tall. What is an incense bottle? Well, you burn incense sticks in it. The end of the wooden stick is placed in a round clip, the incense is lit as normal and then dropped into the bottle. The round clip sits in the neck of the bottle. The incense burns upward and the smoke comes out of the top of the bottle neck. All the ashes fall into the bottom of the bottle. A very safe way to burn incense and I have recently found that there is a big demand for them.
The top of this bottle was glazed with clear crackle raku glaze and then lightly dipped in Green Apple raku glaze. The bottom was glazed with Green Apple as well.

 Last Friday I helped students from Viterbo University with Alternative Firing. The get together was held at the instructor's house and we utilized his back yard fire pit for a pit firing. In this photo we have already lined the pit with sawdust, loaded all the pots, piled wood on top of the pots and lit the fire.
 I've been making a bunch of pottery tools lately. These are just a couple. The strips of wood are slab rolling strips 1 inch wide, 24 inches long, and 1/4, 3/8, and 1/2 inch thick. Of course the sponges are just sponge sticks. Easy to make and fun to use, as are all my homemade tools, because I made them. I also made a bunch of wooded trimming tools and a bunch of cool textured paddles. I posted photos of those on my other blog Coulee Region Art. Check them out.


Well, I've finished the wood/carpentry work on my Korean potter's wheel. This is about 45 pieces of cherry wood, 5 pieces of black walnut, and 4 pieces of pine (the four supports) all glued together and sanded. I've got to say--It is really pretty--REALLY Pretty.
The hardest part was placing the four support dowels and I couldn't have done it without the help of my friend Darrel--He is the the "Wood Man," and it was his shop where I did all this work.
Anyway, this wheel, whether you call it an Onggi Style Potter's wheel, or a Korean Style Potter's wheel, is 17 inches tall. The wheel head is 18-3/4 inches in diameter and the flywheel is 19 inches in diameter.
The next step is having a machine shop weld my 1-inch cold rolled steel to a round piece of 3/8 inch steel and when that is complete I'll be making pots on this beauty.

Yesterday I made a bunch of new pottery tools from scrap wood laying around the shop. I made the two ribs (upper left) out of a piece of pine molding that I cut to size and sanded . They're each about 5-1/2 inches long.
I also made a bunch of different types of trimming sticks. I made them out of left over cherry wood from my Korean kick wheel, which I'm still working on. The trimming sticks are about 10 inches long. I really like the size of these and have come to the conclusion that the ones you buy are too short and not as comfortable.
The bigger tools are my "Onggi" tools that I plan on using when I start throwing on my Korean Kickwheel. The calipers are about 10 inches long and made out of oak. These are really sweet. Nice looking, nice and smoooth, and feels good in the hands. I used a galvanized wing nut on this pair because it was the only thing I had handy at the shop. I'll replace this with a brass wing nut and use brass in all the future calipers I make. No particular reason for the brass other than it just looks better.
The Korean kick wheel is coming along. I now have the flange bearings for the wheelhead and the flywheel and tomorrow I'll get the the piece of 1-inch cold rolled steel for the shaft. The next step is to drill a hole in the center of the flywheel and then drill and set the dowel rods which will connect the wheelhead and the flywheel. Hopefully I'll get this done this weekend. Stay tuned.

I'm still working on my new wheel. Yesterday I spent about 2 hours hand sanding the outside edges of both the wheel head and the flywheel. I'm actually not done with the sanding and I'm hoping that I only have another hour at it. I'm using fine grit sandpaper now to eliminate any remnants of the bandsaw. It is also really making the wood grain pop out and man is it smooth.
Both the flywheel and the wheel head have been tapered, or "shaped" to change the profile. Not neccessary but I thought it added a lot to the wheel as a whole. The name of the machine used to make the tapers is called a "shaper." Basically it is an oversized upside down router.
I'm still waiting for a friend of mine to give me some 2-inch diameter dowel rods. I am going to use these as the supports between the wheel head and the flywheel. When I get the dowels, we won't need the bucket and I'll post a photo when the next step is complete. Once I complete the wheel I'll post a complete materials list and the final dimensions.


Well, here is the finished product. A homemade pottery wheel for under five dollars. Except for the stainless steel drain hole in the upper right hand corner of the table top the entire wheel was constructed with recycled or reclaimed found materials.
This was a really fun project, so much so that I am going to build another wheel with a slightly different design.
If you would like to see additional photos of the building process you can check out my slide show at my other blog that I write for work (my paying job), Coulee Region Art.


Friday was kids in the studio day. Natalie made a small bowl on the wheel all by herself. Pretty amazing for a first day on the wheel. I can remember learning to center--took me quite a bit longer. She just did it on her own with no help or direction. Anyway, today is "clean up the studio day."
Will also be firing up the raku kiln. Both Natalie and I have a few things to fire.


